
Cassette Player User Manual

20
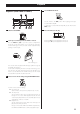
Synchro reverse dubbing (from TAPE I to TAPE II)
When you use this dubbing function and a shorter tape reaches the
end of side “A”, it momentarily stops until the other tape reaches the
end of side “A”. Then both tapes automatically switch over to side “B”
and recording and playback re-start simultaneously.
If TAPE I is shorter than TAPE II
When TAPE I reaches the end of side “A”, TAPE I stops and TAPE II
enters the “blank recording” mode.
When TAPE II reaches the end, both TAPE I and II are reversed
simultaneously. TAPE I starts playback and TAPE II resumes
recording.
When TAPE I reaches the end of side “B”, both TAPE I and II stop
simultaneously.
If TAPE II is longer than TAPE I
When TAPE II reaches the end of side “A”, TAPE II enters the record-
pause mode, while TAPE I continues playback.
When TAPE I reaches the end, both TAPE I and II are reversed
simultaneously. TAPE I starts playback and TAPE II resumes
recording.
When TAPE II reaches the end of side “B”, both TAPE I and II stop
simultaneously.
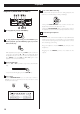
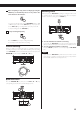
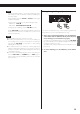
1
Insert a cassette tape for playback into the TAPE I
compartment and a cassette tape for recording into the
TAPE II compartment.
Side “A” facing you
2
Set the REV MODE switch to the two-way (j) position.
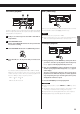
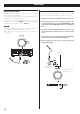
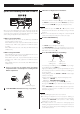
Recording
3
Check the recording direction of both decks.
If the reverse direction indicator (h) lights on the display, press
the PAUSE key followed by the forward PLAY (y) key. Then, be
sure to press the STOP (H) key to get out of the pause mode.
NOTE
< Be careful not to press the PLAY (h or y) key whose arrow
points in the same direction as the indicator. Doing so will start
playback.
< You do not need to adjust the recording level or set the Dolby NR
system, as both depend on the pre-recorded source tape.
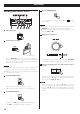
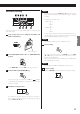
4
Press the SYNC REVERSE key.
The SYNC REV indicator will light on the display.
The SYNC REVERSE key does not work if the reverse mode is
set to any positions other than j or if the transport direction of
both decks is set to reverse (h).
5
Press either DUB START key to start dubbing.
normal speed high-speed
dubbing start dubbing start
For normal speed dubbing, press the NORMAL key. For high-
speed dubbing, press the HIGH key.
High-speed dubbing makes a copy at approximately two times
the normal speed. We recommend normal speed dubbing for
best audio quality.
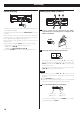
During dubbing, either the
NORM DUB or HIGH DUB indicator lights
steadily on the display.
During normal speed dubbing, only the following keys work:
TAPE I deck : STOP (H)
TAPE II deck : PAUSE, REC MUTE, STOP (H)
During high-speed dubbing, only the STOP (H) key works.
Pressing the STOP (H) key on either deck stops both tapes at
once.
Neither DUB START key works immediately after the tape is fast-
forwarded or rewound to the end. Wait for 5 seconds or more
before pressing the key.
NOTE
< During dubbing, the pitch control does notwork.
< Recording level adjustment is not necessary for dubbing, as
the recording level is set to the level of the pre-recorded tape.
Operating the REC LEVEL control, before or after starting
dubbing, has no effect at all.
< If a nearby television set is switched on during high-speed
dubbing, a high-pitched interference noise may be recorded on
the tape. To avoid this, either perform dubbing at normal speed,
or turn off the television.