
Installation Guide


• A lighting scene Smart Control allows you to set up combinations of lights to turn on and off. For
example, you could use this Smart Control to activate the Smart Control (by tapping it on the Smart
Control page) to turn on lights in some rooms while turning off lights in other rooms.
To create a custom Smart Control:
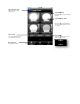
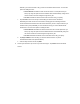
1. Tap the Smart Control menu at the bottom of the page
2. When the Smart Control page opens, tap Create New Smart Control. A setup wizard guides you
through setting up your Smart Control.
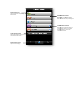
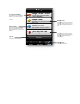
3. On the first page of the wizard, tap Choose Name to type a name for your new Smart Control, and
tap Choose Icon to select an icon to associate with it. When you are ready to continue, tap Next.
4. Tap Schedule or Lighting Scene for the type of Smart Control you want to create.
5. Tap to select the rooms, lights, and/or fixtures you want to turn on or off with this Smart Control,
and then tap Next.
6. For the selected rooms, tap the option to turn lights on or off. For selected lights and fixtures, drag
the slider control to set dimmer level when light turns on. Tap Next when you are ready to continue.
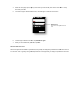
7. If you are creating a schedule Smart Control:
a. Optionally, tap the ON/OFF, ON, or OFF options to limit the view to only those settings (for
example, if you only want to schedule the lights to turn both on and off, then tap the ON
option).
b. Tap Turn On to set the time of day for activating the Smart Control. Remember, activating the
Smart Control is not the same as turning lights on. Activating the Smart Control means that the
Smart Control will take the action you set in step 6 at the time you schedule. After you tap