
Installation Guide


Note:
If you are installing a new light bulb that did not come with your kit (for example, if you reset network light bulbs from a
remote control kit), then you must manually connect the light wirelessly to your Gateway. In this case, you should
access your Gateway during the steps below as you will have to press its sync button to engage the network connection.
Before installing the light bulbs, determine the appropriate locations in your home for installing them. The
Lighting Kit Overview
chapter provides information on planning your lighting network. When you are ready to
install the light bulbs, perform the following steps:
1. Turn power OFF
to the light fixtures where you will be installing the network light bulbs.
2. Remove any existing
standard
3.
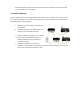
Install each network light bulb into the light fixtures as you would any standard light bulb.
4.
Turn power on to the light fixtures.
5.
If you are installing only light bulbs that came with your kit, you
are also
installing light bulb
bulb
s from a remote control kit
a.
When you turn power on,
wirelessly to your Gateway.
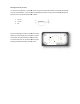
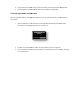
b. P
ress the sync button
activity indicator begins to display a clockwise rotating pattern.
c. When the light bulbs
are
brightness. P
ress the sync button
search process
(otherwise the Gateway will stop the search process
automatically in five minutes
If you are installing a new light bulb that did not come with your kit (for example, if you reset network light bulbs from a
remote control kit), then you must manually connect the light wirelessly to your Gateway. In this case, you should
access your Gateway during the steps below as you will have to press its sync button to engage the network connection.
Before installing the light bulbs, determine the appropriate locations in your home for installing them. The
chapter provides information on planning your lighting network. When you are ready to
install the light bulbs, perform the following steps:
to the light fixtures where you will be installing the network light bulbs.
standard
light bulbs from the light fixtures.
Install each network light bulb into the light fixtures as you would any standard light bulb.
Turn power on to the light fixtures.
If you are installing only light bulbs that came with your kit, you
can skip this step. However, i
installing light bulb
s that did not come with your kit (for example,
if you reset
s from a remote control kit
), then you must connect them to your Gateway:
When you turn power on,
the light bulbs will brighten and dim while
attempting to
wirelessly to your Gateway.
ress the sync button
on the Gateway once to enable the connection. The
activity indicator begins to display a clockwise rotating pattern.
are
connected to your Gateway, they turn on to full
ress the sync button
on the Gateway again to stop the network
(otherwise the Gateway will stop the search process
automatically in five minutes
after finding the most recent light bulb).
If you are installing a new light bulb that did not come with your kit (for example, if you reset network light bulbs from a
remote control kit), then you must manually connect the light wirelessly to your Gateway. In this case, you should
be ready to
access your Gateway during the steps below as you will have to press its sync button to engage the network connection.
Before installing the light bulbs, determine the appropriate locations in your home for installing them. The
chapter provides information on planning your lighting network. When you are ready to
to the light fixtures where you will be installing the network light bulbs.
Install each network light bulb into the light fixtures as you would any standard light bulb.
can skip this step. However, i
f you
if you reset
network light
attempting to
connect