DMP-BD87_77_VQT3V18_eng.book 1 ページ 2011年10月24日 月曜日 午後2時45分 Owner’s Manual Blu-ray DiscTM Player Model No. DMP-BD87 DMP-BD77 Dear customer Thank you for purchasing this product. For optimum performance and safety, please read these instructions carefully. Please keep this manual for future reference. If you have any questions contact U.S.A.
DMP-BD87_77_VQT3V18_eng.book 2 ページ 2011年10月24日 月曜日 午後2時45分 Getting started IMPORTANT SAFETY INSTRUCTIONS Read these operating instructions carefully before using the unit. Follow the safety instructions on the unit and the applicable safety instructions listed below. Keep these operating instructions handy for future reference. 1 Read these instructions. 2 Keep these instructions. 3 Heed all warnings. 4 Follow all instructions. 5 Do not use this apparatus near water. 6 Clean only with dry cloth.
2011年10月24日 CAUTION Unit ≥ This unit utilizes a laser. Use of controls or adjustments or performance of procedures other than those specified herein may result in hazardous radiation exposure. ≥ Do not place sources of naked flames, such as lighted candles, on this unit. Placement To reduce the risk of fire, electric shock or product damage, ≥ Do not install or place this unit in a bookcase, built-in cabinet or in another confined space. Ensure this unit is well ventilated.
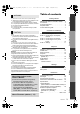
DMP-BD87_77_VQT3V18_eng.book 4 ページ 2011年10月24日 Accessories 月曜日 午後2時45分 Unit and media care Check the supplied accessories before using this unit. ∫ Clean this unit with a soft, dry cloth 1 ≥ Never use alcohol, paint thinner or benzine to clean this unit. ≥ Before using chemically treated cloth, carefully read the instructions that came with the cloth.
DMP-BD87_77_VQT3V18_eng.
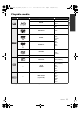
DMP-BD87_77_VQT3V18_eng.book 6 ページ 2011年10月24日 ∫ Discs that cannot be played in this unit Any other disc that is not specifically supported or previously described. ≥ DVD-RAM ≥ Super Audio CD ≥ Photo CD ≥ DVD-Audio ≥ Video CD and Super Video CD ≥ WMA discs ≥ All types of DivX discs ≥ PAL discs ≥ HD DVD ≥ BD-Video discs recorded at a rate of 50 fields/sec ∫ Region management information BD-Video This unit can play BD-Video discs supporting the region code “A”.
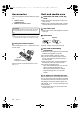
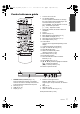
DMP-BD87_77_VQT3V18_eng.book 7 ページ 2011年11月4日 金曜日 午前10時41分 11 1 2 1 2 12 13 3 3 14 4 5 15 6 7 16 17 18 8 19 20 9 10 4 5 6 7 8 9 10 11 12 13 14 15 16 17 18 19 20 Turn the unit on and off TV operation buttons You can operate the Panasonic TV through the unit’s remote control. (Depending on the TV these buttons may not work.) [Í TV POWER] : Turn the television on and off [AV] : Switch the input select [i j VOL] : Adjust the volume Select title numbers, etc.
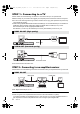
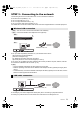
DMP-BD87_77_VQT3V18_eng.book 8 ページ 2011年10月24日 月曜日 午後2時45分 STEP 1 : Connecting to a TV Perform either one of the following connections in accordance with your TV input terminal. ≥ Before making any connections we suggest you temporarily disconnect all the units from AC power. ≥ Do not connect video signals through a video recorder. Due to copy guard protection the picture may not be displayed properly. ≥ Please use High Speed HDMI Cables that have the HDMI logo.
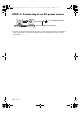
DMP-BD87_77_VQT3V18_eng.book 9 ページ 2011年11月4日 金曜日 午前10時41分 STEP 3 : Connecting to the network The following services can be used when this unit is connected to broadband. ≥ Firmware can be updated (> 13) ≥ You can enjoy BD-Live (> 17) ≥ You can enjoy Network Service (> 18) ≥ You can access other devices (DLNA) (> 19) For details about connection method, refer to the instructions supplied with the connected equipment.
DMP-BD87_77_VQT3V18_eng.book 10 ページ 2011年10月24日 月曜日 午後2時45分 STEP 4 : Connecting to an AC power source To a household AC outlet AC power supply cord (supplied) ≥ This unit consumes a small amount of AC power (> 33) even when turned off. In the interest of power conservation, if you will not be using this unit for an extended period of time, it can be disconnected.
2011年10月24日 STEP 5 : Settings Easy Setting After connecting your new player for the first time and pressing [Í], a screen for the basic settings will appear. After completing “Easy Setting”, you can perform “Network Easy Setting”. Wired connection Select “Wired”. Network Easy Setting Select a connection mode. Current setting : Wired LAN cable connection: Connect a LAN cable to the unit and select "Wired." Press [Í]. Wireless LAN connection: Select "Wireless." Setup screen appears.
DMP-BD87_77_VQT3V18_eng.book 12 ページ 2011年10月24日 ∫ “Search for wireless network” The available wireless networks will be displayed. 1 Select your network name. ≥ If your network name is not displayed search again by pressing the [R] button on the remote control. Stealth SSID will not be displayed, in this case enter manually. Wireless Settings Select a wireless network for connection.
2011年10月24日 Reprogramming the remote control If you have more than one Panasonic player/ recorder and the remote control operates both products at once, you will need to change the remote control code to prevent this occurrence. (> 26, “Remote Control Code”) 月曜日 午後2時45分 Firmware updates Occasionally, Panasonic may release updated firmware for this unit that may add or improve the way a feature operates. These updates are available free of charge.
DMP-BD87_77_VQT3V18_eng.book 14 ページ 2011年10月24日 Inserting or removing media Playback TENTATIVE CALL SD CARD 午後2時45分 HOME menu Major functions of this unit can be operated from the HOME menu. Preparation Turn on the television and select the appropriate video input on the television. 1 2 Press [Í] to turn on the unit. Press [OK] or [3, 4, 2, 1] to select the item. HOME ≥ When inserting a media, ensure that it is facing the right way up.
DMP-BD87_77_VQT3V18_eng.book 15 ページ 2011年10月24日 Multi-user mode Up to 4 people can be registered as the users and the settings of wallpaper, and picture and audio quality etc. are saved respectively. Each member of your family can use the unit with their own settings. 月曜日 午後2時45分 Switching the user ∫ Using color buttons Press the color buttons in the Home menu to switch to the user corresponding to the button.
DMP-BD87_77_VQT3V18_eng.book 16 ページ 2011年10月24日 Playback 1 Insert the media. Playback starts depending on the media. 2 Select the item to play. Repeat this procedure if necessary. ≥ DISCS CONTINUE TO ROTATE WHILE MENUS ARE DISPLAYED. Press [∫STOP] when you have finished playback to protect the unit’s motor, your television screen and so on. ≥ MKV : Successive play is not possible.
DMP-BD87_77_VQT3V18_eng.book 17 ページ 2011年10月24日 Displaying menus and playback information Press [POP-UP MENU/TOP MENU]. ≥ Press [3, 4, 2, 1] to select the item and press [OK]. Show the status messages While playing, press [STATUS]. The status messages give you information about what is currently being played. Each time you press [STATUS], the display information may change or will disappear from the screen. ≥ Depending on media and contents, the display may change or may not appear. e.g.
DMP-BD87_77_VQT3V18_eng.book 18 ページ 2011年10月24日 Enjoying Network Service (Netflix, etc.) You can enjoy Network Service. Network Service provides a variety of selected Internet services such as the followings. ≥ Online movie rental service ≥ Video browsing service Settings TENTATIVE Internet * Images are for illustration purposes, contents may change without notice. Preparation ≥ Network connection (> 9) ≥ Network setting (> 11) 1 Press [NETWORK].
DMP-BD87_77_VQT3V18_eng.book 19 ページ 2011年10月24日 DLNA feature Playing back contents on the DLNA server You can share photos, videos and music stored in the DLNA Certified media server (PC with windows7 installed, smartphone, etc) connected to your home network, and enjoy the contents with this player. 月曜日 午後2時45分 Using the Digital Media Controller You can use the smartphone, etc. as the Digital Media Controller (DMC) to play back contents from DLNA server on the Renderer (this unit).
DMP-BD87_77_VQT3V18_eng.book 20 ページ 2011年10月24日 VIERA LinkTM “HDAVI ControlTM” What is VIERA Link “HDAVI Control”? VIERA LinkTM is a new name for EZ SyncTM. VIERA Link “HDAVI Control” is a convenient function which will link the operations of this unit and a Panasonic TV (VIERA) or amplifier/receiver under “HDAVI Control”. You can use this function by connecting the equipment with an HDMI cable. See the operating instructions for connected equipment for operational details.