User Guide [UG template version 15a] [Sprint_ALCATEL_5027B_UG_EN_20160303_Draft1]
Table of Contents Introduction.................................................................................................................................................... 1 About the User Guide............................................................................................................................ 1 Get Started .................................................................................................................................................... 2 Parts and Functions .
Vibrate Mode ............................................................................................................................... 24 Airplane Mode ............................................................................................................................. 25 Enter Text ............................................................................................................................................ 25 Touchscreen Keyboards ................................................
In-Call Screen Layout and Operations ........................................................................................ 48 Place Calls from Contacts/Call Logs ................................................................................................... 49 Place a Call from Contacts ......................................................................................................... 50 Call from Call Logs ........................................................................................
Delete Gmail Threads ................................................................................................................. 75 Search Gmail Messages ............................................................................................................. 75 Report Spam or Phishing Gmail ................................................................................................. 75 Add another Google (Gmail) Account .........................................................................
Calculator ............................................................................................................................................ 90 Calendar .............................................................................................................................................. 90 Add an Event to the Calendar ..................................................................................................... 91 View Calendar Events ...............................................
More Settings .................................................................................................................................... 111 Default Messaging App Settings ....................................................................................................... 111 Sound & Notification Settings ........................................................................................................... 111 Display Settings ...............................................................
Introduction The following topics describe the basics of using this guide and your new phone. About the User Guide Thank you for purchasing your new ALCATEL 5027B. The following topics explain how best to use this guide to get the most out of your phone. Accessible services may be limited by subscription contract conditions. Descriptions in the User Guide Note that most descriptions in this guide are based on your phone's setup at the time of purchase.
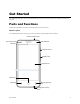
Get Started The following topics give you all the information you need to set up your phone and wireless service the first time. Parts and Functions These topics illustrate your phone’s primary parts and key functions. Phone Layout The following illustration outlines your phone’s primary external features and buttons. 3.
Part Ambient light and proximity sensor Description Detects how close an object is to the surface of the screen. This is typically used to detect when your face is pressed up against the screen, such as during a phone call. While talking on the phone, the sensor detects talk activity and locks the keypad to prevent accidental key presses. Self camera lens Takes pictures and records videos while facing the screen, and allows you to video conference.
Handling a SIM Card Keep the following in mind when handling a SIM card. ● Customer is responsible for any damage caused by inserting SIM card in another-brand IC card reader, etc. The company is not responsible in such case. ● Always keep the IC chip clean. ● Wipe clean with a dry, soft cloth. ● Avoid applying labels. May damage SIM card. ● View instructions included with SIM card for handling. ● SIM card is the property of the company.
2. Remove the battery. 3. Push SIM card into the slot. Insert gently with gold IC chip facing downward. Note: Your phone only supports Micro-SIM cards. Do not attempt to insert other SIM card types such as mini and nano cards, as they may cause damage to your phone. 4. Insert the battery. Get Started Align the contacts of the battery with the contacts in the phone.
5. Attach the battery cover. Make sure all the tabs are secure and there are no gaps around the cover. Remove SIM Card Follow these instructions to remove a SIM card. Remember to power off your phone before removing a SIM card. 1. Remove the battery cover. 2. Remove the battery. 3. Push SIM card out of the slot.
SD Card Your phone supports the use of an optional SD card (not included) to expand its storage capacity. It supports cards up to 32 GB. Some cards may not operate properly with your phone. SD Card Cautions Data: Information stored on SD Card can become lost or changed accidently or as a result of damage. It is recommended that you keep a separate copy of important data. The company is not responsible for damages from data that is lost or changed.
1. Remove the battery cover. 2. Remove the battery. 3. Push SD card into the slot. Get Started Insert gently with gold IC chip facing downward.
4. Insert the battery. Align the contacts of the battery with the contacts in the phone. 5. Attach the battery cover. Make sure all the tabs are secure and there are no gaps around the cover. Unmount the SD Card Always unmounts the SD card before removing it from your phone. 1. From home, touch Apps > Settings . 2. Touch Storage. 3. Touch Unmount SD Card > OK. The menu option name changes from Unmount SD Card to Mount SD Card. Remove SD Card Follow these instructions to remove an SD card.
1. Remove the battery cover. 2. Remove the battery. 3. Push SD card out of the slot. Erase SD Card When you insert an optional SD card for the first time, it is recommended that you format it on your phone. 1. From home, touch Apps > Settings . 2. Touch Storage.
3. Touch Erase SD card. 4. Touch 5. Touch . to confirm. All data on the SD card is erased, and the card is formatted for use on your phone. Battery Use The following topics explain how to insert and remove your phone’s battery. Battery Cautions Storage: Avoid storing or leaving battery with no charge remaining. Saved information and settings may become lost or changed, or battery may become unusable. Charge once every six months before storing or leaving unused for a long period.
2. Insert the battery. 3. Attach the battery cover. Remove the Battery Follow these instructions to remove your phone’s battery. Always power the phone off before removing the battery. 1. Remove the battery cover. Get Started Lift gently in the direction shown.
2. Remove the battery. 3. Attach the battery cover. Make sure all the tabs are secure and there are no gaps around the cover. Charge the Battery Follow these instructions to charge your phone’s battery using either the included AC adapter or via a USB connection on your computer. Charge Using the AC Adapter 1. Plug the USB connector into the charger/accessory jack on the right bottom of your phone.
2. Plug the other end of the USB cable into the AC adapter. 3. Plug the AC adapter into an electrical outlet. The indicator light becomes red when charging starts. The light turns green when the battery is fully charged. Fully charging a battery may about 2.5 hours. 4. After charging, disconnect the phone from the charger. Unplug the AC adapter from the outlet, and remove the micro USB cable from the phone and the AC adapter.
2. Insert the large end of the micro USB cord into an external USB port on your computer. 3. After charging, remove the micro USB cable from both the phone and the computer. Turn Your Phone On and Off The instructions below explain how to turn your phone on and off. Turn Your Phone On ■ Press and hold the Power/Lock key. Your phone will power on. Depending on the settings, you may see the lock screen. See Lock and Unlock Your Screen and Screen Lock for information about using the screen lock.
Touch or Touch When you want to type using the onscreen keyboard, select items onscreen such as application and settings icons, or press onscreen buttons, simply touch or touch them with your finger. Touch and Hold To open the available options for an item (for example, a contact or link in a Web page), touch and hold the item. Swipe or Slide To swipe or slide means to quickly drag your finger vertically or horizontally across the screen.
Note: The Auto-rotate check box needs to be selected for the screen orientation to automatically change. From home, touch Apps > Settings > Display > When device is rotated. Tip: You can also access the screen rotation setting from the notifications window. Pull down the status bar and touch Auto-rotate/Portrait to select or deselect the option. Pinch and Spread “Pinch” the screen using your thumb and forefinger to zoom out or “spread” the screen to zoom in when viewing a picture or a Web page.
You can also start the activation process manually. ■ From home, touch Apps > Settings > Activate this device. Complete the Setup Screens The setup screens help you set up certain features and preferences on your phone. Once your phone has been turned on, you will see a Welcome message. You can then complete the setup process. Note: You may be able to complete the setup screens before your phone has been activated on your account. 1.
Name – Enter your name to personalize some apps, or touch NEXT to skip to next screen. Protect your phone – Touch SET SCREEN LOCK NOW to choose screen lock pattern, or touch SKIP > SKIP ANYWAY to next screen.
Google services – Mark the check box to improve location services or improve Android experience. Touch NEXT. Your setup is now complete.
Your phone is now set up for use. If you skipped any part of the setup, you can access additional options through the Apps screen or through Settings.
Basic Operations The following topics outline basic features and operations of your phone. Basics The following topics offer an overview of your phone’s basic operations. Home Screen and Applications (Apps) List Most of your phone’s operations originate from the Home screen or the apps list. For information about using the Home screen, see Home Screen Basics. Select Options and Navigate Screens Touch icons, onscreen keys, and other items to open or activate the assigned function.
Note: The Auto-rotate check box needs to be selected for the screen orientation to automatically change. From home, touch Apps > Settings > Display > When device is rotated. Tip: You can also access the screen rotation setting from the notifications window. Pull down the status bar and touch Auto-rotate/Portrait to select or deselect the option. Capture Screenshots You can use your phone’s power and volume keys to capture screenshots.
The apps list opens. 2. Touch an app icon to launch the corresponding application. The application opens. Silent Mode Silent mode sets your phone’s ringtone, operation sounds, notifications, etc., not to sound to avoid disturbing others around you. Note: Camera shutter, video start/stop tones, and certain other sounds may still be active during silent mode. To set silent mode: 1. Press and hold the Power/Lock key to display the device options menu. 2. Touch . Your phone is now in silent mode.
Your phone’s vibrate settings are now restored. Airplane Mode Airplane mode turns off all functions that emit or receive signals, while leaving your phone on so you can use apps that don’t require a signal or data. To turn on airplane mode: 1. Press and hold the Power/Lock key to display the device options menu. 2. Touch Airplane mode. Your phone is now in airplane mode. You will see the airplane mode icon in the status bar. To turn off airplane mode: 1.
● English (US) Google Keyboard lets you use a traditional QWERTY setup to enter text. Additional options expand your ability to enter text faster and more accurately. See English (US) Google Keyboard for details.
Note: Keyboard layouts and options may change depending on where you’re using them. For example, if you’re entering text to do a Web search, a search icon may be available instead of an enter key. Swype The Swype™ keyboard lets you enter words by drawing a path from letter to letter in one continuous motion. When you lift your finger after the last letter of a word, a space is automatically added. Assigning Swype for Text Entry Swype is typically the default entry type.
For more information about using Swype and its additional capabilities, including using voice entry and personalizing your Swype dictionary, touch and hold visit swype.com for more information. from the Swype keyboard display.
● Speak the word/phrase you want to search for. A list of search results will display for you to select from. Tips for Editing Text Your phone gives you many options to make entering text easier, including copying, cutting, and pasting text, using voice-to-text input, customizing the user dictionary, using predictive text, and more. To edit text you have entered: 1. Touch and hold or double-touch within the text you would like to edit. 2. Drag the tabs to change the highlighted selection. 3.
Google Account You will need a Google Account to access several phone features such as Gmail, Google Maps, Hangouts, and the Google Play applications. Before you are able to access Google applications, you must enter your account information. These applications sync between your phone and your online Google Account. Google Account Cautions Be sure not to forget your Google Account ID or password.
4. Look for an email from Google in the email box you provided, and respond to the email to confirm and activate your new account. Create a Google Account Using Your Phone 1. From home, touch Apps > Settings > Accounts > Add account. 2. Touch Google and then touch Or create a new account. 3. Enter your First name and Last name, and then touch NEXT. 4. Enter a desired Username, and then touch NEXT. 5. Create password and confirm the password, then touch NEXT. 6.
Google Play Store Google Play™ is the place to go to find new Android apps, books, movies, and music for your phone. Choose from a wide variety of free and paid content ranging from productivity apps and games to bestselling books and blockbuster movies and music. When you find what you want, you can easily download and install it on your phone. To access the Google Play store app, you must first connect to the Internet using your phone’s Wi-Fi or mobile data connection and sign in to your Google Account.
6. The subsequent screen notifies you whether the app will require access to your personal information or access to certain functions or settings of your phone. If you agree to the conditions, touch ACCEPT (for free apps) or the price tag (for paid apps) to begin downloading and installing the app. If you selected a paid application, you’re redirected to the Google Wallet screen to pay for the application before it’s downloaded to your phone. The selected app is downloaded and installed on your phone.
Set Automatic App Updates 1. From home, touch Apps 2. Touch Menu > Play Store . > Settings > Auto-update apps, select auto-update apps conditions. Note: Automatic updates are unavailable for some apps. Uninstall an App You can uninstall any app that you have downloaded and installed from Google Play. 1. From home, touch Apps 2. Touch Menu > Play Store . > My apps. 3. On the Installed screen, touch the app you want to uninstall, and then touch UNINSTALL > OK.
The lock screen appears. 2. Swipe your finger across the screen to unlock it. The screen is unlocked. If you have set up a screen lock, you will be prompted to draw the pattern or enter the password or PIN. See Screen Lock. Update Your Phone From time to time, updates may become available for your phone. You can download and apply updates through the Settings > System updates menu. Software Update Cautions During update: The phone cannot be used until the software update is complete.
2. Select the text message from the list to view the message thread. 3. Touch and hold on a portion of the text message from the string. The Message options context menu appears. Note: You can back up stored text messages by forwarding them to your own phone number. Open the messages after you have updated your firmware. 4. Touch . 5. Enter your phone number and touch Send . To back up your Google apps: 1. From home, touch Apps 2. Touch Menu > Play Store . > My apps > ALL tab. 3.
4. Touch Download and follow the onscreen instructions. The downloading icon ( ) appears within the status bar to indicate the phone is downloading the necessary files. 5. Touch Restart and install to complete the process. Confirm Your Current Phone Firmware 1. From home, touch Apps > Settings > About phone. 2. Locate the Baseband version read-only field.
Your Phone Interface The following topics describe how to use and customize your phone’s Home screen, understand the status bar, and use the notifications window. Home Screen Basics The Home screen is the starting point for your phone’s applications, functions, and menus. You can customize your Home screen by adding application icons, shortcuts, folders, widgets, and more. Home Screen Layout Your Home screen extends beyond the initial screen. Swipe the screen left or right to display additional screens.
Item Description Home key Touch to display the main Home screen. Back key Touch to return to the previous screen. Note: Your phone’s Home screens cycle through so that you can keep swiping in one direction and make it back to the main Home screen. The small circles above the primary shortcuts let you know your current screen position. Tip: Touch to return to the main Home screen from any other screen.
Icon Notification New text or MMS message New Hangout message Event USB connection Alarm Warning Update available Update downloading Update successful Keyboard active Main Status Icons Icon Status ® Bluetooth active GPS active ® Wi-Fi active Downloading Vibrate Your Phone Interface 40
Icon Status Speakerphone active Network (full signal) Network (roaming) Enhanced 4G LTE data service 3G (data service) Airplane mode Sync active Battery (charging) Battery (full charge) Notifications Window Drag the status bar down to open the notifications window. From there, you can check notifications, download updates, open messaging apps, use the quick settings menu, and more. Open the Notifications Window ■ Drag the status bar down. (Slide your finger down from the top of the screen.
Notifications Window Layout The notifications window gives you access both to notifications and the quick settings menu. Customize the Home Screen Learn how to set the wallpaper and add, move, or remove shortcuts, widgets, and folders from the Home screen. Operations for Rearranging the Home Screen ● Moving Widgets and Icons: From home, touch and hold an item and then drag it to the desired location. ● Deleting Widgets and Icons: From home, touch and hold an item and then drag it to Remove.
The icon will disengage and you will see thumbnails of your Home screens. 3. Drag the icon to an empty location on one of the Home screens. The shortcut is added to the Home screen. Add Widgets to the Home Screen You can add widgets to your phone’s Home screen. Widgets are self-contained apps that display on the Home screen. Unlike a shortcut, the Widget works like as an onscreen application.
Phone App The following topics outline the use of your device’s phone app to place and receive calls, use voicemail, set up and manage contacts, and more. Place and Answer Calls The following topics describe how to directly dial calls, how to answer incoming calls, and how to use the in-call screen options. Adjust In-Call Volume ■ Adjusting Call Volume: Press the Volume Keys during the call. Troubleshooting Question: Difficulty during call.
3. Touch to call the number. The phone dials the number. The call begins when the other party answers. 4. To end the call, touch . The call ends. Troubleshooting Question: Call does not connect. Answer 1: Was the number dialed using the area code? If not, try dialing using the full 10-digit number including the area code. Answer 2: Are you in an area with poor wireless coverage? Try calling again from another area.
3. Touch . As long as you are in an area covered by wireless service, the emergency call is placed. Enhanced 9-1-1 (E9-1-1) Information This phone features an embedded Global Positioning System (GPS) chip necessary for utilizing E9-1-1 emergency location services where available. When you place an emergency 9-1-1 call, the GPS feature of your phone seeks information to calculate your approximate location.
2. To end the call, touch .
■ Press the Volume Key. Reject a Call and Send a Text Message You can reject an incoming call and automatically send a text message to the caller. 1. When a call arrives, drag up from the center of the circle. The ringtone or vibration will stop and you will see a list of preset text messages. 2. Choose a preset message to send it to the caller. The selected message will be delivered to the caller. You can edit the reject messages through the Call settings menu.
In-Call Screen Layout Touch options to activate them during a call. ● : Touch to change mode to Speaker, Handset earpiece. ● : Mute the microphone during an active call. touch again to unmute the microphone. ● : Toggle the appearance of the onscreen keypad. ● : Touch and hold to initiate a conference call (3-way call). ● : End the current call. Warning: Because of higher volume levels, do not place the phone near your ear during speakerphone use.
Place a Call from Contacts You can place phone calls directly from entries in your Contacts list. 1. From home, touch Phone to display the phone app. 2. Touch CONTACTS to display the Contacts list. The contacts list appears. 3. Touch a contact. 4. Touch Call next to the number you want to call. The phone dials the number. The call begins when the other party answers. 5. To end the call, touch . The call ends.
Voicemail Setup You should set up your voicemail and personal greeting as soon as your phone is activated. Always use a password to protect against unauthorized access. Your phone automatically transfers all unanswered calls to your voicemail, even if your phone is in use or turned off. 1. From home, touch Phone Phone App > > Settings > Call settings > Voicemail.
2. Touch Setup to set for voicemail. Important: Voicemail Password – It is strongly recommended that you create a password when setting up your voicemail to protect against unauthorized access. Without a password, anyone who has access to your phone is able to access your voicemail messages. Listen to Multiple Voicemail Messages When you are done listening to a voicemail message you can easily access other voicemail messages without returning to the main voicemail screen. 1.
2. Swipe your finger left or right to display the next or previous message. The next or previous message will begin playing automatically. You can navigate through voicemail messages as frequently as you'd like. You can even move to the next or previous message before you're finished listening to the current one. Caller ID Blocking Caller ID identifies a caller before you answer the phone by displaying the number of the incoming call.
To respond to an incoming call while you’re on a call: ■ Slide to the right. (This puts the first caller on hold and answers the second call.) To switch back to the first caller: ■ Touch Swap. Note: For those calls where you don’t want to be interrupted, you can temporarily disable Call Waiting by pressing before placing your call. Call Waiting is automatically reactivated once you end the call.
3. When you’re connected to the second party, touch 4. To end the three-way call, touch . Your conference call is now in session. . Note: If one of the people you called hangs up during your call, you and the remaining caller stay connected. If you initiated the call and are the first to hang up, all callers are disconnected. Call Forwarding Call Forwarding lets you forward all your incoming calls to another phone number – even when your phone is turned off.
You will hear a tone to confirm the activation of Call Forwarding. All calls to your wireless number will be forwarded to the designated phone number. To deactivate Call Forwarding: 1. From home, touch Phone 2. Touch 3. Touch > . . . You will hear a tone to confirm the deactivation. Call Settings Your phone’s Call Settings menu lets you configure your voicemail options and a number of other settings for the phone application.
Setting Description Speed dial settings Touch to set up speed dial. Blocked Call List Add numbers to blacklist, those numbers will be blocked when calling your phone. Voice privacy Mark the check box to enable enhanced privacy mode. Use the Call Settings Menu 1. From home, touch Phone . The phone app opens. 2. Touch Menu > Settings > Call settings. The call settings menu appears. 3. Configure your options. Touch a menu item to display its options.
You can also access contacts directly from the Contacts shortcut or the apps list. From home, touch Contacts 2. Touch , or if there’s no shortcut, touch Apps > Contacts . to add a contact. The Add Contact screen appears. 3. If you have multiple account types associated with your phone, select a contact type. Select Google if you want to save contacts to your Google Account; these will be synced automatically with your Google Account online.
5. When you have finished adding information, touch . The contact is added. Save a Phone Number You can save a phone number to Contacts directly from the phone dial pad. 1. From home, touch Phone > . 2. Enter a phone number and touch Add to contacts. 3. To add the number to an existing contact, touch the target contact you want to update. To add a new contact, touch Create new contact. For an existing contact, touch the contact name and select a number type for the new number.
1. From home, touch Phone > CONTACTS tab. You will see the Contacts list. You can also access contacts directly from the Contacts shortcut or the apps list. From home, touch Contacts , or if there’s no shortcut, touch Apps > Contacts . 2. Touch a contact to view its details. The contact’s detailed listing appears. Contacts Screen Layout The following illustration show’s your Contacts app layout and describes the various features.
Item Description Image Touch to show thumbnail of contact entry. Touch an icon to place a call, send a message, etc. Search Search contacts. Index Browse contacts by letter. Add new Add a new contact. Edit a Contact Once you’ve added a contact, you can add or edit any of the information in the entry, assign a caller ID picture, customize with a unique ringtone, and more. 1. From home, touch Contacts . You will see the Contacts list.
2. Touch a contact to view its details. The contact’s detailed listing appears. 3. Touch Menu > Delete. 4. Touch OK. The contact is deleted. Import Contacts from an SD Card or Storage Import (load) contacts which have been backed up on an SD Card. Before Importing Contacts from an SD Card You will need to have installed an SD card with previously backed up contacts information into your phone before you can import contacts. See SD Card for SD card information.
Back Up Contacts to Your SD Card 1. From home, touch Contacts . You will see the Contacts list. 2. Touch Menu > Import/export. You will see the Import/export contacts menu. 3. Touch Export to storage. 4. Select the contacts you want to import and then touch . 5. Select path as SD Card, touch OK to confirm. 6. Touch OK again to confirm the export. The contacts are exported and saved to the installed SD card.
Messaging and Internet With wireless service and your phone’s messaging and data capabilities, you have the opportunity to share information through many different channels and accounts, including Gmail (Google), personal and corporate email, text and multimedia messaging, social networking accounts, and Hangouts. Text and Multimedia Messaging With Text Messaging (SMS), you can send and receive instant text messages between your wireless phone and another messaging-ready phone.
Note: A counter appears above the Send button ( ) to tell you how many characters you have entered and how many characters are left. Once you go over the 160-character limit, a new message is created but automatically joined into one when received. 5. When done, touch to send the text message.
Touch the icon, and then select the contacts to who you want to send the message. You can also select contact groups as recipients. When you have selected all the message recipients, touch . Note: You can add a subject line by touching Menu > Add subject. 4. Touch the “Type message” box, and then start composing your message. 5. Touch to add attachment. 6. In the Attach window, select from the following file attachments: Pictures: Attach a stored picture from Gallery.
8. Touch Send to send the MMS message. Create a Slideshow In a multimedia message, you can add slides, each containing a picture, video, or audio. 1. In the multimedia message you’re composing, touch slide. > Slideshow to add space for a new 2. Touch slide 1 or Add slide to attach slides.
3. To compose your slideshow, touch Menu and do any of the following: Preview: Touch to preview your slide. Add picture: Touch to select a picture from Gallery. Capture picture: Touch to capture picture. Audio: Touch to select an audio and attach. Record audio: Touch to record audio and attach. Add video: Touch to select a video. (You cannot add both a picture and a video on the same slide.) Capture video: Touch to capture video. Add slide: Touch to add a new slide.
To resume composing the message: 1. From home, touch Apps > Messaging . 2. On the Messaging screen, touch the message to resume editing it. 3. When you finish editing the message, touch . New Messages Notification Depending on your notification settings, the phone will play a ringtone, vibrate, or display the message briefly in the status bar when you receive a new text or multimedia message. To change the notification for new text and multimedia messages, see Text and MMS Options for details.
2. On the Messaging screen, touch a multimedia message or conversation to open it. 3. Touch the attachment to open it. If the attachment is a vCard contact, it is imported to your phone’s contacts list. For more information, see Contacts. If the attachment is a vCalendar file, you can choose the calendar where you want to save the event. For information on using Calendar, see Calendar.
Delete a Single Message 1. While viewing a conversation, touch and hold the message that you want to delete. If the message is locked, touch and hold it, then touch > Unlock on the options menu and hold the message to display the options menu again. 2. Touch on the options menu. 3. When prompted to confirm, touch OK.
● Import/export messages: Import or export messages between phone, SIM card, and microSD card. ● Validity period: Select your SMS validity period. SMS Signature ● Signature: Mark the check box to enable SMS signature function. ● Edit SMS signature: Touch to edit SMS signature. Multimedia Message (MMS) Settings ● Auto-retrieve: Select this option to automatically retrieve all your multimedia messages completely.
● Close all: Close button to close all messages. Extra Settings ● Blocked Call List: Enable this function to block incoming messages from phone numbers in the blocked call list. CMAS ● Emergency alerts settings: Touch to set which alert types to receive. Gmail Use Google’s Gmail service and your Google Account to send, receive, and manage your Gmail messages. Before using Gmail, you must register a Google (Gmail) Account on your phone. See Google Account for details.
Note: To view your draft email messages, touch Note: To view your sent messages, touch and then touch Drafts. and then touch Sent. Check Received Gmail Messages Your phone allows you to access, read, and reply to all your Gmail messages. Open New Gmail Messages When new Gmail arrives, you will see in the status bar. 1. Drag the status bar down to display the notifications window. 2. Touch the new message from the notifications window. The new Gmail message opens.
Use Gmail Labels Gmail saves all mail in one box, but you can add labels that allow you to sort your Gmail conversation threads. For example, when a new thread starts with a received mail, the label "Inbox" is automatically added to the thread. By then adding the label "travel," all threads with "travel" are shown in a list. 1. From home, touch Apps > Gmail . The inbox opens. 2. Touch and hold a conversation thread to add a checkmark to it, and then touch Options Change labels. > 3.
2. Touch and hold a conversation thread to add a checkmark to it, and then touch Options Report spam. > The selected message is reported as spam or phishing Gmail. Add another Google (Gmail) Account If you have multiple Gmail accounts you wish to view on your phone, you can add them from the Settings > Accounts menu. 1. From home, touch Apps > Settings > Accounts > Add account. 2. Touch Google and then touch Or create a new account. 3. Enter your First name and Last name, and then touch NEXT. 4.
Set Up an Email Account Your phone supports several types of email accounts and allows you to have multiple email accounts set up at one time. Before setting up an email account, make sure you have the username (user ID), password, server name, etc., so you can get set up successfully. 1. From home, touch Apps > Email . A popup window for adding an account appears if no email account has been previously set up. 2. Follow the onscreen instructions to set up your email account.
4. Enter the incoming server settings, confirm the settings information and touch NEXT. 5. Enter the outgoing server settings, confirm the settings information and touch NEXT. 6. Select your sync settings and then touch NEXT. 7. Enter an account name and a display name and touch NEXT to complete setup. The email account is set up and you will begin receiving email for the account. Important: If the account type you want to set up is not in the phone database, you will be asked to enter more details.
Open Email Messages You can also open and read email messages directly from the email inbox. Reading and replying to email on your phone is as simple as on your computer. 1. From home, touch Apps > Email . The email inbox opens. 2. Touch the message you want to view. The email message opens. Tip: Touch the account name at the top of the screen to switch to a different email account. 3. Touch Reply or touch Menu > Reply all to reply to the message.
Chrome Browser Your phone supports the Chrome mobile Web browser. If you are signed in with a Google Account, the Chrome browser will import all your bookmarks and other Web preferences for use on your phone. 1. From home, touch Apps > Chrome . Chrome opens. 2. Touch the address bar at the top and enter search words (for a Google search) or a Web address (URL). The search results appear or a Web page opens. Tip: For more information, from your computer, visit: google.
Camera and Video You can use the camera or video camera to take and share pictures and videos. Your phone comes with a 5 megapixel camera with an autofocus feature that lets you capture sharp pictures and videos. Take Pictures and Record Videos The following topics teach you how to take pictures and record videos with your phone’s camera. Capturing Pictures/Videos ● File Format for Pictures: File format for pictures is JPEG. ● File Format for Videos: File format for videos is MPEG4.
Viewfinder Screen The Viewfinder screen lets you view your subject and access camera controls and options. The following features are available from the viewfinder screen: ● Flash mode: Touch to enable flash mode automatically ● ● ● , disable flash mode or choose flash mode when capturing a picture. Switch view mode: Switch between the back camera lens and the front-facing camera lens (for self-portraits, video chatting, etc.). HDR mode: Select HDR mode for the camera.
1. From home, touch Apps > Gallery . The album list opens. 2. Touch an album (such as Camera). The list of pictures and videos for the album opens. To select another album, touch Back to return to the Albums tab. 3. Touch an image to view the picture or video. The picture opens or the video begins playing. Touch a picture or video to view it full screen.
The list of pictures and videos for the album opens. 3. Touch the picture you want to rotate. 4. Touch Menu and then select either Rotate left or Rotate right. The picture is rotated and saved to the phone or SD card, depending on your settings. Crop a Picture 1. From home, touch Apps > Gallery . The album list opens. 2. Touch an album (such as Camera). The list of pictures and videos for the album opens. 3. Touch the picture you want to crop. 4. Touch Menu > Crop.
The list of pictures and videos for the album opens. 3. Touch the album that contains the pictures or videos you want to share. 4. Touch and hold the pictures or videos you want to share. To select multiple items, touch and hold an image to turn on multiple select. Touch all the items you want to include. 5. Touch > See all, and then touch Email or Gmail. Follow onscreen prompts to complete and send the message.
The album list opens. 2. Touch an album (such as Camera). The list of pictures and videos for the album opens. 3. Touch the album that contains the pictures or videos you want to share. 4. Touch and hold the pictures or videos you want to share. To select multiple items, touch and hold an image to turn on multiple select. Touch all the items you want to include. 5. Touch > See all, and then touch Bluetooth. Follow the onscreen prompts to complete and send the files.
3. Select your desired settings. The settings are applied. Settable items differ depending on the camera type in use. Scan Barcodes Your Camera app allows you to scan barcodes. 1. From home, touch Apps > Camera . The camera viewfinder appears. 2. Aim the camera at your subject, touch and then touch . 3. Focus on the barcode and start scanning.
Useful Apps and Features The following topics detail many of your phone’s tools and features such as maps and navigation, calendar, clock, social networking apps, music, memos, and more. Navigation Your phone offers a number of location-based navigation programs to help you figure out where you are and get you where you’re going. Enable Location Services on Your Phone Before using any location-based services, you must enable your phone’s location feature.
● Route candidates appear in a list. Check Detailed Operation for Maps: From the Maps app, touch Menu > Help. Hangouts Hangouts is Google's instant messaging service. Use to communicate with other Hangout users, and also use video calling. Log in to a Google account beforehand (see Google Account). Using Hangouts 1. From home, touch Apps > Hangouts . The Hangouts app will open. Follow the onscreen instructions to complete the account setup. 2. Touch Add to start a new Hangout. 3.
Use Google Search Type search terms in the Google Search bar to find information on your phone and around the globe. 1. From the Home screen, touch the Google search bar or touch Apps 2. Type your search keywords and touch Search > Google . . Search results appear. To search by voice, touch in the search bar and speak your search terms. Use Google Voice Search Use your voice to search instead of typing, with Google Voice Search. 1. From home, touch Apps > Voice Search .
● Change Calendar View: From the Calendar, touch Month, Agenda or Year to change the current view. ● View Next/Previous Day (Day View): From the Calendar, flick the screen left or right. ● View Next/Previous Week (Week View): From the Calendar, touch choose Week and flick the screen left or right. ● View Next/Previous Month (Month View): From the Calendar, touch choose Month and flick the screen up or down.
View Calendar Events You can display the Calendar in daily, weekly, monthly, or agenda view. To change the Calendar view, touch the Year, Month, Week, Day, Agenda. 1. From home, touch Apps > Calendar . The Calendar app opens. 2. Touch a date and then touch an event. The event details appear. In event details, touch In event details, touch Delete to edit the event. and follow the prompts.
2. Touch the Alarm tab and then touch . 3. Set the alarm options, including time, days, repeat pattern, alarm type, alarm tone, and volume, and then touch . The alarm is set. Phone at Alarm Time ● At the setting alarm time, the phone sounds the alarm and/or vibrates. ● Stopping an alarm: When the alarm sounds, swipe to the right to dismiss it. Additional Clock Features Your phone’s time app provides additional useful features including world clock, stopwatch, and timer functions.
1. From the clock app, touch Timer 2. Touch to begin timing. 3. Touch to stop timing. . YouTube View videos uploaded to YouTube and upload your own videos to your YouTube account. View YouTube Videos You can use the YouTube app to view videos on YouTube even if you aren’t signed in to a YouTube account. 1. From home, touch Apps > YouTube . The YouTube app launches. If you’re prompted to provide confirmation to use the site, follow the onscreen instructions to continue. 2.
Google Play Music App The Google Play Music app lets you browse, shop, and play back songs purchased from Google Play as well as songs you have loaded from your own music library. The music you choose is automatically stored in your Google Play Music library and instantly ready to play via streaming or download. For more information about Google Play Music, visit play.google.com/about/music. Note: For information about loading music onto your phone, see Transfer Files Between Your Phone and a Computer.
Create Playlists in Google Play Music Organize music into playlists to fit every occasion. 1. From home, touch Apps > Play Music . The Play Music app opens to the library. 2. Touch and select My Library category to choose Artist or Albums. 3. Touch and select Playlists to create Playlists. Adding Currently Playing Music to a Playlist ■ From the player view, touch new playlist. > Add to playlist, you can add to the existing playlist or create a The music is added to the playlist.
2. Touch and enter your notes. 3. Touch . The memo is saved.
Connectivity The following topics address your phone’s connectivity options, including USB file transfer and tethering, Wi-Fi, Bluetooth and more. Transfer Files between Your Phone and a Computer You can use the supplied USB connector to connect your phone directly to your computer and transfer music, pictures, and other content files.
3. You will see either Connected as a media device (MTP) or Connected as a camera (PTP). The files on your phone can now be accessed via your computer. For most transfers, you'll want to use Connected as a media device. To change the option, touch it in the notifications window to open Connected as a media device, and then touch the desired option. 4. On your computer, navigate to the detected device (such as through My Computer menu) and open it. 5.
The password, for a household wireless LAN router, is sometimes found on a sticker on the router (WEP, WPA, KEY, etc.). Contact the router manufacturer for information. For password for a public wireless LAN, check with user's service provider. Entering a password is not required if an access point is not security protected.
After disconnecting from an access point, you may need to re-enter the password to reconnect. Wi-Fi Direct Use Wi-Fi Direct to connect directly to other Wi-Fi Direct devices simply via Wi-Fi, without an access point or via the Internet. 1. From home, touch Apps > Settings . 2. Touch Wi-Fi. The Wi-Fi settings menu appears. 3. Touch the Wi-Fi slider to turn Wi-Fi on . Wi-Fi is enabled. You will see the names and security settings of in-range Wi-Fi networks. 4.
Bluetooth Information Bluetooth is a technology that enables wireless connection with PCs, Bluetooth devices with hands-free features, etc. Function Description Audio output Listen to music, etc., wirelessly. Hands-free calls Call hands-free, using Bluetooth-capable hands-free devices and headsets. Data exchange Exchange data with Bluetooth devices. Enable the Bluetooth Feature Use the settings menu to enable or disable your phone’s Bluetooth capabilities.
1. From home, touch Apps > Settings . 2. Touch Bluetooth. The Bluetooth settings open. Nearby devices appear in the “Available devices” list. If a target device is not detected, touch > Refresh to search again. 3. Touch a device from the “Available devices” list, and follow the onscreen instructions to pair with the device. The Bluetooth device is paired to your phone. Methods to accept a Bluetooth connection differ depending on the devices used. Forgetting from a Paired Device 1.
Note: Due to different specifications and features of other Bluetooth-compatible devices, display and operations may be different, and functions such as transfer or exchange may not be possible with all Bluetooth-compatible devices. Send Information Using Bluetooth You can use Bluetooth to transfer information between your phone and another Bluetooth-enabled device such as a phone or notebook computer.
When you open a received file, what happens next depends on the file type: • Media files and documents are usually opened directly in a compatible application. For example, if you open a music track, it starts playing in the Music application. • For a vCalendar file, select the calendar where you want to save the event, and then Touch Import. The vCalendar is added to your Calendar events. (For more information on using the Calendar, see Calendar.
Settings The following topics provide an overview of items you can change using your phone’s Settings menus. Basic Settings From the Home screen, touch Apps ■ > Settings to access your phone’s settings menu. Alternatively, you can drag the status bar down and touch Settings . The table below outlines the top-level settings categories. Category Description Wi-Fi Enable and set Wi-Fi options. Bluetooth Enable Bluetooth connections. Data usage Check data usage status.
Language & input Set your display language and input method. Backup & reset Set your backup and reset your phone. Date & time Set your phone’s date and time. Accessibility Set accessibility options such as screen magnification, hearing aid compatibility, etc. Printing Use your phone to do printing job. Activate this Device Activate your phone. System updates Check available updates. About phone Check information about your phone.
Entering a password is not required if an access point is not security protected. Advanced Wi-Fi Settings The advanced Wi-Fi settings menu lets you set up and manage wireless access points. ● ● Enable Notification when Open Networks Are Available: From Wi-Fi settings, Touch Menu > Advanced > Network notification. The setting is available when Wi-Fi is turned on. Touch Network notification to turn the option on or off.
2. Touch Bluetooth. The Bluetooth settings open. Bluetooth Settings Operations ● ● ● ● Enable Bluetooth: In Bluetooth settings, touch the slider or . When enabled, confirmation appears for your phone to be discoverable by other devices. Follow the onscreen instructions. Touch Alternatively, touch Bluetooth > to enable and to disable. or . Pairing Bluetooth Devices: Make sure the other devices are set to be discovered.
Data Usage Settings The Data usage menu lets you view your phone’s mobile and Wi-Fi data usage, set data limits, restrict hotspot usage, and more. 1. From home, touch Apps > Settings . 2. Touch Data usage. The data usage window opens. Data Usage Settings Operations ● ● ● ● Cellular data: In Data usage window, touch the slider for Mobile data to enable the service. When enabled, confirmation appears for your phone to be discoverable by other devices. Follow the onscreen instructions.
● View Both Mobile Data and Wi-Fi Usage: From the Data usage window, touch Menu > Show Wi-Fi. Touch Show Wi-Fi usage to toggle on and off. Touch When Show Wi-Fi usage is enabled, you will see a Wi-Fi tab at the top of the Data usage window. Touch to view your phone’s Wi-Fi data usage. to enable and to disable. More Settings The More settings menu provides access to additional wireless and network options, such as default messaging app, mobile networks, VPN, roaming and more.
Sound & Notification Settings Overview The sound settings menu allows you to configure the following options: Sound & notification Setting Description Sound Set volume for ringtones, alarms, system features, etc. Also vibrate for calls Touch the on/off switch to enable or disable vibrate for calls. Interruptions Set your phone’s interruptions. Phone ringtone Set a tone for incoming calls. Default notification ringtone Set a tone for default phone notifications.
Brightness level Set the display brightness. Adaptive brightness Touch the on/off switch to enable or disable Adaptive brightness. Wallpaper Set wallpaper. Set a screen timeout duration. Sleep Note: Longer durations discharge the battery more quickly. Daydream Touch the on/off to enable or disable daydream. Ambient display Touch on the switch to wake up screen when device picked up or notifications arrive. Font size Set font size for display.
Unmount SD card If an optional SD card is installed, touch to unmount the card to allow for safe removal. Mount SD card If an optional SD card is installed, touch to mount the card and make it available for use. Erase SD card If an optional SD card is installed, touch to erase all data stored on the card and prepare it for use by your phone. Access Storage Settings 1. From home, touch Apps > Settings . 2. Touch Storage. 3. Check or touch items. Review your storage settings.
ALL Check all apps. Access Apps Settings 1. From home, touch Apps > Settings . 2. Touch Apps. 3. Touch items to view details. Check your application settings condition and access additional options. Depending on the app and its location, you may be able to force the app closed, uninstall or disable the app, clear cache and data, and more.
Access Location Settings 1. From home, touch Apps > Settings . 2. Touch Location. 3. Configure the desired settings. Your location settings are applied and saved. Security Settings The Security settings menus let you set encryption options, password visibility, administrator settings, and credential storage options. Security Settings Overview Many security settings are dependent on Screen lock settings, SIM lock settings, etc.
Trusted agents View or deactivate trusted agents. Apps with usage access Touch to set apps with usage access. Blocked call list Touch the switch on to block calls and messages from phone numbers in the blocked call list. Access Security Settings 1. From home, touch Apps > Settings . 2. Touch Security. The Security settings menu opens. 3. Set your security options. Your security settings are applied and saved. Screen Lock You can increase the security of your phone by creating a screen lock.
Disable the Screen Lock Follow the instructions below to turn off your current screen lock. 1. From home, touch Apps > Settings > Security. 2. Touch Screen Lock. The Lock screen settings menu opens. 3. Touch None. The screen lock is disabled. If you fail to enter the correct password after five attempts, you will be prompted to wait for 30 seconds before you can try again.
Pointer speed Set the speed of the pointer for a mouse/trackpad. Access Language and Input Setting Options 1. From home, touch Apps > Settings . 2. Touch Language & input. The Language and input settings menu opens. 3. Set options. The language and input settings are applied and saved. Backup and Reset Your phone’s Backup and reset menu lets you back up your phone’s data and settings to Google servers before resetting your phone to the original factory settings.
● Erased information cannot be restored. Only erase data after you are sure you have saved everything you need. Access Backup and Reset Options 1. From home, touch Apps > Settings . 2. Touch Backup & reset. The Backup and reset menu opens. 3. Set options. The backup and reset settings are applied and saved. If you’re performing a Factory Data Reset, follow the prompts to confirm the data removal. The phone will erase all data and reboot.
The account is added to the accounts list. Manage Existing Accounts 1. From home, touch Apps > Settings . 2. Touch Accounts > . The account settings menu appears. 3. Select your account settings, and then touch Done. The account options are updated. Date & Time Settings Use the Date & Time settings menu either to automatically use the network-provided date and time or manually set these values, as well as select time and date format options.
Accessibility Settings The Accessibility menu lets you enable and manage accessibility-related applications. Accessibility Settings Overview The following Accessibility options may be configured: Accessibility Option Description TalkBack When Talkback is on, your device provides spoken feedback to help blind and low-vision users. Switch access Switch access allows you to control your device using configurable key combinations. Captions Touch to set captions settings.
Access Accessibility Options 1. From home, touch Apps > Settings . 2. Touch Accessibility. 3. Set available accessibility options. Your accessibility settings are applied and saved. Printing The Printing menu lets you configure Google's Cloud Print service. You can connect your printer to your Google Account and then add the printer on your phone in the Printing menu. After that, you can send documents, pictures, emails, or web pages from your phone to the printer wirelessly and have them printed out.
System Updates Overview System updates Item Description Update PRL Update the phone’s coverage area. Update profile Update the phone’s voice and data settings. UICC unlock Set UICC unlock options. System updates Check and enable software updates. Access System Updates Options 1. From home, touch Apps > Settings . 2. Touch System updates. About Phone The About Phone menu lets you access important phone information, search for and apply updates, and view legal and safety information.
Kernel version Check the phone’s kernel version. Build number Check the current phone build number. Access About Phone Options 1. From home, touch Apps > Settings . 2. Touch About phone. 3. Select or view available options. Your phone information is displayed. Copyright Information ©2015 Boost Mobile. All rights reserved. Other marks are trademarks of their respective owners.
For Assistance The following topics address areas of support for your phone, including troubleshooting, specifications, account information, warranty information, and customer service contact information. Troubleshooting Check the questions and answers below for troubleshooting solutions for common phone issues. Check Here First Question: Phone freezes/operation is unstable. Answer: Turn the phone on again.
Answer: Are you where signal is weak or have been out of service area for a long period? Calling where signal is weak or being out of service area uses a lot of Battery. Question: Cannot install applications. Answer: Applications cannot be installed with only a little free space on the phone or SD card. To check free space, see Storage Settings. Applications not supported by your phone cannot be installed. Question: Cannot unlock screen. Answer: Power the phone on again.
Capacity 1780 mAh Boost Mobile Account Information and Help Find out about managing your account online and on your phone, buying additional minutes for your plan, and getting help. For more information about your Boost Mobile account, as well as other Boost Mobile services, visit us at: boostmobile.com. Manage Your Account To access information about your account, you can: ● Check your minutes. ● Re-Boost (add money to your account). ● Change plans. ● And more.
Re-Boost Boost Mobile makes it easy to add money to your account. You decide exactly how and where you want to pay. Keep your account active by using your phone and adding money to your account. Pay with Cash Find an Authorized Re-Boost Retailer near you. Pick up a Re-Boost Card or recharge for as low as $10 at the register, where available. Pay Anytime with a Credit/Debit Card Dial #ADD ( ) to add money to your phone, or visit My Account at boostmobile.com to charge online.
Regulatory Information The following topics provide important regulatory information. Specific Absorption Rates (SAR) for Wireless Phones The SAR value corresponds to the relative amount of RF energy absorbed into the head of a user of a wireless handset. The SAR value of a phone is the result of an extensive testing, measuring and calculation process. It does not represent how much RF the phone emits. All phone models are tested at their highest value in strict laboratory settings.
Using Your Phone with a Hearing Aid Device A number of Boost phones have been tested for hearing aid device compatibility. When some wireless phones are used with certain hearing devices (including hearing aids and cochlear implants), users may detect a noise which can interfere with the effectiveness of the hearing device. Some hearing devices are more immune than others to this interference noise, and phones also vary in the amount of interference noise they may generate. ANSI standard C63.
the store. More information about hearing aid compatibility may be found at: fcc.gov, fda.gov, and accesswireless.org. This equipment complies with the hearing aid compatibility technical requirements of Section 20.19 of the rules. HAC Ratings: ANSI C63.19-2011 M4/T3. Warning Statements THIS DEVICE COMPLIES WITH PART 15 OF THE FCC RULES.
Index 3-way Calling, 56 Accessibility, 124 Accessory Jack, 3 Accounts Add new, 122 Manage, 123 Settings, 122 Activation, 17 Alarm, 94 Answer a Call, 48 Apps Find and install, 33 Request refunds, 34 Uninstall, 35 Update, 34 Apps Settings, 116 Auto Rotate Screen, 115 Back Key, 3 Back Up Phone, 121 Battery Settings, 116 Bluetooth Connect, 105 Receive information, 106 Send information, 106 Settings, 110 Share pictures and videos, 87 Turn on or off, 104 Calculator, 92 Calendar, 92 Add event, 93 View events, 94 C
New messages, 76 Read and reply, 76 Read messages, 76 Report phishing, 77 Report spam, 77 Search, 77 Send message, 75 Share pictures, 86 Switch accounts, 78 Google Chrome, 82 Create account, 31 Hangouts, 91 Sign in, 32 Voice search, 92 Google Maps, 90 Google Play Find and install apps, 33 Help, 35 Store, 33 Google Play Music, 97 Google Search, 92 Google Voice Typing, 29, 120 GPS Satellites, 117 Hangouts, 91 Headset Connect, 105 Headset Jack, 3 Home Screen, 39 Add Folders, 44 Add Shortcuts, 44 Add Widgets, 4
Save a Phone Number, 61 Screen Lock, 119 Screen Rotation, 115 Screen Timeout, 115 SD card Format, 116 SD Card Mount, 116 Unmount, 116 Search Google, 92 Security Settings, 118 Settings, 108 Overview, 108 Setup Screens, 18 Slide, 16 Sound Settings, 113 Speaker, 3 Spread, 17 Status Bar, 41 Status Icons, 42 Stopwatch, 95 Storage Settings, 115 Swipe, 16 Swype, 27 Tap, 16 Text Editing, 30 Text Entry, 26 Text Messaging Conversations, 71 Draft messages, 70 Notifications, 71 Options, 73 Send messages, 66 Index Tex