Getting started – English quick guide VoiceLive 3
Important safety instructions 1 Before you begin 3 Introduction 5 Making connections Inputs Outputs 1. Vocals and guitar using guitar/headphone cable 2. Stereo vocal and stereo guitar (2 channels) 3. Stereo vocals and stereo guitar (4 channels) 4. Mono vocals and mono guitar (dual mono mode) 5. Stereo vocals and guitar amplifier 6. Mono vocals and guitar amplifier 7.
VoiceLive 3 Getting started – English quick guide 2 VoiceLive 3
Important safety instructions Important safety instructions 1. 2. 3. 4. 5. 6. 7. 8. 9. 10. 11. 12. 13. 14. Read these instructions. Keep these instructions. Heed all warnings. Follow all instructions. Do not use this apparatus near water. Clean only with a dry cloth. Do not block any ventilation openings. Install in accordance with the manufacturer’s instructions.
Important safety instructions EMC / EMI Electromagnetic compatibility / Electromagnetic interference This equipment has been tested and found to comply with the limits for a Class B digital device, pursuant to part 15 of the FCC rules. These limits are designed to provide reasonable protection against harmful interference in residential installations.
Before you begin Before you begin About the VoiceLive 3 quick guide VoiceSupport This quick guide will help you learn understanding and operating your VoiceLive 3. VoiceSupport is the application that allows you to fully unlock the potential of your TC-Helicon product and stay in touch with the latest news, tips and tricks. You can download the most current version of this quick guide from tc-helicon.
Before you begin Live 3 in a particular setup. This means the “what you hear” section in the lower right corner does not show guitar sounds coming from the PA – even though they might at a gig.
Introduction Introduction Thank you for purchasing VoiceLive 3! Your new Vocal, Guitar and Loop processor is quite an amazing piece of technology. With literally thousands of effect combinations and many versatile controls, you can completely customize your sound. VoiceLive 3 replaces stand-alone vocal processors, guitar multi effects units and phrase loopers – reducing your “gig weight” to what you can throw in a backpack.
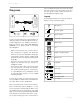
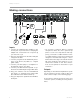
Making connections Making connections 4 SWITCH-3 2 3 6 7 5 1 Inputs 1. Connect the supplied power adapter to the 12 V DC jack of your VoiceLive 3 and plug the adapter into a wall outlet. Do not power up your VoiceLive 3 yet. 2. Plug your microphone into the MIC / LINE jack using an XLR cable. 3. Connect your guitar to the GUITAR IN jack using a ¼” Tip Sleeve (TS) cable (i.e., a regular guitar cable). 4. Connect your MP3 player or smartphone to the AUX jack using a 1/8” cable. 5.
Making connections 1. Vocals and guitar using guitar/headphone cable This setup utilizes the included guitar/headphone cable, which is perfect for personal monitoring in any setup. You will see that the two smaller ends of the cable are different. One end has a male headphone jack beside the guitar jack. Connect these to the GUITAR IN and HEADPHONE jacks. The other end plugs into your guitar and has a female jack for your headphones/in-ear monitors.
Making connections 2. Stereo vocal and stereo guitar (2 channels) This is a very common setup for both live performances with a stereo PA (double-check that the venue PA system is actually in stereo!) or for basic 2 channel recording.
Making connections 3. Stereo vocals and stereo guitar (4 channels) L R VoiceLive 3 features “jack sensing” on several inputs and outputs. With this connection setup, all guitar signals are removed from the XLR signal path when ¼” Guitar OUT connections are made. This gives you separate stereo channels for your vocals and guitar. This is a great setup for connecting to a 4 channel audio interface.
Making connections 4. Mono vocals and mono guitar (dual mono mode) If you are not using a guitar amplifier, this is a common connection setup for most live venues, since the PA is typically in mono. It also allows a sound tech to control the overall balance between your vocals and guitar. Output modes can be changed in the Setup/Output menu.
Making connections 5. Stereo vocals and guitar amplifier Keep in mind that your guitar amp may be miked and come out through the PA. That part of the signal flow isn’t shown in this setup example. Guitar output is automatically muted in the XLR signal path when a 1/4” guitar out connection is made.
Making connections 6. Mono vocals and guitar amplifier Keep in mind that your guitar amp may be miked and come out through the PA. That part of the signal flow isn’t shown in this setup example. Guitar output is automatically muted in the XLR signal path when a 1/4” guitar out connection is made.
Making connections 7. Stereo vocals and MIDI keyboard VoiceLive 3 is not a synthesizer and cannot convert MIDI note messages to audio. The MIDI connection is only used for NaturalPlay chord detection and other control data.
Let’s get going! Let’s get going! Make all connections as seen in “Making connections” (page 6). Before you power up VoiceLive 3, make sure that the amplifier or PA it is connected to is muted or turned all the way down! Press the POWER switch on the back of the unit. For additional information on input trim, please refer to your PA or mixer’s instruction manual. If you need a bit more guidance, check out this “Craig’s Corner” video explaining mixer setup: youtube.
Let’s get going! To browse presets, press the footswitches with the up and down arrows on the far left. Editing HIT settings is covered in the reference manual. Are we there yet? Frankly, we haven’t even started… Note which presets you enjoy the most – you can use them as a starting point for creating your own presets later. VoiceLive 3 for acoustic guitar players VoiceLive 3 comes with pristine reverbs, modulation effects, EQs and delays to make your acoustic guitar sound better than it ever has.
Technical specifications Technical specifications Inputs Voice connector Input impedance balanced Mic input level @ 0 dBFS Line input level @ 0 dBFS EIN @ max mic gain rg = 150 ohm Mic SNR Combo Balanced XLR/ Balanced TRS ¼”phone jack 3.