
User Manual


3 MIC MECHANIC 2 User Manual
1. Controls
(1) (2) (3)
(5)
(4)
(8)
(6)
(7)
(9) (10)(11)(12)
(1) ECHO knob selects the type and amount of echo e ect on your voice.
Adjusting the knob within your preferred echo style determines how loud
the echoes will be. Turning the knob fully counterclockwise turns the echo
e ect o . There are 3 types of echo available:
•
• Tape – simulates the warm sound of analog tape echo
•
• Digital – creates a pristine, exact replication of the original signal
•
• Slap – creates a single, quick echo e ect
(2) REVERB knob selects the type and amount of reverb e ect on your voice.
The 3 types of reverb appear in order from the smallest space (Room) to
the largest (Hall). Adjusting the knob within your preferred reverb space
determines how pronounced the e ect will be. Turning the knob fully
counterclockwise turns the reverb o .
(3) CORRECTION knob adjusts the amount of pitch correction. With the knob
at the center 12:00 position, the e ect will provide subtle pitch support
without noticeable or unnatural artifacts. Turn the knob all the way up for a
more aggressive e ect, or fully counterclockwise to turn the e ect o .
(4) BATTERY LED indicates the battery level, with green showing full life,
yellow being partial life, and red to alert that the batteries
should be changed.
(5) TONE button engages a preset combination of adaptive EQ, de-essing, and
noise gate. "Normal" and "Less Bright" settings can be toggled by holding
the Tone button and pressing the footswitch.
(6) ON/OFF LED lights when the e ect is engaged, and ashes in rhythm to the
delay tempo when using the tap tempo function.
(7) FOOTSWITCH bypasses the Reverb, Echo and Correction e ects, but does
not a ect the Tone status.
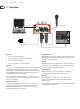
(8) USB input accepts a micro USB cable for connection to a computer.
Use the VoiceSupport application to install rmware updates, and for
other features depending on your product. Download VoiceSupport from
tc-helicon.com/products/voicesupport/
(9) ON/OFF switch powers the pedal on and o .
(10) POWER input accepts a 9V power cable (not included).
(11) OUT jack accepts a balanced XLR cable for connection to a mixer or
active speaker.
(12) MIC input jack accepts a balanced XLR cable to connect your microphone.