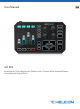
User Manual GO XLR Revolutionary Online Broadcaster Platform with 4-Channel Mixer, Motorized Faders, Sound Board and Vocal Effects
GO XLR User Manual Table of Contents Important Safety Instructions....................................... 3 Legal Disclaimer.............................................................. 3 Limited warranty............................................................. 3 1. PC Setup Guide........................................................... 4 2. Connection Diagram.................................................. 7 3. Setting Up Your Mic.................................................... 8 4.
Important Safety Instructions Terminals marked with this symbol carry electrical current of sufficient magnitude to constitute risk of electric shock. Use only high-quality professional speaker cables with ¼" TS or twist-locking plugs pre-installed. All other installation or modification should be performed only by qualified personnel.
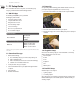
GO XLR User Manual 1. PC Setup Guide 1.3 Power Up This section will describe how to set up a basic one-PC streaming setup. To begin, you must first download the GO XLR app and driver. 1.1 GO XLR App The GO XLR app is REQUIRED to operate your GO XLR.
GO XLR User Manual 1.6 Why is a dual-PC setup special? First, understand that all audio processing is done inside GO XLR, and you end up with a USB audio stream called “Broadcast Mix.” This Broadcast Mix would normally go through a one-PC setup directly to OBS, XSplit or whatever livestreaming service you plan to use. However, with a dual-PC setup, you need to get that Broadcast Mix audio out of GO XLR and into your streaming computer.
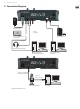
GO XLR User Manual 6. Plug a 3.5 mm stereo cable into the LINE OUT jack if you wish to route a stereo copy of your livestream out to other devices. In a dual-PC setup, you will want to connect the LINE OUT jack on GO XLR to the LINE IN jack on your streaming PC. 7. If you will be gaming on a Playstation† or Xbox‡, plug these gaming consoles into the OPTICAL output on the rear panel. * Yeti is a registered trademark of Blue Microphones.
GO XLR User Manual 2.
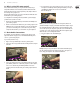
GO XLR User Manual 3. Setting Up Your Mic Once you have your microphone connected to GO XLR, you will need to go into the GO XLR app and set up the input levels and processing for your microphone. 4. While talking into the microphone at a regular level, watch the level in the Mic Meter. 3.1 Setting the Input Level After plugging your microphone into GO XLR, you will first need to set the input level by following these instructions: 1. Go to the System tab in the lower half of the GO XLR app window. 5.
GO XLR User Manual 2. Raise or lower the Bass and Treble controls in the Equalizer section to adjust the basic equalization of your vocal. Raise the Bass control to add thickness, or reduce the control to thin out your vocal sound. Raise the Treble control to add brightness, or reduce the control to remove a harsh or tinny sound. 4. Adjust the Gate setting if you wish to screen out ambient background noise in your room.
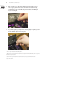
GO XLR User Manual 3.3.2 Compressor 3.3.3 Gate Compressor with expanded controls Compressors even out sounds by reducing the loud portions and increasing the quiet parts, i.e., they “squish” or compress the sound into a more narrow dynamic range. Compression is extremely important to voice professionals, such as radio DJs and voiceover artists, so your livestream broadcast will sound more professional.
GO XLR User Manual 4. Understanding Audio Channels Instead of showing up in your computer’s operating system as a single device with multiple inputs and outputs, GO XLR shows up in your computer as several different audio sub-devices dedicated to different elements of your overall livestream. 4.1 Sound>Playback Tab These different sub-devices will each appear separately in your PC’s Sound>Playback tab: 4.
GO XLR User Manual 4.4 Audio devices and GO XLR Once each of these sub-devices has been set up and assigned to a GO XLR slider, each slider on GO XLR can independently control its assigned audio device. Each slider may then be used to adjust that device’s volume within the final livestream stereo mix.
GO XLR User Manual 3. Right-click on your designated Default Device. 4. Choose the Properties option from the pop-up menu. 5. Choose the “Listen” tab in the Properties pop-up window. 6. Find the “Listen to this device” option. 7. Make sure “Listen to this device” is UN-CHECKED.
GO XLR User Manual 5. App Basics • Samples Tab—This tab is where you manage samples. Any samples you have recorded “in the box” will live in this tab, and all sample will appear time-stamped and dated, so you know when you created a sample. These dated samples can be re-named later. This tab also has a file management option so you can look through other folders and locations to find and pull in samples created elsewhere. • Presets Tab—This area handles presets for your vocal effects section.
GO XLR User Manual 5.3 Live View • Effects—Shows effects and settings assigned to the knobs and buttons in the Effects section, as well as color customization for these controls. • Sampler—Shows settings and sample assignments for each button in the Sampler section, as well as controls for color customization. The Samples tab in the upper left will automatically open when you open this section. You can use this section to record, manipulate and assign samples to your desired controls.
GO XLR User Manual 6. Navigating the Mixer Tab The Mixer Tab is where you assign devices to the four hardware faders, designate what will appear on the slider screens and work with the Mute buttons. Mixer tab The Mixer Tab has two main sub-sections, the Settings tab and the Lighting tab.
GO XLR User Manual 6.2 Setting Mix Levels for Additional Devices Even though you only have four hardware faders, you may have additional devices that also need to be mixed into your livestream. To control and mix these additional devices, go to the Mixer box next to the Mute box. In the Mixer box, you will find virtual faders for every available device, assigned and unassigned, including the devices already assigned to the hardware faders. 7.
GO XLR User Manual 6. Set the Output Volume to 100%, which is located a little over halfway toward the right end of the Output Volume slider. Avoid going beyond 100% to avoid an unwanted volume boost. 10. Switch on “Enable Quality of Service High Packet Priority.” 11. Switch on “Show a warning when Discord is not detecting audio from your mic.” 7. Under Input Mode, you may select either “Voice Activity” or “Push to Talk,” depending on your preferences.
GO XLR User Manual 8. Assigning Apps without an Output to a Fader In the “Understanding Audio Channels” chapter on pg.X, we described how to assign audio devices in your PC’s operating system to channel faders on GO XLR. This assignment method works well when your video game has the ability to choose an existing GO XLR audio input. For example, the Hardware window for this game has a built-in option to choose a “Sound Output” device: 8.
GO XLR User Manual Spotify audio level can now be adjusted and mixed separately. 6. Your Chrome tab should now be visible in the list of programs running audio. (If you do not see your Chrome tab listed, go back and momentarily play some audio from the YouTube video in the Chrome tab. This quick playback should cause Windows to detect your Chrome tab and place it in the list.) Checking the Music fader You may repeat this process for any game or even for your web browsers. 7.
GO XLR User Manual 9. Setting Up GO XLR with XSplit /OBS 5. Click “OK” to exit the Settings window. This section will show you how to set up audio for OBS (Open Broadcaster Software) and XSplit. Both programs are very similar, so these instructions for XSplit should also work for OBS. 9.1 Setup Recommendations Open up XSplit and follow these setup instructions: 1. Click on the Tools pulldown menu and select “Settings” to open the Settings window. 6.
GO XLR User Manual 4. Select “Delay (ms)” by clicking on the selection box. 5. Use the selector box immediately to the right to add several milliseconds of delay to the audio stream. Begin with about 10 ms of audio delay and gradually add more delay as needed. 10. Sampler Basics The GO XLR sampler has three banks of samples (A, B and C). Each bank can contain up to four samples (one for each of the Sample Pads on the GO XLR unit).
GO XLR User Manual 10.2 Working with the Sampler Tab The Sampler tab can be found in the Control Tabs section located in the bottom half of the GO XLR app window on your computer. Within the Sampler tab, the Settings window shows controls for the sample banks on the left, along with playback options. The Sampler section to the right shows the filename and waveform for the currently-selected Sample Pad, along with some basic editing tools so you can trim the length of the sample as needed.
GO XLR User Manual Click on the folder icon in the upper left of the Samples tab to open the file browser. Then, within the file browser, you can create new folders to organize your samples, e.g., “All Rick & Morty Samples” or “Samples I Made with Friends”. 4. Drag the sample down from the Samples tab to the Sample section in the lower right of the screen. Samples tab file browser 5.
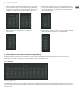
GO XLR User Manual 11. Global, FX & Sampler Lighting The GO XLR app gives you detailed custom control over the color and appearance of the GO XLR panel. You can assign colors for different functions and states, such as whether a Sample Pad has a sample loaded, is actively playing back, is stopped, and so on.
GO XLR User Manual The Bleep and Cough sections will also allow you to customize a Color 2 to represent the “off” state for those buttons. By default, the Off Option will be Dim Color 1, but you can easily select the Color 2 or Dim Color 2 options. Cough button color assignments 11.2 Assigning Custom Sampler Colors 11.3 Apply To All To begin assigning custom colors for Sampler buttons, go to the Sampler tab in the lower set of Control Tabs.
GO XLR User Manual 11.4 Assigning Custom Colors for Effects Similarly, you may also assign custom colors to the buttons and knobs in the GO XLR Effects section, with separate sets of color options for Presets, Encoders and buttons for Effects, including the Megaphone, Robot, Hardtune and FX buttons. Effects lighting options Each section also has the “Apply To All” option available if you want identical color schemes for all Presets buttons or for all encoder knobs. 11.
GO XLR User Manual 12. Specification Analog Connections XLR In Phantom power Line In Mic Phones Line Out 1 x XLR, balanced +48 V, switchable via control app 1 x 1/8" TRS, stereo 1 x 1/8" TRS, biased for computer microphone input 1 x 1/8" TRS, stereo 1 x 1/8" TRS, stereo Digital Connections USB Optical 1 x USB 2.
GO XLR User Manual FEDERAL COMMUNICATIONS COMMISSION COMPLIANCE INFORMATION GO XLR Responsible Party Name: Music Tribe Brands UK Ltd. Address: Klark Industrial Park, Walter Nash Road, Kidderminster, Worcestershire, DY11 7HJ United Kingdom Phone Number: +44 1562 732290 GO XLR complies with the FCC rules as mentioned in the following paragraph: This equipment has been tested and found to comply with the limits for a Class A digital device, pursuant to Part 15 of the FCC Rules.