
Manual
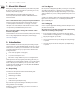
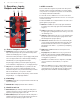


Table Of Contents

3. Operation – Inputs,
Outputs and Controls
3.1 Power / Computer connection
(1) POWER input To power up your pedal, connect a power supply to its power
input socket. The power input socket of your TCElectronic eect pedal is a
standard 5.5/2.1 mm DC plug (centre = negative).
Your TCElectronic eect pedal requires a 9 V power supply providing 100 mA
or more (not supplied). TCElectronic recommends using the PowerPlug 9.
To minimize hum, use a power supply with isolated outputs.
If no power supply is available, you can run this product using a battery.
For more information on changing batteries, see “6.2 Changing the battery”.
(2) USB port Use the standard Mini-B USB port on your TCElectronic eect
pedal to connect your pedal to a computer. This will allow you to load
TonePrints into the pedal or create your own TonePrint using TC’s TonePrint
Editor. For more information, see “4. Operation – TonePrint”.
If there should be rmware updates for this pedal, they can also be installed
using the USB port – see “6.1 Updating the rmware”.
3.2 Switching
(3) FOOTSWITCH To turn the eect on, tap the footswitch. To turn the eect o,
tap the footswitch again.
(4) INDICATOR LED The LED lights up when the eect is switched on.
3.3 Audio in and out
(5) AUDIO INPUT (mono) The audio input on the right side of this pedal is a
standard ⁄" jack (mono/TS). Connect your guitar to the audio input on the
right side of your pedal using a regular ⁄" mono cable.
(6) AUDIO OUTPUT (mono) The audio output on the left side of this pedal is a
standard ⁄" jack (mono/TS). Connect the audio output of your pedal to the
next device in the signal chain using a regular ⁄" mono cable.
3.4 Eect controls
Please note that the knob assignments on your TC Electronic eect pedal are
the default assignments. Using the TonePrint Editor, you can rewire all knobs
so they control one or several parameters of your choice. For more information,
see “4.3 Editing TonePrints with TonePrint Editor”.
An octaver adds one or more additional voices one or more octaves above or
below the original signal. Sub’n’Up features three extra voices: one octave up and
one and two octaves below.
Use SUB ’N’ UP OCTAVER’s controls to adjust how much of each of three octave’s
you want applied to your guitar signal.
(7) DRY knob Use the DRY knob to set the level dry signal. Crank this knob
if you want the same amount of dry signal as when SUB ’N’ UP OCTAVER
is bypassed.
(8) UP knob The UP knob allows you to blend in an extra voice an octave above
the original signal. Try cranking this knob in classic mode to get some cool ol’
school Hendrix-type tones.
(9) SUB knob The SUB knob adds an extra voice one octave below the original
dry signal. This can be used to fatten up ris or getting fake bass sounds
when backing down the dry signal completely.
(10) SUB 2 knob The SUB2 knob adds an extra voice an earth-shattering two
octaves below the original signal. Experimental bass players like to crank
this knob with all the other controls at zero for a cool synth-like eect
when playing above the 12th fret… or go down low to potentially bring
down the P.A.!
(11) MODE selector The MODE switch alters the circuit operation to suit
dierent situations:
• • Poly (Polyphonic) Set the MODE selector to “Poly” to get the latest in
polyphonic octaving. In this mode SUB ’N’ UP OCTAVER will handle even
the most complex jazz chords and give all sorts of cool sounds from fake
12-string guitar to organ-like tones.
• • TonePrint To use TonePrint-based Octave congurations, set the MODE
selector to “TonePrint”. For more information, see “4. Operation –
TonePrint”.
• • Classic Set the MODE selector to “Classic” to jump straight into those old-
school octave tones of yesteryear. With this setting, you get all the warm,
organic imperfections associated with classic analog stompbox octaving.
Playing chords in this mode will lead to weird and beautiful glitches.
(1)(2) (11)
(2)
(4)
(6)
(9)
(7)
(10)
(8)
(6)
5 SUB ’N’ UP OCTAVER User Manual