Studio Konnekt 48 User’s Manual English Version
IMPORTANT SAFETY INSTRUCTIONS The lightning flash with an arrowhead symbol within an equilateral triangle is intended to alert the user to the presence of uninsulated “dangerous voltage” within the product's enclosure that may be of sufficient magnitude to constitute a risk of electric shock to persons. 1 2 3 4 5 6 7 8 9 10 11 12 13 14 Read these instructions. Keep these instructions. Heed all warnings. Follow all instructions. Do not use this apparatus near water. Clean only with dry cloth.
EMC / EMI & CERTIFICATE OF CONFORMITY EMC/EMI This equipment has been tested and found to comply with the limits for a Class B Digital device, pursuant to part 15 of the FCC rules. These limits are designed to provide reasonable protection against harmful interference in residential installations. This equipment generates, uses and can radiate radio frequency energy and, if not installed and used in accordance with the instructions, may cause harmful interference to radio communications.
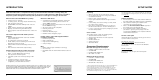
INTRODUCTION SETUP NOTES Studio Konnekt 48 offers a comprehensive array of professional features that make recording, mixing and monitoring a breeze. All essential recording tools are in one box including world-class DSP effects, a wealth of I/O options, speaker management and many other powerful tools to take your recordings to the next level.
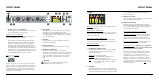
FRONT PANEL FRONT PANEL 6 channel 1 preamp channel 2 preamp OFF -20dB TM -20dB max gain trim TM -20dB max gain trim TM phones 2 master level ADAT SPDIF 1-8 1-2 -20dB TOS 1-2 3-4 MIDI IN OUT PAD min mic/inst input IMPACT II technology phones 1 OFF PAD min mic/inst input IMPACT II technology channel 4 preamp OFF PAD min mic/inst input IMPACT II technology channel 3 preamp OFF PAD max gain trim min mic/inst input TM IMPACT II technology max gain trim 1 (ch3-4) (ch11
REAR PANEL REAR PANEL 9 CAUTION in 100-240VAC~ 50-60Hz, 25W WCK out in spdif out WARNING SERIAL NO. in opto out tos 3-4 RISK OF ELECTRIC SHOCK DO NOT OPEN MIDI input main stereo outputs IN output adat 96k TO REDUCE THE RISK OF FIRE OR ELECTRIC SHOCK DO NOT EXPOSE THIS EQUIPMENT TO RAIN OR MOISTURE AVIS: RISQUE DE CHOC ELECTRIQUE-NE PAS OUVRIR.
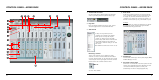
CONTROL PANEL - MIXER PAGE CONTROL PANEL - MIXER PAGE 1 The Konnekt select tabs Use the select tabs to switch between the Konnekt units in your setup and the System Settings page. 2 Page tabs Press to navigate between the mixer, setup, effects and tuner pages for the selected Konnekt unit.
CONTROL PANEL - MIXER PAGE These are the options Nothing connected 7 Mic/XLR Inst./jack Channel name - editable This is the name of the mixer channel. Click once on the name using the mouse to edit the name. All Channels 8 9 Input Level meters & +4 dBu/-10 dBv sensitivity The meters indicate the level of the signal present on the input channels. Best signal to noise ratio is achieved when the input signal only occasionally peaks at “0”.
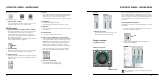
CONTROL PANEL - MIXER PAGE Let us take a closer look at the Talkback mixer-channel Channel naming and channel input metering is described previously. CONTROL PANEL - MIXER PAGE Click the “L” on the channels you want to feed to the outputs when talkback is active. Notice that the listen-back function overrides the dim function in order to be able to communicate with the recording musicians.
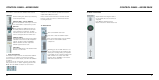
SETUP PAGE SETUP PAGE Input section Overview of the input channels. Idle inputs are grayed out. If a device is connected to an input the icon will display this. Example: Nothing connected 1 XLR device connected Mic Ch1-4 Channels 1-4 connections on the front panel are autosensing. They automatically detect whether you have connected an XLR (microphone) or 1/4” jack (instrument), and display this graphically.
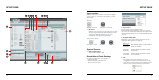
SETUP PAGE Routing Channels to Outputs Introduction - basics The main purpose of the output section is routing of the physical, DAW and FireWire input channels to the physical outputs. Starting from left going to right we have the: - the Source select that allows you to select the input you intend to route SETUP PAGE 6 Link button This button allows you to link/unlink channel pairs. DAW In this section you route the outputs of your DAW.
SETUP PAGE SETUP PAGE outputs. 10 Speaker sets The speaker sets can be labeled individually. Simply click in the text field and enter a name of your choice. Example: Without Bass Management Example: With Bass Management 11 Trim Range: -20 dB to 0 dB Individual trim levels for each channel. 12 DLY Range: 0 to 30 ms Perfect listening conditions and placement of speakers according to an ITU 775 circle are not always possible. This delay parameter allows for individual alignment of speakers.
SETUP EXAMPLES - STUDIO RECORDING & MONITORING SETUP EXAMPLES - STUDIO RECORDING & MONITORING 5.1 SPEAKER SET - ACTIVE L C R SUB MAIN SPEAKERS - ACTIVE LS RS Features used in this setup: • 4 mic preamps and 4 line inputs for instruments and microphones • Easy switching between three sets of speakers including a 5.
SETUP EXAMPLES - BASS MANAGEMENT & INTEGRATION ACTIVE SPEAKERS RIGHT LEFT SETUP EXAMPLES - BASS MANAGEMENT & INTEGRATION Features in this setup • One stereo set of active speakers and one active Sub. The sub is fed with both the LFE channel signal and lo-freq signal from the main channels via bass management.
INTEGRATOR The Integrator plug-in for Studio Konnekt 48 makes integration of external hardware into your DAW environment seamless. Integrator offers a “plug-in” audio routing representation of your external digital effects processors and operates as a normal VST/AU plug-in. The Integrator plug-in can be inserted on any track, utilizing external effects as send or insert effects on any track or bus in your host application.
INTEGRATOR KONNEKT WDM DRIVER Integrating external hardware with your DAW WDM handling (Windows only) Let us take at closer look at the integration of the Reverb 4000 from the setup example on page 24. WDM is Windows' audio driver system, and is used for Windows sounds, media player and other applications that don't support ASIO. An application such as PowerDVD also uses WDM as audio driver system.
SYSTEM SETTINGS SYSTEM SETTINGS Access the System Settings page by pressing the System Settings tab: 4 In a digital setup, it is important that all connected devices run at the same sample rate. The Clock Master device defines this sample rate, and distributes a digital clock based on this sample rate to all devices in the setup. There can be one, and only one clock master in a digital setup, and you cannot select your computer here; the clock master device is always your audio interface.
SYSTEM SETTINGS Again we have to stress that not only does Studio Konnekt 48 provide a high quality clock but it also facilitates excellent jitter-elimination that will clean up a less than perfect digital signal from an external source such as a CD player. • • The CD player is connected to “SK48 No1” via Toslink (optical S/PDIF). “SK48 No1” is selected as Clock Master on the System Settings page and Sync Source is set to Optical S/PDIF.
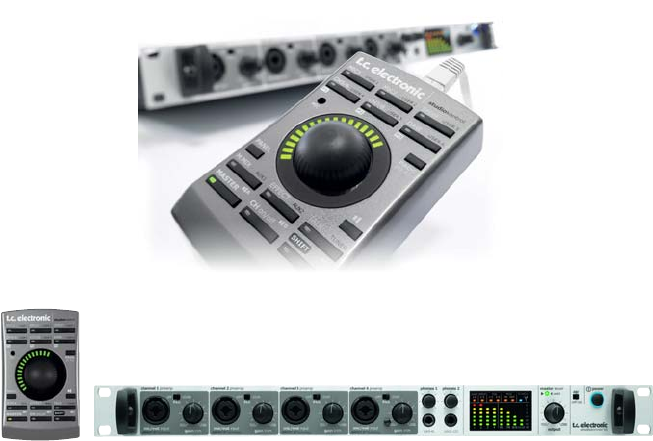
STUDIO KONTROL (OPTIONAL) STUDIO KONTROL Via the drop down menu you can assign the channel to any of the 6 user buttons. To access assigned channels simply press SHIFT followed by the button you have assigned the channel to. The optional Studio Kontrol is a highly flexible remote giving access to numerous key functions, even from a distance.
STUDIO KONTROL 9 STUDIO CONTROL ENCODER and LIGHTRING The encoder is used to change values for the selected parameter or function. The encoder and lightring have various secondary functions when pressed once. Dim function: Master, aux 1 , aux 2 and Main mix can have can have an individual dimmed level setting. Press the encoder to go to dimmed mode and once more to exit. Dim mode is also indicated on the lightring. See illustration below.
STUDIO CONTROL REMOTE PAGE The Remote page handles various options for the Studio Kontrol. STUDIO CONTROL REMOTE PAGE LEVEL knob - Mix push mode EFFECT button Via the drop-down menu the EFFECT button can be set in two modes. Reverb Time/Decay or MIDI MIDI Fallback to master REVERB TIME/DECAY When the REVERB TIME/DECAY option is selected you can control each of these parameters by turning the big encoder. To alternate between Reverb Time and Reverb Decay level simply click once on the encoder.
FABRIK C STUDIO Introduction FABRIK C Overview Fabrik C Studio is based on the innovative Meta Intuitive Navigation Technology (MINT™) that redefines the way you use professional audio plug-ins for professional results. We have integrated a simple yet highly effective and intuitive approach to working with audio, and the result is a user-interface with few handles that are effective but simple to use.
FABRIK C STUDIO the overtones intact. 3-band compression on grouped sources If you have grouped several sources and want to do a “global” compression on this section, the 3-band mode can be very effective. It will give you more transparency in your overall mix as you can apply independent compression to each of the three frequency bands.
FABRIK C STUDIO FABRIK C STUDIO EQ section Filter types The Fabrik C Studio EQ section is a 4-band parametric EQ with four selectable filter types: Notch, Parametric, Shelving and Cut. If you’re looking for a razor sharp filter, use the Notch filter that has a lower limit as low as 0.01 octaves. For a more gentle approach the shelving filter with a variable slope is a better choice. Cut filters can be switched between a 12dB/oct maximum flat amplitude (Butterworth) and a flat group delay type (Bessel).
FABRIK C STUDIO Type Range for the Notch filter: Lo Gain : -inf; -97 Mid1 Gain : -inf; -97 Mid2 Gain : -inf; -97 Hi Gain : -inf; -97 FABRIK C STUDIO Freq dB dB dB dB to to to to 0 0 0 0 dB dB dB dB Range Range Range Range - Lo band Mid1 band Mid2 band Hi band : : : : 20 20 20 20 Hz Hz Hz Hz to to to to 20 20 20 40 kHz kHz kHz kHz Source selection Compression - via the drop down menu 3-band and Full-band modes Gain page Gain Range for the Notch filter: Lo BW : 0.01 oct Mid1 BW : 0.
FABRIK C STUDIO FABRIK C STUDIO Compression Compression Compression 3-band mode only Compressor Control page 3-band mode only Level page - Full-band mode The Compressor is in Full-band mode when “3-band” is not marked. In 3-band mode the Compression Control COMP and the Level Control LEVEL handle the distribution of compression and level between the 3 bands. In Full-band mode these controls are redundant and not available. In Full-band mode only Source and GAIN apply.
FABRIK C STUDIO The Limiter FABRIK C STUDIO Routing modes Two routing modes can be selected via the Routing mode drop-down menu. Fabrik C Studio also holds a Limiter. The Limiter is used to prevent overloads occurring at extreme and occasional peaks in the source material - peaks that may not be caught and attenuated sufficiently by the Compressor. Where the Limiter can be used to limit the extremes, the Compressor can be used to apply a much more “musical” and gentle compression.
FABRIK R STUDIO FABRIK R STUDIO Introduction Reverb Types Fabrik R Studio is based on the innovative Meta Intuitive Navigation Technology (MINT™) that redefines the way you use professional audio plug-ins for professional results. Fabrik R Studio combines nine TC Reverb algorithms in one single plug-in. Thanks to MINT™, it is a breeze to find the sound you are looking for. If you want to apply a “live” vibe to your vocals or instruments, use the Live Reverb.
FABRIK R STUDIO FABRIK R STUDIO Tweak section Meters In this section, all parameter adjustments are made. Parameters are organized in 4 different layers/pages. The list below shows the exact distribution of value readings on the meter segments on both IN and OUT meters. A precise reading close to 0dBFS and around key values such as -18, -20 and -24 dBFS is imperative and this distribution takes these key values into consideration.
FABRIK R STUDIO Color page FABRIK R STUDIO Level page Additional parameters Routing modes Bypass Bypass function for the entire plug-in. Two routing modes can be selected via the Routing mode drop-down menu. In/Out In level Range Out level Range : -24 to 0 dB : -24 to +12 dB Sets the Input/Output levels for the algorithm. If the Internal overload indicators “O/L” are lit, you may need to readjust the In/Out levels. Meters In and output meters.
PRESET HANDLING: FABRIK C & FABRIK R Preset Handling The comprehensive file-based preset architecture makes storing presets a simple process. Presets are saved as discrete files on your hard drive. Once a preset is saved on the default location, it automatically appears in the “File” menu. Preset File Menu Pressing the File button will open the File menu. The File menu allows you to load or save into the currently selected program. P1, P2 and P3. The following options are available from the File menu.
RESONANCE FILTER Studio Konnekt 48 comes with ResFilter, a plug-in that offers state-of-the-art filtering effects. Throw in resonance, 6, 12 and 24 dB slopes for even more stunning sounds. Its inter-communication-bus facilitates controlling and tweaking multiple plug-ins and parameters from one plug-in, cross-fading between two instances of the plug-ins etc. Basic operation The ResFilter integrates as a pure VST/AU filter and does therefore NOT open from the TC Near control panel like the Fabrik plug-ins.
RESONANCE FILTER Communication Using the communication section, it is possible to send and receive parameter movements between instances of the plug-in. In other words, a parameter on one instance of the plug-in can control an unlimited amount of parameters in other instances of the plug-in. Communication is not limited to each of the parameter types, but works very fine across parameter types. For example, the Cutoff parameter of one instance can control the output level of another instance.
TUNER Studio Konnekt 48 holds an excellent tuner with various modes for stringed instruments. The Tuner page holds all relevant parameters as well as the tuner display. It is also possible to have Tuner indication via the lightring on the Konnekt unit. This is excellent for stand-alone applications. TUNER 3 Mode selector Click to switch between Strobe and normal mode. Strobe mode: Sections of three red LEDs will slide left, when the played note is too low, and right when it is too high.
APPENDIX - ASIO CHANNEL NAMES STUDIO KONNEKT 48 - SIGNAL FLOW This page describes how the Konnekt ASIO channels distribute according to the selected sample rate. 176.4 kHz,..,192 kHz: quadro (high) rate 44.1 kHz,..
APPENDIX - FAQ APPENDIX - DICE BACKGROUND TC Near prevents computer standby mode Before setting your computer in standby mode the TC Near control panel must be shut down. Computers handle standby mode and hibernation in different ways. To prevent instability on the audio interface after the computer is turned back on, the TC Near control panel must be closed. Most likely you will also need to close you host application (Cubase or Logic or ...
TECHNICAL SPECIFICATIONS Digital Inputs and Outputs Connector (S/PDIF): Formats (S/PDIF and TosLink): Connector (ADAT® or TosLink): Format (ADAT®): Connector (Word Clock IO): FireWire (format): FireWire (channels): Digital IO Engine: Clock and Jitter Internal Sample Rates: Internal Clock Precision: External Sample Rates: Jitter Rejection Engine: Jitter Rejection Filter: DIO Interface Jitter: AD/DA Conversion Jitter: Digital Output Phase (stand alone and across network): Input Slip Sample Tolerance (all DIs)