
Installation Instructions


ID_20201110_EN_FIBERFLOOR
Page 5 of 6
© 2020 Tarkett USA Inc. 11/2020
FOR PERMANENT BOND METHOD:
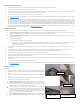
a. Fold or tube larger, main piece of flooring back to the half-way point of room, and remove fill piece from area.
b. In an area starting from the closest wall to the seam to about 1’ out from the seam, apply Q-Bond One or 959 Vinyl and Plank adhesive with
a 1/32" deep x 1/16" wide x 1/32" apart notched trowel evenly over the entire exposed substrate and S-860 seam tape.
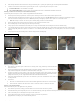
c. Remove release liner from seam tape, being careful not to disturb the applied adhesive.
d. Finish applying the adhesive onto the rest of the exposed subfloor.
e. Allow the adhesive to reach a semi-wet state with adhesive transfer to the finger with a light touch.
f. Carefully walk or roll the larger, main piece of flooring into the adhesive.
g. Place the fill piece into the adhesive.
h. Realign Match Marks on the surface of the vinyl so that the seam is back in its original position. Once aligned, remove the Match Marks with
a pencil eraser as the lead can contaminate the seam sealer.
i. Fold or tube the remaining un-adhered half of the flooring back to the half-way point of the room.
j. Repeat steps d. and e. above to complete adhesive application and laying the remaining flooring in.
FOR RELEASABLE BOND METHOD:
a. Fold or tube larger, main piece of flooring back to the half-way point of the room, and remove fill piece from the area.
b. In an area starting from the closest wall to the seam to about 1’ out from the seam, apply Q-Bond One adhesive evenly using a medium nap
paint roller designed for smooth surfaces over the exposed substrate and S-860 seam tape.
c. Remove release liner from seam tape, being careful not to disturb the applied adhesive.
d. Finish applying the adhesive onto the rest of the exposed subfloor.
e. Allow adhesive to dry until tacky to the touch, but does not transfer to the fingers. Dry time will vary depending on the porosity of the substrate,
temperature and humidity. Flooring must be placed into adhesive within one hour of becoming tacky. Do not walk on applied adhesive as this
can deaden the bond. Avoid trapping air beneath the sheet.
f. Carefully position larger, main piece of flooring so that it aligns with the center of the S-860 seam tape. NOTE: While the Q-Bond is
releasable, the dry-set application will grab the material and require full removal to reposition.
g. Place the fill piece into the adhesive.
h. Confirm Match Marks on the surface of the vinyl are aligned. If they are not aligned, the fill piece will need to be fully removed and repositioned
before laying back into the adhesive. Once aligned, remove the Match Marks with a pencil eraser as the lead can contaminate the seam
sealer.
i. Fold or tube remaining un-adhered half of the flooring back to the half-way point of the room.
j. Repeat adhesive application from steps b. and d. above for the remainder of the substrate.
k. Carefully walk the flooring into the adhesive.
6. Roll flooring with a minimum75 lb. (34 kg) sectional floor roller.
7. Seal seams.
a. All seams on Tarkett FiberFloor must be sealed. Detailed application instructions are in the DT-65 kit.
b. TARKETT DT-65 SEAM SEALER – For use on all products with low gloss vinyl or urethane finish.
c. Seal seams with Tarkett DT-65 Seam Sealer. Protect seam from traffic for a minimum of 8 hours.
Permanent Bond Method with no seams
1. Fold or tube one half of flooring back to the half-way point of room.
2. Starting from the wall and working to the halfway point, apply Q-Bond One or 959 Vinyl and Plank adhesive with a 1/32" deep x 1/16" wide x 1/32"
apart notched trowel evenly over the entire exposed substrate.
3. Allow the adhesive to reach a semi-wet state with adhesive transfer to the finger with a light touch.
4. Carefully walk or roll the flooring into the adhesive.
5. Fold or tube the remaining un-adhered half of the flooring back to the half-way point of the room.
6. Repeat steps 2 through 4 above to complete adhesive application and laying the remaining flooring.
7. Roll flooring with a minimum 75 lb. (34 kg) sectional floor roller.
Releasable Bond Method with no seams
1. Fold or tube half of flooring back to the half-way point of the room.
2. Starting from the wall and working to the halfway point, apply Q-Bond One adhesive evenly using a medium nap paint roller designed for smooth
surfaces over the exposed substrate and S-860 seam tape.
3. Allow adhesive to dry until tacky to the touch, but does not transfer to the fingers. Dry time will vary depending on the porosity of the substrate,
temperature and humidity. Flooring must be placed into adhesive within one hour of becoming tacky. Do not walk on applied adhesive as this can
deaden the bond.
4. Carefully walk or roll the flooring into the adhesive. Avoid trapping air beneath the sheet. NOTE: While the Q-Bond is releasable, the dry-set
application will grab the material and require full removal to reposition.
5. Fold or tube remaining un-adhered half of the flooring back to the half-way point of the room.
6. Repeat adhesive application from steps 2 through 4 above for the remainder of the substrate.
7. Roll the flooring with a minimum 75 lb (34 kg) sectional floor roller.