
Installation Instructions


ID_20201110_EN_FIBERFLOOR
Page 4 of 6
© 2020 Tarkett USA Inc. 11/2020
6. Slide flooring underneath the undercut door casings, maintaining the ¼” spacing for expansion gap on Floating Method installations.
7. Continue to the Double Cut Procedure if your flooring has a seam. If your flooring does not require a seam:
FLOATING METHOD: Your installation is complete.
FULL SPREAD METHODS: Continue below to the applicable Permanent or Releasable Installation Instructions.
Seaming – Double Cut Procedure (For All Installation Methods)
If your flooring does not require a seam, continue to applicable bond method below.
1. After first piece of flooring is positioned, cut second piece of flooring. Be sure to allow extra material for pattern match.
2. Overlap seam edges and obtain exact pattern match. An exact pattern match on a Do Not Reverse pattern is achieved by overlapping a Square
and a Circle from the selvedge mark, and on a Reverse pattern by overlapping a Square with a Square or a Circle with a Circle.
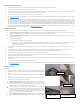
PRO TIP: Cutting a “window” out of the top sheet will help align grout lines or board markings.
3. After exact pattern match to the first cheet is achieved, cut the second sheet to fit the room.
4. Place masking tape at seam overlap to prevent flooring from moving.
5. Using a pencil, create a Match Mark across both pieces of vinyl. This mark will be used to realign the sheets after double cutting.
6. Lay a straight edge along center of seam overlap or grout line. Using the straight edge as a guide, double cut through both sheets of flooring with
a sharp, sturdy utility knife held to produce a vertical cut. Do not tilt knife blade. When installing over an existing floor, do not cut into the existing
flooring.
7. Lift top edge of flooring and carefully remove bottom salvage and the masking tape.
Seaming – Floating Method:
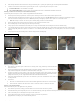
1. After double-cut procedure, place Tarkett S-875™ Floating Seam Tape, positioning it centered under both
sides of the sheet..
2. Remove the release liner from the side with the larger, main piece of flooring, pulling it down and away at a 45˚
angle. Roll the flooring with a hand roller to ensure bond with the seam tape.
3. Position your fill piece over the portion of the seam tape that still has release liner. Realign your Match
Marks to ensure the sheets are back in position. Remove the remaining release liner with the same motion,
pulling down and away at a 45˚ angle. Roll the seam with a hand roller to ensure bond.
4. Remove the Match Marks with a pencil eraser. The lead from a pencil can contaminate the seam sealer if
not fully removed.
5. Seal seams.
a. All seams on Tarkett FiberFloor must be sealed. Detailed application instructions are in the DT-65 kit.
b. Seal seams with Tarkett DT-65 Seam Sealer. Protect seam from traffic for a minimum of 8 hours.
Seaming – Full Spread Methods
Seams are double-cut prior to the application of any adhesive.
1. After double-cut procedure, realign your Match Marks to ensure the sheets are back in position.
2. Mark substrate along seam edge with pencil. Do not contaminate flooring seam edge with the lead in the pencil as it can contaminate seam sealer.
3. Fold or tube both pieces of flooring back to expose entire seam area.
4. Apply Tarkett S-860 Seam Tape to the substrate, so that it is centered over pencil line.
5. Apply adhesive according to your selected bonding method:
Double Cut Procedure
“Window” cut on top sheet