
Installation Instructions


INSTALLATION INSTRUCTIONS
FIBERFLOOR
®
ID_20190628_EN_FIBERFLOOR_SHEET
INSTALLATION
FLOATING INSTALLATION SYSTEM
1) Measure the room and precut the flooring allowing 3” extra material for trimming.
a) Unroll the flooring and position in the room so the pattern is aligned squarely with
walls.
b) Allow flooring to relax for 20 minutes. Material shall be lying completely flat before
fitting.
c) undercut doorway jams and casings the thickness of the flooring
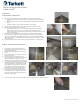
2) Using a sharp, sturdy utility knife, make relief cuts at inside and outside corners.
3) Trim the flooring around the edges of the room.
a) When fitting flooring, leave a 1/4” space between flooring and all verticals (i.e.
walls, cabinets, pipes, etc.). Leave a 1/2” gap for floors installed over wood
substrates that have a potential of being exposed to high moisture levels (i.e. crawl
spaces, mobile homes)
4) When installing in a full bathroom, the flooring may be fit net against the bathtub or
shower stall. Apply S 860 Seam Tape along the front of the tub or stall. Remove the
release liner and fit the flooring against the tub or stall. The remaining walls and toilet
flange must have the 1/4" space between the flooring. Apply a bead of silicone caulking
in front of bathtub.
5) Slide flooring underneath the undercut door casings, maintain the ¼” expansion gap.
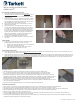
SEAMING – FLOATING INSTALLATION SYSTEM
1) After first piece of flooring is positioned, cut
second piece of flooring. Be sure to allow extra
material for pattern match.
2) Overlap seam edges and obtain exact pattern
match.
3) Place masking tape at seam overlap to prevent
flooring from moving.
4) After second piece of flooring has been fit,
remove masking tape from seam area. Mark the
substrate along factory edge with a pencil.
Realign the match and replace the masking tape.
5) Lay a straight edge along center of seam overlap
or grout line. Using the straight edge as a guide,
cut through both sheets of flooring with a sharp,
sturdy utility knife held to produce a vertical cut.
Do not tilt knife blade. When installing over an
existing floor, do not cut into the existing floor.
6) Lift top edge of flooring and carefully remove
bottom salvage and the masking tape. Place S-
875, floating seam tape, position the S-875 and
remove the release liners, position flooring and
roll seam area thoroughly.
7) Seal seams with Tarkett DT-65 Seam Sealer. Protect seam from traffic for a minimum of 8 hours.