
Installation Guide


SUBSTRATE PREPARATION
• All substrates must be dry, clean, smooth and level.
• Any materials present such as paint, wax, grease, oil, adhesive residues, crayon, pen markings, etc. that may prevent a
proper bond, must be removed.
• Fill and level all plywood seams, cracks in concrete, construction joints, control joints, depressions, grooves or other
irregularities. Use a cementitious based patching compound.
• Sweep and/or vacuum substrate to remove all dirt and debris.
SQUARE LAYOUT
To square the area to be covered, first find the center of one end of the main rectangle. Locate the same point at the other end
wall. Snap a chalk line between these points. Measure this center line to find the middle of the room and mark. A right angle
must be established off this center mark. Use one of the following methods to establish a right angle.
Method 1
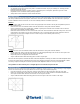
At the center point, mark off a line across the room at exactly right angles to the first line. This may be accomplished by the 3-4-5
triangle method (Figure 1).
• Measure 4 feet out on the chalk line towards each side wall from the center point and mark chalk line.
• Using a carpenters square and a straight edge, establish a right angle on both sides of the chalk line 3 feet out from the
center point of the chalk line and mark substrate
• Measure the distance between the 3 foot mark and the 4 foot mark. This measurement should be exactly 5 feet. If the 5 foot
measurement is not exactly 5 feet, the center crossing line is not at a true right angle and must be adjusted to achieve a
right angle. For larger rooms, multiples of 6-8-10 or 9-12-15 may be used to obtain greater accuracy.
Method 2
• Measure 4 feet out on the chalk line towards each side wall from the center point and mark chalk line.
• At each 4 foot mark, swing a 5 foot line and mark an arc on the floor approximately 3 feet out from the center point of the
first line. Where the arcs intersect is the right angle to the first line.
• Repeat the process on the opposite side of the first line.
• Snap a chalk line between both intersecting points to achieve a right angle.
After room has been squared, determine the width of the border tile/planks. Generally, the width of the border tile/planks should
be at least one half the size of a tile/full plank. This can be done simply by measuring across the room full tile/planks. It will be
necessary to adjust the starting line to achieve equal sized border tile/planks. Make sure to snap a new guide line.
Once guideline has been finalized, place a straight edge over the chalk line and pencil the line.
DIAGONAL LAYOUT
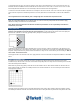
Square the area to be covered and mark center lines as outlined for Square Layout. It is then necessary to snap diagonal
lines on the floor through the center point which are at a 45º angle to the center lines (Figure 5).
• From the intersection of the two center lines, measure equal distances in all four directions along the center lines.
• Mark an arc at right angles on both sides of each mark. Be sure to use a radius greater than the distance between the
center point and each mark. Where the arcs intersect is a 45º angle to each line.
•
Snap a chalk line between both intersecting points and the center point of the room to achieve a 45º angle.