
User manual

A s s e m b l i n g - T w o I n d i v i d u a l H e a t e r s J o i n e d
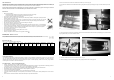
1. Take the first heater and place it face down on a flat surface.
2. Take the second heater and place it face down and positioned parallel to the first heater.
3. Push the M8 bolts (used to hold the wall brackets through the hole in the brackets on the rear heaters and slide a shake-proof washer on all the
threads from the protruding side.
4. Slide the joining bars on each bolt and fit a washer and nut – do not fully tighten at this point.
5. Ensure the second heater is still parallel to the first and sitting flat.
6. Slide the joining bars on each protruding bolt of the other heater to connect them together and fit the washers and nuts.
7. Again, ensuring the heaters remain flat, fully tighten all four nuts to secure the joining bars in place.
J o i n i n g I n d i v i d u a l H e a t e r s T o g e t h e r
The Sorrento IP heater can be joined to other Sorrento IP heaters using the joining bars provided. A maximum of three individual heaters can be joined
in one installation.
When two Sorrento IP Double heaters are joined they should only be hung from a ceiling
on chains - do not wall mount!
Always allow the heater to cool before attempting to reposition/move. Never attempt to
move the heater while it is switched on!
Observe the minimum safe distance between the heater body and inflammable surfaces
and objects when mounting.
Please refer to Table 1 for the recommended positioning of the heater with regards to
minimum distances. Do not install the heater in a corner!
Keep out of the reach of children.
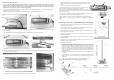
1. Please refer to Table 1 for recommended positioning of the heater. When
hanging from a ceiling two chains of equal length and gauge are required and
should be selected with fixings that are more than adequate to hold the weight of
the heater. If in doubt contact a professional for advice!
2. Fix the heater assembly to the chains via the hole in the centre of the joining bar as
shown in Fig. E. and ensure the heater faces directly down when hanging.
3. Secure the supply cable so it is not resting on the body or obstructing the air-vents.
Always isolate the heater from the mains supply when adjusting the position.
Fig. E
A s s e m b l i n g - T h r e e I n d i v i d u a l H e a t e r s J o i n e d
1. Take the first heater and lie it face down on a flat surface.
2. Take the second and third heaters and position them face down and parallel to the first.
3. Push the M8 bolts (used to hold the wall brackets through the hole in the brackets on the rear heaters and slide a shake-proof washer on all the
threads from the protruding side.
4. Slide the long joining bars (not supplied, available separately) on each bolt and fit a washer and nut – do not fully tighten at this point.
5. Position the second heater so it’s parallel to the first and sitting flat.
6. Take the third heater and a joining bar. Push a bolt and washer through the end hole and place a serrated washer on the other side. Push the
bolt through the bracket hole on heater. Repeat on opposite side and secure with a washer and nut – do not fully tighten at this point.
7. Position the third heater so it’s parallel to the second.
8. Line-up the bars of the first heater with the brackets of the second heater – they should go on the inside faces like heater one.
4
C e i l i n g H a n g i n g - T w o I n d i v i d u a l H e a t e r s J o i n e d
C e i l i n g H a n g i n g - T h r e e I n d i v i d u a l H e a t e r s J o i n e d
When three Sorrento IP Double heaters are joined they should only be hung from a ceiling on chains - do not wall mount!
Always allow the heater to cool before attempting to reposition/move. Never attempt to move the heater while it is switched on!
Observe the minimum safe distance between the heater body and inflammable surfaces and objects when mounting.
Please refer to Table 1 for the recommended positioning of the heater with regards to minimum distances. Do not install the heater in a corner!
Keep out of the reach of children.
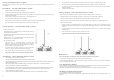
1. Please refer to Table 1 for recommended positioning of the heater. When hanging from a ceiling four chains of equal length and gauge
are required and should be selected with fixings that are more than adequate to hold the weight of the heater. If in doubt contact a professional
for advice!
2. Fix the heater assembly to the chains via the holes in the centre of the long joining bars as shown in Fig. F. and ensure the heater faces directly
down when hanging.
3. Secure the supply cable so it is not resting on the body or obstructing the air-vents.
Always isolate the heater from the mains supply when adjusting the position.
Fig. F
9. Line-up the bars of the third heater with the brackets of the second heater – these should go on the outside faces like heater three.
10. Push a bolt from the back of the long joining bars through the holes putting a serrated washer on each side of the heater bracket.
11. Fit a washer and nut to both sides and providing the assembly is sitting flat, fully tighten both sides and also the nuts of the first and third
heaters to the joining bars.
12. The heater is now ready for hanging.
M a i n t e n a n c e
In the event of heater failure, or for spare parts or advice, please contact the manufacturer in the first instance.
Disconnect from the mains before commencing any maintenance procedure including cleaning.
To ensure optimum heat effectiveness, it is recommended that that the guard is removed and the reflector is wiped with a lint-free cloth should the
reflector show considerable signs of dust or dirt.
H a n d l i n g t h e R e p l a c e m e n t E m i t t e r
Your new quartz emitter should not be handled with bare hands.
Remove finger marks with a soft cloth and methylated spirits or rubbing alcohol. Finger marks will burn into the quartz glass causing it to fail
prematurely.
Y o u r R e p l a c e m e n t E m i t t e r
It is very important that your replacement emitter is exactly the same as the one it was supplied with. Failure to fit the exact same type could cause the
heater to fail or even become dangerous especially when used in an outdoor environment.
Please contact Tansun Limited to purchase your replacement emitter and state the model number of the heater you wish to fit the emitter to.
5