User Guide VNETTM USB AND RS232 INTERFACE
IMPORTANT SAFETY INFORMATION Please read carefully and keep the following instructions and safety information. Heed all warnings and follow all instructions. 1. 2. 3. 4. 5. 2 Do not remove covers. There are no user-serviceable parts inside; please refer servicing to qualified service personnel. This equipment must be earthed. Protect the power cord from being walked on or pinched, particularly at plugs, convenience receptacles, and the point where they exit from the apparatus.
VNET INTERFACE USER GUIDE IMPORTANT SAFETY INFORMATION Please read carefully and keep the following instructions and safety information. Heed all warnings and follow all instructions. • Do not remove covers. There are no user-serviceable parts inside; please refer servicing to qualified service personnel. • Only use attachments/accessories specified by the manufacturer.
WINDOWS 2000 DRIVER INSTALLATION You need to have administrator privileges to install any new drivers under Windows2000. To install the driver or update the configuration please log onto Windows 2000 as "Administrator" or ask your system administrator to install the USB driver. Please proceed with the following steps to install the driver: 1. Connect a USB cable from your computer (or USB hub) to the USB port of the Interface. 2. The connection brings up "Found New Hardware Wizard". 3. Click "Next". 4.
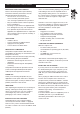
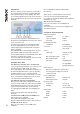
VNET INTERFACE USER GUIDE 2. Remove the two screws from one side of the Accessory. USB You can connect your computer to the VNET™ Interface via USB using a USB Type A to USB Type B cable as in diagram 2. It is not usually necessary to use a Power Supply to power the VNET™ Interface when using USB, since USB will supply sufficient power for the Interface. If there are any Network powered devices on the network however, then it will be necessary to use the Accessory Power Supply.
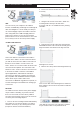
OPERATION Once the VNET™ Interface has been connected to the computer and to the devices (and if applicable, to the optional VNET™ Power Supply) then there are no further adjustments to make on the interface itself. The indicators on the front of the unit operate as follows Are the appropriate indicators illuminated? (See above). Make sure the network cable is not too long, is correctly connected, and is not damaged. Check that the Tx indicator flashes when PodWare attempts to go online.
NOTES 7
Revision Date: 23/11/15 Part Number: 6481 0509 Tannoy operates a policy of continuous research and development. The introduction of new materials or manufacturing methods will always equal or exceed the published specifications. All specifications are subject to change without notice. Copyright (c) 2015 Music Group Innovation SC Ltd. All rights reserved.