NetComm NF20 Wi-Fi 6 Quick Start Guide This guide provides instructions for setting up, connecting, and configuring your NetComm NF20 Wi-Fi 6.
contents: Get to Know Your NetComm NF20 Wi-Fi 6 .............................................................................................................................3 Setting up Your NetComm NF20 Wi-Fi 6 .................................................................................................................................6 Configuring Your NetComm NF20 Wi-Fi 6 ..............................................................................................................................
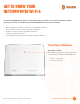
get to know your Netcomm NF20 Wi-Fi 6 The NetComm NF20 Wi-Fi 6 delivers a new adaptive Wi-Fi experience to your home with improved WiFi speed, performance, and efficiency.
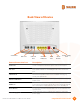
Back View of Device VoIP Ports DSL Port USB 3.0 Port Ethernet LAN Ports WAN Port Reset Button Power Supply Jack Button/Connection Port Description VoIP Ports Connect a telephone handset for phone calls over the internet. DSL Port Connect the telephone line operating your VDSL service. Fibre to the Node (FTTN) and Fibre to the Building (FTTB) services use the DSL port. USB 3.
Side View of Device Wi-Fi Button WPS/LED Button On/Off Button NetComm NF20 Wi-Fi 6 Quick Start Guide Will trigger the Wi-Fi Protected Setup (WPS) function when held down for approximately three (3) seconds and toggle the LED indicators on or off when held for approximately six (6) seconds. tangerinetelecom.com.
setting up your NetComm NF20 Wi-Fi 6 Step 1: Power on the NetComm NF20 Wi-Fi 6 Wait a few minutes for it to start up. Step 2: Connect your NetComm NF20 Wi-Fi 6 Depending on your NBN technology type, your NetComm NF20 Wi-Fi 6 will connect differently. If you are unsure of your NBN technology type, it is listed in your NBN ordered email.
Power Adapter Power Outlet NBNCo Network Connection Device WAN Port Power Supply Jack Ethernet Cable If your NBN connection is: Instructions: Fibre to the Node (FTTN ) Fibre to the Building (FTTB) or VDSL (over a traditional telephone line) Connect the DSL cable from the DSL port on the NetComm NF20 Wi-Fi 6 to the wall socket. Connect the power adaptor from the power supply jack to the power outlet.
Step 3: Connect your devices to Wi-Fi Type the network name and password on the Wi-Fi Security Card into your wireless device when connecting, or you can scan the QR code. Connecting a telephone to a NetComm NF20 Wi-Fi 6 Connect a regular telephone handset to the NetComm NF20 Wi-Fi 6 by connecting the cable from the VoIP port to the telephone handset. Power Adapter Power Outlet Telephone Handset Power Supply Jack VoIP Ports VoIP Cable NetComm NF20 Wi-Fi 6 Quick Start Guide tangerinetelecom.com.
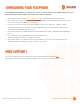
Configuring your NetComm NF20 Wi-Fi 6 Note: If you have purchased your NetComm NF20 Wi-Fi 6 from the Tangerine website, it will come pre-configured and all you’ll need to do is follow the set-up process outlined above. If you have factory-reset your device or purchased from an alternative retailer, please follow these easy steps to access the configuration page of your NetComm NF20 Wi-Fi 6. 1. Push the power button on the side of the NetComm NF20 Wi-Fi 6 to turn it on.
Configuring your Telephone To configure your telephone, you will need to contact our Voice Team for your VoIP settings. Once you have received your VoIP settings follow these easy steps listed below. 1. Open a web browser and type https://192.168.20.1/ into the address bar, then press Enter. 2. At the login screen, type in ‘admin’ as your username and the password printed on the label on the bottom of the NetComm NF20 Wi-Fi 6 and login. 3.