
User Manual

Graupner
GmbH & Co. KG * Henriettenstraße 94-96 * D- 73230 Kirchheim/Teck * www.graupner.de
13
Finishing.
Film covering – all the wooden surfaces are supplied pre-sanded, but will benefit
from further fine finishing prior to covering. Follow the instructions provided with the
covering materials, always taking care to make all joins in the direction of the air-flow.
As an alternative to our own high stable decorative vinyl based covering material, we
can also recommend Oracover (Profilm) covering materials.
NOTE: Take care to avoid excessive heat when using heat-shrink covering films on
the wings as the polystyrene cores will be destroyed (polystyrene starts to melt at
70°C). Use low temperature heat-shrink covering films and make every effort to avoid
prolonged exposure to heat.
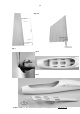
Fibre-glass finish – for the ultimate finish to your ALPINA 2501 ELEKTRO, cover
the wings and tail-plane with a lightweight glass-fibre cloth and treat with a suitable
finishing resin. This involves a specialist process which is well documented in the
popular model trade. Choose good quality materials and follow the manufacturer’s
instructions. Take care not to add excessive weight!
DESIGN Models.
Our DESIGN range of models are supplied with pre-printed graphics which are both
lightweight and durable. Please observe the following simple steps to maintain the
appearance:
• TA-Film is stable up to a nominal temperature of 70
0
C so care should be
taken not to expose the surfaces to excess heat. The use of a normal
hairdryer is all that is required to soften the material should it eventually
become necessary.
• The graphics are waterproof but are not resistant to solvents. Clean your
model with a mild solution of soapy water applied with a soft sponge and dry
carefully to restore the fine finish.
• Do not under any circumstances use cleaning products which contain
concentrated alcohol or acetone as a solvent.
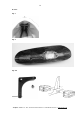
Radio Control Equipment Installation.
Fuselage servo installation - Install the servos in the servo mounting tray, following
instructions supplied with your radio control equipment. Connect the servo output
horns and clevises and check full and free movement – using the full range of the
servo. Also check for any slop in the push-rods and secure the Bowden cable
carriers always keeping mind to minimise the length of unsupported control linkage.
Note: Depending on your choice of servos, you may find that you will have to
remove a little material in the area of the fuselage opening to accommodate the
servo output horns. Do so carefully, removing only the minimum amount of
material necessary to install and operate the servos.