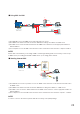
ɡ Using Mail via LAN Ԛ -AIL "OX ԛ Ԙ 0# 0/0 OR )-!0 3ERVER (5" 242 7 㧔 㧕 㧔 㧕 㧔 㧕 3-40 #LIENT ԙ 3-40 3ERVER 㧔 㧕 ӱ The RTR-5W accesses the SMTP server and sends mail to the server. Ӳ The SMTP server delivers the mail sent from the RTR-5W according to the address to a POP server. ӳ The POP server receives the delivered mail from the SMTP server and stores it in the appropriate mailbox for that mail address.
Installation Install the provided software. - Is Windows® operating properly? If Windows® is not operating properly,ȶRTR-5W for Windowsȷmay not be installed correctly or it may not operate properly. - Please quit all other applications. If other programs are open, please close and quit all of them, making sure to quit all Quick Start programs such as a virus checker.
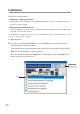
. SelectȶRTR-5W for Windows¤ and click the [Execute] button to start the installation. 4. Continue the installation by following the directions as they appear. 5. After installation has been completed,ȶRTR-5W for Windowsȷwill be registered in the Window's [Start] Menu.
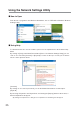
Using the Network Settings Utility ɡ How to Open From the list of programs in the Window's Start Menu, click on "RTR-5W for Windows"-Network Settings Utility. ɡ Using Help For details about how to use the software, please see the explanations in the Software Help Menu. By clicking on [Help] in the Menu Bar and then [How to Use Network Settings Utility] you can click on one of the tabs [Contents] or [Keyword] to search for the topic or term you are unsure about or have questions about.
ɡ Network Settings Utility Functions The Network Settings Utility contains the following functions: Network Initialization Settings After purchasing a RTR-5W unit, the first step is to make all Network Initialization Settings including assigning an IP Address and a Subnet Mask. Detailed Network Settings The reception of RTR-5W settings and more detailed network settings can be made here.
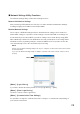
Network Initialization Settings To connect an RTR-5W to a network, it is necessary to enter an IP Address and Subnet Mask that are appropriate for your network. NOTE: Please note, that upon purchase, all RTR-5W units are set with the same IP address. To make IP address changes, connect one unit at a time and carry out the changes.Do not connect more than one unit with the same address to the network at the same time. 1.
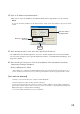
4. Enter an IP Address and Subnet Mask. - Make sure to enter an IP Address and Subnet Mask that are appropriate for your network. NOTE: Do not use the same IP address for two different units. It may cause abnormalities to the entire network system. Enter an IP address and Subnet mask Enter the Login ID and Password [Send] button 5. After entering the above, next, enter the Login ID and Password. The RTR-5W factory default Login ID is "wsc-user" and the Password is "wsc-passwd".
Detailed Network Settings After making the network initialization settings for the RTR-5W, the reception of RTR-5W settings and more detailed network settings can be made. *Before making any of these settings, please make sure that the RTR-5W is set with the proper IP address. ɡ Receiving Settings 1. Click the [Detailed Network Settings] Tab. 2. In the [Receive Settings] Area, enter the information for the RTR-5W you wish to make settings for and click the [Receive Settings] button.
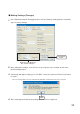
ɡ Making Settings (Changes) 1. In the [Detailed Network Settings] window, click the [Change Settings] button and make any necessary changes. [Send Setting] button Enter info for the TR-7W you wish to make settings in. 2. After making the settings, enter the info for the recipient of the settings and click the [Send Settings] button. 3. A message will appear asking you if it is OK to restart the system. Click the [Yes] button to restart.
ɡ [Dial Settings] button Use this to make settings for a POP before SMTP server, make settings for using a telephone line to connect your computer via a dialup connection, or make settings for connecting to a telephone line to send warning mails from the RTR-5W. 1. In the [Detailed Network Settings] window, click the [Dial Settings] button and make any necessary settings changes. *For details about making settings changes, see the [Help] Menu in the [Network Settings Utility].
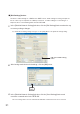
ɡ [Re-Activate Communication] Button If the browser does not open, wireless communication continually results in failure, or if any errors occur during communication, click the [Re-activate Communication] button. Note that by restarting, the data transfer graph in the RTR-5W Web Viewer will also be reset. [Re-Activate Communication] button NOTE: Note that by clicking the [Send Settings] button or the [Re-activate Communication] button over and over, communication may become impossible.
Returning the Network Settings to the Factory Default Settings If you have forgotten the IP address or the password you can easily return the logger to the default factory settings. 1. Pull out the AC adaptor plug from the RTR-5W logger. 2. Press in the [RESET] button on the RTR-5W logger with a pointed object and reconnect the AC adaptor. [RESET]button 3.
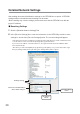
RTR-5W Clock Settings If the clock settings for the RTR-5W are not set correctly, the clock in the RTR-5W Web Viewer and the time of warnings will also be incorrect. Please make sure to set correctly before beginning to use. ɡ Automatic Setting of the Clock Normally, when an RTR-5W is rebooted the clock settings will be initialized. However, by making settings to enable the SNTP server it is possible to have the clock automatically reset to the current time upon rebooting.
4. After making the settings, enter the info for the recipient of the settings and click the [Send Settings] button. [Send Setting] button Enter the information for the recipient 5. A message will appear asking you if it is OK to restart the system. Click the [OK] button to restart. *The new settings will not become valid until the RTR-5W communication function is restarted. [OK] button 6. ĴĶ After restarting has finished, the settings will have been completed.
ɡ Making the Clock Settings Manually *If you wish to manually set the clock, please carry out settings only after having created a Location. NOTE: If you make clock settings manually, the clock will lose its settings upon removal of the AC adaptor or after restarting the system. Hence, it is necessary to reset the clock after having restarted the system or having lost AC power. 1. Open [RTR-5W for Windows] 2. Open the Properties for the Location (RTR-5W) you wish to make settings for.
How to Operate RTR-5W for Windows ɡ How to Openȁ From the list of programs in the Window’s Start Menu, click on [RTR-5W for Windows] - [RTR-5W for Windows] to open. ɡ Using Help For details about how to use the software, please see the explanations in the Software Help Menu. -In the Menu Bar, click [Help] - [Search by Topic], then click on one of the tabs [Contents], [Keyword], or [Search Text] to search for the topic or term you are unsure about or have questions about.
ɡ RTR-5W for Windows Functions RTR-5W for Windows is designed to allow the user to utilize RTR-51/52/53 and RVR-52A Data Loggers via the RTR-5W Base Station.Management of all devices is carried in the application main window out using a tree format with loggers being registered to Groups and Groups belonging to Locations (RTR-5W). From the main window it is possible to carry out the various tasks such as Registrations, Recording and Warning Monitoring Settings, as well as the Downloading of Data.
Remote Registration In order to carry out Wireless Communication between a Data Logger and an RTR-5W Base Station, it is first necessary to register the Data Logger as a Remote Unit of that RTR-5W. ɡ Create a Location 1. Open [RTR-5W for Windows] 2. In the [Registration / Administration] Menu, click on [Create Location (RTR-5W)] to display a window where you can enter a name for the new Location. * In the Location name, you cannot use a space, or any of the following characters [\/:,;*?"<>|&] .
ȶAccess Settingsȷ Enter the IP Address / Domain that were assigned when making the network initialization settings. [Set] button [Get Time] button [Set Clock] button ȶBrowser Display Settingsȷ [Reboot] button ɡ Access Settings Enter the IP address (or Domain) for the RTR-5W that was entered in the [Network Settings Utility]. ɡ Browser Display Settings If necessary, make settings in the [Browser Display Settings] Area.
[Get Time] Button Clicking this button will start communication with the Location and will retrieve and display the time settings from the Location's internal clock. Due to network delays, this may be a few seconds off from the time you receive the settings. [Set Clock]ȁbutton If settings have been made to use an SNTP server, upon opening, the clock will be automatically updated. It is also possible to make clock settings in the clock settings dialog. See pp. 34-36 for details.
ɡ Creating Groups 1. In the [Registration / Administration] Menu, click on [Create Group] to display a window where you can enter a name for the new Group. *Up to 8 characters can be entered. *In the Location name, you cannot use a space, or any of the following characters [\/:,;*?"<>|&] Enter a Group Name 2. [OK] button After entering the Group Name, by clicking the [OK] button, the Group will be created in the Administration Tree. Group Icon Administration Tree 3.
ɡ Registering a Remote Unit 1. Place a Data Logger face down on the RTR-5W -See page 16 for more details about how to connect. 2. Select the Group in which you wish to register Remote Units from the Registration Tree. In the [Registration / Administration] Menu, select [Remote Unit (RTR-5, RVR-5) Registration] to display the Remote Unit Registration window.
3. Enter a name for the Remote Unit and click the [Register] button to finish the registration. -If you are using an RVR-52A logger, click the [RVR-52A Measuring Mode] button and select the desired measuring mode. [Register] button Enter the Remote Unit Name [RVR-52A Measuring Mode] button Remote Units that have already been registered *If you wish to register other Remote Units, repeat the process as in steps 1~3.
ɡ Sending Registration Info to an RTR-5W 1. Select a Location from the Administration Tree, and in the [Settings] Menu, select [Send Group / Remote Info]. [Send] button 2. Click the [Send] button to send the registration info to the RTR-5W and complete the settings. *Make sure to carry out this operation each time changes are made to settings.
ɡ Wireless Communication Test Gather the current data readings from each Remote Unit and check to make sure that wireless communication is possible between the Remote Units and the RTR-5W Station. 1. Place a Remote Unit in the actual place from which you wish to measure and record data. - The wireless communication range, if unobstructed and direct, is about 100 meters [330 ft]. 2. Select the placed Remote Unit from the Administration Tree, and in the [Data] Menu, select [Gather Current Data].
Recording Settings Note: If the computer clock is set incorrectly the programmed start time will also be incorrect. Make sure the clock settings are correct before starting a recording session. 1. 2. Open [RTR-5W for Windows]. From the Administration Tree, select the Remote Unit for which you wish to make recording settings, and in the [Settings] Menu, select [Start / Stop Recording]. 3. Setting the Recording Conditions.
ɡ Measuring Mode:
4. Click the [Start Recording] button to send the recording condition settings via the RTR5W Station to the Remote Unit and complete the set-up. NOTE: By starting a new recording session, all currently recorded data will be erased. [Get Settings] Button Gather current recording condition settings from the selected Remote Unit. *The collecting of current recording settings cannot be carried out on a multiple number of Remote Units.
Adjustment Function This function enables the user to make adjustments to measured values to correct inaccuracies that may occur when compared to a standard or reference temperature measurement. By setting an adjustment equation beforehand, the adjustment function will automatically calculate to record and display the post-adjusted measurement. It is possible to select from two methods of adjustment: 1-point adjustment and 2-point adjustment.
Downloading Data It is possible to download recorded data by two methods: [Wireless Communication] or [Optical Communication]. NOTE: If the computer clock is set incorrectly the time of the downloaded data will also be incorrect. Make sure the clock settings are correct before starting a downloading session. ɡ When using Wireless Communication 1. 2.
ɡ When using Optical Communication 1. Open [RTR-5W for Windows] 2. Place the Remote Unit from which you wish to download data face down on top of the specified RTR-5W (Location). 3. From the Administration Tree, select the Location you will use for Optical Communication. 4. In the [Data] Menu, select [Download Data (Optical Communication]. [Specify...] button [Download] button Select the Download Mode 5. Click the [Specify] button to specify the file saving location.
Operating the Temp / Humidity Graph ɡ How to Openȁ From the list of programs in the Window’s Start Menu, click on "RTR-5W for Windows" "Temp_Humid Graph". ɡ Using Help For details about how to use the software, please see the explanations in the Software Help Menu. -In the Menu Bar, click [Help] - [Search by Topic], then click on one of the tabs [Contents], [Index], or [Search] to search for the topic or term you are unsure about or have questions about.
ɡ Temperature / Humidity Graph Display Names and Functions ӵ Ӷ ӵ Ӵ ӳ ӷ Ӹ Ӳ ӱ ӷ ӱ ӹ Ӻ ӱ A and B Cursor Movement Buttons By clicking the arrow buttons, you can simultaneously move the A/B cursors. Ӳ A and B Cursor Buttons Click and drag the A or B button to move the cursor to the left or right. ӳ Toolbar Buttons appear for frequently used commands. Ӵ Menu Bar Click on the desired menu in the Menu Bar to set or display each function from which you can choose from an array of commands.
ɜ Zoom in Using the Mouse With the left button drag the mouse to outline the area you want to zoom in on. ɜ Menu Display Using the Mouse By right clicking on the graph, the Menu will be displayed.
ɡ Data List Display Part Names and Functions This is a list of the data that was displayed in graph form. From the [View] Menu. [Date/Time]Button By clicking this button, you can shift the display between the recorded date and the amount of elapsed time since recording started. [Date/Time] button ӱ Ӳ Recorded Date Display ӱ The highest value is in RED, lowest is in BLUE, and the average is in PINK Ӳ Scroll Bar: By dragging it up and down you can move to the data you want.
Making Changes to the Graph Display ɡ Changing Colors of Data Display Area: From the [View] Menu You can change the letters used in the data list display for each channel between monochrome and channel color. ɡ Selected Channels ON / OFF : From the [View] Menu You can choose to view only the selected channels in the Graph. 1. By moving the mouse to [Selected Channels ON / OFF], the channel numbers are displayed. 2. Click the channel number to remove or place a check mark.
ɡ Editing Recording Conditions: From the [Tools] Menu It is possible to make corrections to channel names and to recording start date and times. 1. By clicking the [Channel. No.] Button of the channel you wish to edit, the [Name] and [Started Date / Time] in the "Edit Items" display will show info for that channel number. -Name: Up to 32 letters can be entered. -Started Date/Time: The month, day, year, hour, minute and second can be changed. [OK] button Channel Number [Restore] button Edit Items 2.
ȺRe-order by Dragging a Channel NumberȻ Drag the channel number you wish to move to the newly desired channel number position and drop it. *The [Restore] button is only effective while making changes. After clicking the [OK] button the settings cannot be restored to the original settings. [OK] button Drag the channel number to the newly desired [Restore] button ȺSpecify the Channel Numbers to be MovedȻ 1. Specify the channels to be moved From: (original position) To: (desired position). 2.
ɡ Erase Selected Channel Data : From the [Tools] Menu 1. Put a check on the channel number you wish to erase. 2. By clicking on the [OK] button, the deletion will be completed. [OK] button Check ɡ Shift Unit (Ɏ / Ȍ F) : From the [Tools] Menu By clicking on [Shift Unit(Ɏ / Ȍ F)], you can automatically change the temperature unit scale in the graph display and in the channel info list. ɡ Change Graph Colors : From the [Tools] Menu 1. Click the channel number of which you wish to change the color.
2. Choose the color you want and click the [OK] button. 3. After confirming the color, by clicking the [OK] button the change will be completed. *By clicking the [Return to Default] button, you will return to the color settings when the software was opened. ȺGraph Line Width SettingsȻ Change the width of the data lines and the scale lines. [OK] button [Default] button 1. 2. Click on the [ ɥ ] button to change the width of the graph / scale lines.
Operating the Graph Display ɡ Returning to Original Size Clicking here will return the graph to its original size. ɡ Zooming In and Out Zooms in or out one step at a time ɡ Moving the A/B Cursors Right and Left Simultaneously move the AB Cursors to the right or left. ɡ Moving Right and Left on the Graph Move the Graph Display to the right or left. ɡ Moving Up and Down on the Graph Move the Graph Display up or down. ɡ Vertical Axis Settings Set the vertical axis scale range 1.
How to operate the Multi-scale Graph ɡ How to Openȁ From the list of programs in the Window’s Start Menu, click on "RTR-5W for Windows"-"Multiscale Graph". ɡ Using Help For details about how to use the software, please see the explanations in the Software Help Menu. -In the Menu Bar, click [Help] - [Search by Topic], then click on one of the tabs [Contents], [Index], or [Search] to search for the topic or term you are unsure about or have questions about.
ɡ Multi-scale Graph Display Names and Functions Ӷ ӷ Ӹ Ӷ ӵ Ӵ ӳ Ӳ ӱ ӹ Ӻ ӹ ӻ Ӽ ӱ A and B Cursor Movement Buttons By clicking the arrow buttons, you can simultaneously move the A/B cursors. Ӳ A and B Cursor Buttons Click and drag the A or B button to move the cursor to the left or right. ӳ It is possible to hide or view the vertical scale for each channel It is possible to hide or view the scale on the graph for each channel. Ӵ Toolbar Buttons appear for frequently used commands.
Zoom in Using the Mouse With the left button drag the mouse to outline the area you want to zoom in on. Menu Display Using the Mouse By right clicking on the graph, the Menu will be displayed.
ɡ Data List Display Part Names and Functions This is a list of the data that was displayed in graph form. From the [View] Menu [Date/Time]Button: By clicking this button, you can shift the display between the recorded date andthe amount of elapsed time since recording started. ӱ Recorded Date Display [Date/Time] button Ӳ ӱ The highest value is in RED, lowest is in BLUE, and the average is in PINK. Ӳ Scroll Bar : By dragging it up and down you can move to the data you want.
Making Changes to the Graph Display ɡ Selected Channels ON / OFF : From the [View] Menu You can choose to view only the selected channels in the Graph. 1. By moving the mouse to [Selected Channels ON / OFF], the channel numbers are displayed. 2. Click the channel number to remove or place a check mark. Only those channels with a check mark next to the number will be displayed in the Graph. *The same operation can be done by clicking on the channel number icons in the Toolbar.
ɡ Set High, Low, Average Calculation Range: From the [Tools] Menu 1. Enter a calculation range in the [New Calculation Range] [OK] button [Entire Graph] button Enter the numerical values - [By clicking the [Entire Graph] button, the dates and times for the entire graph will be displayed.
ɡ Editing Recording Conditions: From the [Tools] Menu It is possible to make corrections to channel names and to recording start date and times. 1. By clicking the [Channel. No.] Button of the channel you wish to edit, the [Name] and [Started Date / Time] in the "Edit Items" display will show info for that channel number. [OK] button Channel Number [Restore] button Edit Items - Name: Up to 32 letters can be entered. - Started Date/Time: The month, day, year, hour, minute and second can be changed.
ɡ Re-order Channel Data: From the [Tools] Menu You can re-order the data during graph display. There are two methods to use when re-ordering channels: [Re-order by Dragging a Channel Number] and [Specify the Channel Numbers to be Moved]. ȺRe-order by Dragging a Channel NumberȻ Drag the channel name / number you wish to move to the newly desired channel name / number position and drop it. Drag the channel name to the newly desired [OK] button ȺSpecify the Channel Numbers to be MovedȻ 1.
ɡ Merge Channel Data: From [Tools] Menu It is possible to merge two different pieces of data in to one piece of data. NOTE: The following data cannot be merged If the total number of readings after merging exceeds 16,000 data readings. If the recording intervals are different If the data is of different types If the conversion equation for the scale settings are different If the measuring times overlap (This can be adjusted by using the [Edit Recording Conditions]) 1.