
DLT4000 Tape Backup System Installation Guide


BBBBBBBBBBBBBBBBBBBBBBBBBBBBBBBBBBBBBBBBBBBBBBBBBBBBBBBBBBBBBBBBBBBBBBBB
Tandberg DLT4000 Installation Guide 3-1
3. Configuring and Operating
the Tandberg DLT4000 Drive
3.1. This Chapter
7KHFRQILJXUDWLRQVHFWLRQLQWKLVFKDSWHUDSSOLHVWRWKH
EDVLF GULYH ZLWKRXW H[WHUQDO FDELQHW &KDSWHU DS
SOLHV WR FRQILJXULQJ WKH H[WHUQDO WDEOHWRS &KDSWHU
LQFOXGHVWKHVHPDLQWRSLFVDQGVHFWLRQV
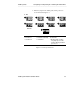
Topic Section
Before You Install the Tandberg DLT4000
Drive
3.2.
Selecting Density 3.3.
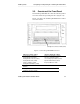
Overview of the Front Panel 3.4.
Description of Controls and Indicators 3.5.
Description of the Tape Cartridge 3.6.
Loading a Cartridge 3.7.
Using the Cleaning Tape Cartridge 3.8.
Unloading a Cartridge 3.9.
Preserving Cartridges 3.10.
Firmware Update Procedure 3.11.
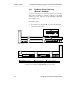
3.2. Before You Install the Tandberg
DLT4000 Drive
6HFWLRQLQFOXGHV
Topic Section
Disabling Parity Checking 3.2.1.
Changing the SCSI ID 3.2.2.
Setting the TRM PWR jumpers 3.2.3.
Locating the SCSI Cable and Power
Connectors
3.2.4.