
DLT4000 Tape Backup System Installation Guide


Tandberg Data Installing and Configuring the Tandberg DLT4000 Drive
BBBBBBBBBBBBBBBBBBBBBBBBBBBBBBBBBBBBBBBBBBBBBBBBBBBBBBBBBBBBBBBBBBBBBBBBBB
Tandberg DLT4000 Installation Guide 2-11
2.6. Test the Installation
6HFWLRQLQFOXGHVWKHIROORZLQJWRSLFV
Topic Section
Run the Power-On Selftest (POST) 2.6.1.
What to Do after POST 2.6.2.
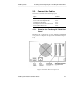
2.6.1. Run POST
7RWHVWWKHLQVWDOODWLRQ IRU WKH 7DQGEHUJ '/7 WD
EOHWRSGULYHE\UXQQLQJ3267
7XUQRQWKHV\VWHPSRZHU
6HWWKHSRZHUVZLWFKRQWKH7DQGEHUJ'/7
UHDUSDQHOWRRQ3267UXQVDXWRPDWLFDOO\
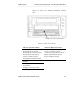
2EVHUYHWKHLQGLFDWRUVRQWKH7DQGEHUJ
'/7IURQWSDQHO(QVXUHWKHLQGLFDWRU
VHTXHQFHRIHYHQWVLVWKHVDPHDVLQ7DEOH
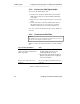
(YHQWVRQWKHULJKWDQGOHIWVLGHVKDSSHQDWWKH
VDPHWLPH
Event Action
1
The indicators on the right front panel turn on sequentially from top
to bottom. All indicators stay on for a few seconds.
2
All indicators on the left front panel turn on at the same time for
about three seconds and then turn off.
3
The green Operate Handle, the orange Write Protected, and the
Yellow Use Cleaning Tape indicators turn off. The yellow Tape in
Use indicator blinks while the tape drive initializes.
4
After initialization, if no cartridge is loaded, the yellow Tape In Use
indicator turns off, the green Operate Handle indicator turns on, the
handle unlatches, and the beeper sounds.
7DEOH3267