
User manual


Tandberg Data
Maintenance
StorageLoader Installation and User Manual
65
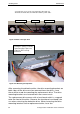
drive and the brackets laying on a level surface to ensure the
brackets are aligned with the bottom of the drive. Fasten the
brackets with two screw
s each.
Insert the replacement drive carefully into the loader the same way
it was removed, reconnect the 3 cables (
the ADI cable is mounted
closest towards the SCSI cable)
and re
-
mount the back plate.
Snap the front bezel that was removed from the repla
cement
-
drive
onto the front of the defective drive. Then pack the defective drive
in the same box you received the replacem ent-drive and return it
to your support center.
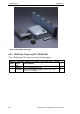
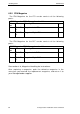
6.5.3
FRU Power Supply
This FRU consists of the following parts:
S808696
Power Supply F
RU StorageLoader 1U
Item
Description
Qty
1
Power supply
1
2
Quick Installation Guide Fan
1
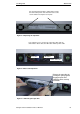
Figure
6.
11
Exchanging a defective power supply
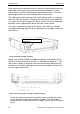
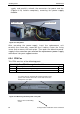
Figure
6.
12
Removing the fixing screw
Rem ove the fixing screw (
Figure
6.
12
). Withdraw the power-
To exchange a defe
ctive power
-
supply switch off the loader and
disconnect the power cord. Dismounting the backpanel cover plate by
removing these two screws:
Removing the fix
ing screw