
User manual


Tandberg Data
Maintenance
62
StorageLoader Installation and User Manual
After removing the defective drive, the drive mounting brackets on
both sides of the drive must be removed from the drive, since
these will be used for mounting the replacement
-
drive. The dr
ive
mounting brackets are fastened with two screws each.
The replacement drive comes with a front bezel which is snapped
onto the front of the drive. Remove the front bezel and keep it for
use when returning the defective drive. Fasten the drive mounting
brackets to the replacement
-
drive with two screws each.
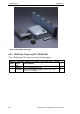
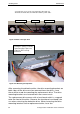
The drive mounting bracket on the drive’s left side has a Guide
cartridge mounting (figure 6.6) for guiding the cartridge in and out
of the drive.
Figure
6.6
Guide cartridge mounting
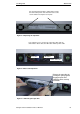
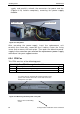
Make sure that the Guide cartridge mounting is mounted in flush
with the inner left wall of the drive, as indicated in figure 6.7. The
two screws shown in figure 6.6 can be loosened for adjusting the
position of the Gu
ide cartridge mounting.
Remember to fasten the
screws again afterwards.
Figure
6.7
Correct position of Guide cartridge mounting
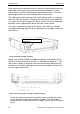
Insert the replacement drive carefully into the loader the same
way it was re
moved, reconnect the 3 cables (
the ADI cable is
mounted closest towards the SCSI cable)
and re
-
mount the back
plate.
Guide Cartridge
Mounting