
Instructions
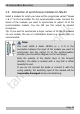
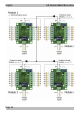
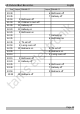
Table Of Contents
- Part A: General information
- Part B: LC-NG versions
- 1. LC-NG-01 "City Lighting"
- 2. LC-NG-02 "Residential buildings"
- 3. LC-NG-03 "Office and commercial buildings"
- 4. LC-NG-04 "Street lamps"
- 5. LC-NG-05 "Road traffic"
- 6. LC-NG-06 "Emergency vehicles"
- 7. LC-NG-07 "(Road) construction site"
- 8. LC-NG-08 "Fire station"
- 9. LC-NG-09 "Railway station"
- 10. LC-NG-10 "Workshop"
- 11. LC-NG-11 "Flickering flames & candle lights"
- 12. LC-NG-12 "Event"
- 13. LC-NG-13 "Chaser lights"
- 14. LC-NG-14 "Funfair lighting"

tams elektronik
!
LC-Modules Next Generation English
2.3. Connection of synchronous modules LC-NG-02
Select a module for which you have set the programme variant "House
1 & 2" as the transmitter for the synchronisation pulse. Connect the
inputs of the modules you want to synchronise to output 14 of the
synchronisation module. You can still use this output to connect
consumers.
Tip: If you want to synchronise a larger number of LC-NG-02 modules
via one module, the use of a distribution board (e.g. power block) is
recommended.
Note:
You must install a diode 1N400x (x = 2..7) in the
connection between the input of the module you want to
synchronise and the output 14 of the synchronisation
encoder (see connection diagram on the next page).
Note the polarity of the diode! Seen in the forward
direction, the diode is marked with a ring that is offset
towards the end.
If you do not connect the diode or connect it with the
wrong polarity, the switching input of the module will be
irreparably damaged during commissioning.
Page 53