
Installation Manual

3
info@ | tamaracksolar.com | (800) 819-7236
2016 v1.01
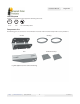
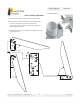
Step 1. Mounting Arm to PV Module
With the arm oriented as shown, insert 1/4-20 x 3/4” bolt,
washer and PV module clamp through each slot.
Repeat step 1 attaching the remaining clamp to the other
slot on the arm.
A.
B.
Installation Manual Single Arm
Place a at washer, lock washer and hex nut on the end of
the bolts and tighten loosely.
Some modules can be attached by bolting through panel
directly to arm.
Lay the PV Module face-down on a protected at surface.C.
Center the arm on the back of the panel as shown and
position the clamps under the edges of the module’s
ange.
Make sure that the clamp bolts are resting against the
module’s ange before tightening.
Tighten the clamp bolts to 84 in-lbs (dry).
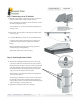
Step 2. Attaching Bracket to Pole
Thread each banding through one of the sets of narrow
center holes and place the bracket on the pole as shown.
A.
When placing the bracket on the pole, ensure that: The at
side of the bracket is away from the pole, and the end of
the bracket with the arm mounting holes nearest to the
edge is up, as in the illustration to the right.
This banding is only compatible with poles ranging from
2.0 inches to 4.5 inches.
Tighten the banding screws to 35 in-lbs (dry).B.
If mounting to a at surface, such as a wall or square pole,
the at side of the bracket should be placed against the
surface. Make certain to orient the holes away from the at
surface. Banding is not used in this case.