
Quick Start Guide User Manual

13
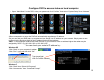
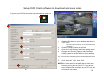
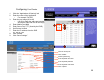
Configure DVR to access video on local computer
1. Click the “Auto Assign” radio button to turn off DHCP
• The radio button will turn from white to black
2. Enter the new IP address into the field.
• Eg.192.168.1.222
3. Enter “7777” into Server Port
4. Enter “80” into HTTP PORT
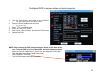
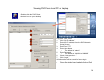
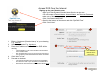
5. Click “Save”, then “Confirm” and exit the DVR menus
6. Reboot the DVR
NOTE: Never reboot the DVR using the power switch on the back of the
unit. Treat the DVR as a Linux based PC and shut it down properly.
• When you exit the “Main Menu” you will see the dialog box to the right
• Click the down arrow for the drop down menu
• Click “REBOOT SYSTEM”
• The DVR will reboot and begin recording
1
2
3 4
5
6