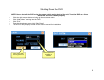
Talos DVR Quick Reference Guide 10-2011
Index Step 1…Setting up your surveillance system • • • • • • • Designing your surveillance system…3 Installing the hard drive…4 Connecting a monitor…5 Initializing (turning on) your DVR…5 Shutting-down / logging-off / Rebooting the DVR…6 Connecting cameras…7 Installing your surveillance system…8 Step 2…Recording and accessing video on your DVR • • • Setting date, time and Recording on your DVR…9 Saving video from the DVR…10 Viewing saved video on a PC…11 Step 3…Accessing your DVR from a Local Computer P
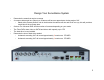
Design Your Surveillance System • • • • • • Determine the areas that require coverage A common wide angle lens (≤4mm) on a camera will have an approximate viewing angle of 60° – Stand at the camera position, look in the direction the camera will aim and cover one eye, this will provide a rough idea of the coverage area Order a 4 or 8-channel DVR and the number of cameras depending on your needs The Talos DVRs store video on SATA hard drives with capacity up to 1TB The hard drive is user installed Determin
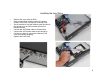
Installing the Hard Drive • • • • • • • Remove the cover from the DVR Stick the hard drive isolation pads to the bottom chassis of the DVR over the four mounting holes Set the hard drive onto the isolation pads and secure the hard drive to the DVR chassis with the four included screws Connect the SATA data cable to the hard drive Connect the SATA power cable to the hard drive Confirm no cables or connectors inside the DVR came loose during shipping Replace the DVR cover 4
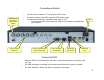
Connecting a Monitor • • • Connect a TV here using a BNC to RCA adaptor Connect camera video here You will need a monitor or TV to set up the DVR for use Connect a monitor to the DVR using the HD15 female output Or connect the DVR to the composite video input on a TV – You will need a BNC video cable with a BNC to RCA adapter, available from Parts-Express Connect a monitor here using a VGA Cable Cat 5 connection for networking Connect the mouse here Power USB thumb drive Turning On DVR • • • When
Shutting Down the DVR • • • • • NOTE: Never shut off the DVR using the power switch on the back of the unit.
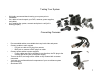
Testing Your System • We highly recommend bench testing your system prior to installation On a table or bench unpack your DVR, cameras, power supplies, and cables As if installing the system, connect each piece to verify all is working properly • • Connecting Cameras • • • • • • Pre-assembled cables are available that carry both video and power Connect a cable to each camera – DC jack on cable to DC plug from camera – BNC jack on camera to BNC plug from cable Connect power cables to power supplies – Po
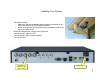
Installing Your System • • • • • Run camera cables – Make sure that pre-assembled camera cables are installed in the correct direction so the DC plug/jack will mate – Never exert force on the connectors during installation as this may cause the cables to fail Mount the cameras and connect video and power Connect camera cables to DVR Connect power cables to power supplies Turn on the DVR Connect the cameras to the video in inputs Power Switch 8
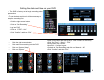
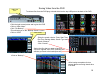
Setting the date and time on your DVR • The DVR is factory set to begin recording when powered on • To set the date and time it will be necessary to stop the recording first - Click the right mouse button - Click on “Set Recording” - Log into DVR - Click on “STOP – ALL” - Click “Confirm” and then “Exit” • • • • Click the right mouse button Click main menu and log into the DVR Click on “System Setup” Click on “System” •Enter correct time and date (Leave “Time Format” as 24 hours) •Click “Set Time” – “Save
USB thumb drive Saving Video from the DVR To retrieve files from the DVR plug a thumb drive into the top USB port on the back of the DVR •Click the right mouse button and log into the DVR •Click on “Main Menu” •Click “File Backup” •This will take you to the “Backup Search” screen •Click on “ADD” Click on add •Enter the search criteria: “Date, Start Time, End Time, Backup Mode, Search Type and Search Channel” •Click “Search” •Select the files that you want to back up •Click on “Append” then “Exit” (select
View Saved Video on a Computer •The video saved from the DVR is .lvf format, your DVR includes a CD with a “plug-in” to view video files with Windows Media Player •Load the software from the CD to your computer •Plug the thumb drive into a USB slot and open a video file •You can save the files to a thumb drive or burn to a CD/DVD ROM to archive the files •NOTE: If you get a message stating that the .lvf is not recognized, click “Yes” and the player will play content.
Configure DVR to access video on local computer • Open “Main Menu” on the DVR, enter your password, click “Confirm” then select “System Setup” then “Network” •When connected to a router the DVR will automatically negotiate an IP address. •So you can find your DVR later, we recommend you assign it an IP address on your network. Simply enter a new number into the last three digits of the IP address and note that address.
Configure DVR to access video on local computer 1 2 1. Click the “Auto Assign” radio button to turn off DHCP • The radio button will turn from white to black 2. Enter the new IP address into the field. 3. 4. 5. 6. Enter “7777” into Server Port Enter “80” into HTTP PORT Click “Save”, then “Confirm” and exit the DVR menus Reboot the DVR • Eg.192.168.1.222 3 4 5 NOTE: Never reboot the DVR using the power switch on the back of the unit. Treat the DVR as a Linux based PC and shut it down properly.
Viewing DVR from local PC or Laptop •Double-click the DVR Client shortcut icon on your desktop 1 2 Log Into Your DVR 3 4 5 1. 2. 6 7 Click “By IP address” Enter the IP address from the DVR Network Setup Screen 3. Enter Port 7777 4. Enter User Name • The default is “admin” 5. Enter Password • The default is “666666 or 888888” 6. Check “Auto-preview…” 7.
Setup DVR Client software to download and save video •Log into your DVR in the same way described on page 14 2 1 3 4 1. 4 4 Create a file folder on your desktop and name it “DVR Files” • 2. 3. 4. This will make it easier for you to find saved video recordings Click the “Setup” button on the GUI Click the “Local Setting” tab in the setting menu Change the “Record, Capture and Download Setting” paths to the file folder on your desktop E.g.: C:\Documents and Settings\user name\Desktop\DVR Files 5.
Download Video Files to Local Computer 2 1 3 1. 2. Click on “Control” Click on the “Download” tab in the “Status Control” menu 3. Select the channel(s), date, and time that you want to download 4. Once the list populates, highlight the file you want to save (you can save only one at a time) 5. Click “Download and Convert” the file will be saved as an .
Access DVR Over the Internet Signing up for your Domain name •Sign up for free Dynamic Domain Name Service at dyn.com •You will create a Domain Name, Account Name, and Account Password, make note of these as you set up your account •Click “Get Started With DNS” •Scroll to the bottom of the screen and click “DynDNS Free” •Click “Get It Now” 1 1. 2. 3. Enter a “Hostname (Domain Name)” of your choosing E.g.. talosdvr Select an extension E.g.. dyndns.
DVR Network Settings for Internet access •Go to main menu and log into the DVR •Click “Main Menu” then “System Setup” then “Network” 1. 2. 3. 4. 5. 6. Click the drop-down box to the left of “DDNS Server” and select DYNDNS.org Enter your “Domain Name” Enter your “Account” name Enter your account “Password” Click “Save” Reboot the DVR 1 2 3 4 5 NOTE: Never reboot the DVR using the power switch on the back of the unit. Treat the DVR as a Linux based PC and shut it down 6 properly.
Configuring Your Router You will need to configure your router for Port Forwarding to allow access to your DVR from the internet •Open Internet Explorer •Enter your router IP address in the address bar, this is the same as your Default Gateway -We are using a Linksys router with an IP address of 192.168.1.
Configuring Your Router 1. 2. 4. 5. 6. 7. Click the “Applications & Gaming” tab Enter the name of the Application • For example Tal DVR Enter the port range (80 to 80) • It is OK to enter the same port number as both the Start and End of the range Enter Mobile Port 8888 Enter Server Port 7777 (Used by the DVR) Set Protocol to Both Enter the IP address from the DVR 8. 9. Click “Enable” Click “Save Settings” 3. 1 6 2 7 8 3 4 5 E.g. 168.192.1.
Accessing DVR Over the Internet Using DVR Client 1. Double-click the DVR Client shortcut icon on your desktop Click “By domain” 1 Enter your DDNS Domain Name Enter Port 7777 Enter User Name 2. 3. 4. 5. • 6. The default is “admin” Enter Password • The default is “666666 or 888888” 7. Check “Save Password” 8. Check “Auto-preview…” 9.
Click the “Security” tab and then “Custom level” •Enable all settings under ActiveX controls and plug-ins •Click OK Click Yes in the “Are you sure you want to change…” dialog box •Click Apply •Click OK •Close Internet Explorer to save changes 22
• • Open Internet Explorer – Internet Explorer is recommended for network or internet access to your DVR In the address line, enter your domain name – The name you created when you set up your DynDNS account E.g.. http://talosdvr.dyndns.tv If IE displays the warning above, click the yellow bar Click Run ActiveX Control You now have access to your DVR and Log-in screen NOTE: The security settings of some computers may not allow access to the DVR.
•Enter User Name •The default is “admin” •Enter Password •The default is “666666 or 888888” •Check “Auto-preview…” •Click “Login” Once video has loaded click “Exit” •You can now reset the security settings in Internet Explorer •Click Tools, Internet Options, Security •Click Reset all zones to default level •Click OK 24
Viewing the DVR with Your Smartphone •Go to your cell/mobile phone provider’s market •Search for talos •Click on IP Camera Viewer (iPhone) or IP Cam Viewer (Droid) •Download and install the application 25
Viewing the DVR with Your Smartphone Click “+” to add cameras Select IP Camera, DVR, NVR Name the camera you will view Select Talos from the “Make” list Select Talos H.264 DVR Mobile Port from the “Model” list 6. Enter your DynDNS name into “Host/IP” field 7. Enter 8888 into the “Mobile Port” field 8. Enter the DVR channel to associate with the camera you will view 9. Enter your DVR login user name into the “User” field 10. Enter your DVR login password into the “Pswd” field 11.
Viewing the DVR with Your Smartphone • • Place a shortcut to IP Cam Viewer on your Smartphone main screen, touch to launch the viewer application You can view 4 or 8 cameras at a time depending on the phone orientation – horizontal for 4 cameras – vertical for 8 cameras • • • Tap a camera to view an individual camera Click the camera icon to take a picture of the camera’s view Use your smartphone to keep tabs on your home, office or store at any time 27