
Instruction Manual


Digital Video Recorder User Manual
46
User can click button to adjust the order of selected preset.
4) Click “Preview” button to preview the selected cruise line, click OK button to save
the setting, click Exit button to exit current menu.
5) Select a cruise line in the list, click “Delete” button to delete it; click “Clear All”
button to clear all cruise lines; click OK button to save the setting; click Exit button to
exit current menu.
Track
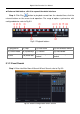
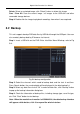
1) Click “Setting” button of track in Fig 4-43 to pop up a window, as shown in Fig 4-48.
Fig 4-48 advanced-track setting
2) Select a channel or all channels which need to configure PTZ parameters; control
the dome rotates up, up left, left, left down, down, right down, right, up right and stop
rotating; drag the slider to adjust the rotate speed; zoom, focus and iris are adjustable;
click button to enable the PTZ wiper, click button to enable the PTZ light.
Note: Wiper and light buttons can take effect with support from PTZ function. At
the same time these two buttons are just available when selecting PELCOP or
PELCOD.
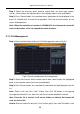
3) Click “Start Record” button to record the track of PTZ movements, click this button
again to stop recording; click “Start Track” button to play recorded track, click this
button again to stop playing.
4) Click button to hide the tool bar, click the right mouse button to revert back;
click button to exit the current menu.
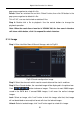
In the advanced interface, click “Default” button to restore the default setting; click
“Apply” button to save the setting; click “Exit” button to exit current menu.