nL = 4, nH = 0 ((tH x 256) + tL) < ((bH x 256) + bL) ((bH x 256) + bL) x (defined unit) ≤ 22 set page format top margin < bottom margin bottom margin < 22 inches Defines top and bottom margins previously defined with the sequence ESC ( U (see page 62).This sequence sets new top and bottom. it does not affect the current page length setting. Set top and bottom margin first, then load paper. Using this sequence within the form sets top margin at the current position.
ESC N ESC O Perforation Skip Reset Perforation Skip Data Structure Description ASCII hex. dec. ESC "N" 1B 4E 27 78 ASCII hex. dec. ESC "O" 1B 4F 27 79 set space before perforation (perforation skip) ➊ reset perforation skip ➋ ➊ This code sequence enables the perforation skip function and sets the bottom margin (distance between the last print line of one page and the first print line of the following page) to n lines.
Example 10 20 30 40 50 60 70 80 REM skip LPRINT CHR$(27);"C";CHR$(6);:REM form length LPRINT CHR$(27);"N";CHR$(1);:REM set skip FOR F=1 TO 2 FOR L=1 TO 5 LPRINT "form";F;" line";L NEXT L:NEXT F END Paper and Text Formatting 11
ESC Q ESC l Right Margin Left Margin Data Structure ASCII hex. dec. ESC "Q" 1B 51 27 81 ASCII hex. dec. ESC "l " set left margin 1B 6C 27 108 Description set right margin ➊ ➋ Values for n Character density 80 columns printer 136 columns printer 10 cpi 12 cpi 15 cpi 17.1 cpi 20 cpi 1... 80 1... 96 1...120 1...136 1...160 1...136 1...163 1...204 1...232 1...255 Values for n are valid for a line length of 8 inch (80 columns printer) or 13.
Example 10 20 30 40 50 60 70 80 90 100 110 REM LPRINT LPRINT LPRINT LPRINT LPRINT LPRINT LPRINT LPRINT LPRINT END left and right margin " 1 2 3 4 5" "12345678901234567890123456789012345678901234567890123" CHR$(27);"l";CHR$(10);CHR$(27);"Q";CHR$(53); "Now the left margin is set to column 10 and"; "the right margin is set to column 53." CHR$(27);"l";CHR$(5);CHR$(27);"Q";CHR$(41); "Now the left margin has been reduced"; "to column 5 and the right margin has"; "been set to column 41.
ESC a Justification and Centering Data Structure ASCII hex. dec. Description In some cases it is necessary to center headlines or to have the text printed in a way that left or right margin or both margins are justified. By means of this code sequence the printer automatically justifies the text. Justification mode depends on the value selected for n: ESC "a" 1B 61 27 97 0 (hex.00 or hex.30) 1 (hex.01 or hex.31) 2 (hex.02 or hex.32) 3 (hex.03 or hex.
Example 10 20 30 40 50 55 60 70 80 90 100 110 120 130 140 150 160 170 180 REM WIDTH LPRINT LPRINT LPRINT LPRINT LPRINT LPRINT LPRINT LPRINT LPRINT LPRINT LPRINT LPRINT LPRINT LPRINT LPRINT LPRINT END justification and centering "LPT1:",255 CHR$(27);"Q";CHR$(48);:REM set right margin CHR$(27);"a";CHR$(1);"CENTERED" "HEADLINE" CHR$(27);"a";CHR$(3) "Now the right and the left justification "; "is on. The lines are filled with blanks "; "until they are long enough to reach the "; "right margin.
Character Spacing ESC c Set HMI (Horizontal Motion Index) Data Structure ASCII hex. dec. Description Valid values: ESC "c" 1B 63 27 99 set HMI (Horizontal Motion Index) 0 ≤ nH ≤ 4 0 ≤ nL ≤ 255 0 < ((nH x 256) + nL)) ≤ 1080; HMI ≤ 3.
This sequence terminates previously set additional character space defined with ESC SP.
SO/ESC SO DC4 ESC W Set enlarged Print Mode Reset enlarged Print Mode Continuous enlarged Print Mode Syntax Description set enlarged print mode (for one line) ➊ DC4 14 20 reset enlarged print mode (set by SO or ESC SO) ➋ ESC "W" or n 1B 57 or n 27 88 or n set/reset continuous enlarged print mode ➌ ASCII hex. dec. SO 0E 14 ASCII hex. dec. ASCII hex. dec. or or or ESC SO 1B 0E 27 14 ➊ Either one of these codes switches the printer to the enlarged print mode.
Example 10 20 30 40 50 60 70 80 90 100 110 120 REM enlarged character densities LPRINT CHR$(27);"P";: REM 10 cpi LPRINT "normal 10 cpi character density" LPRINT CHR$(27);"W";CHR$(1);: REM continuous enlarged density LPRINT "10 cpi continuous enlarged" LPRINT CHR$(27);"M";: REM 12 cpi LPRINT "12 cpi continuous enlarged" LPRINT CHR$(27);"W0";: REM normal character density LPRINT CHR$(14);: REM enlarged character density for one line LPRINT "this is enlarged only" LPRINT "for one line" END Character Spacing
SI/ESC SI DC2 Condensed Character Density Reset Condensed Character Density Data Structure Description ASCII hex. dec. SI 0F 15 ASCII hex. dec. DC2 12 18 or or or ESC SI 1B 0F 27 15 condensed print ON ➊ reset condensed print ➋ ➊ When the printer receives this code, the data will be printed approx. 40% smaller than in normal mode. Condensed print mode can be used in all print qualities. It can be used during printing in the double strike or bold modes.
ESC P ESC M ESC g Character Density 10 cpi Character Density 12 cpi Character Density 15 cpi Data Structure Description ASCII hex. dec. ESC "P" 1B 50 27 80 set character density to 10 cpi (Pica) ➊ ASCII hex. dec. ESC "M" 1B 4D 27 77 set character density to 12 cpi (Elite) ➋ ASCII hex. dec. ESC "g" 1B 67 27 103 set character density to 15 cpi ➌ ➊ This code sequence sets the character density to 10 cpi (Pica). This is also the default character density.
Example 10 20 30 40 50 REM LPRINT LPRINT LPRINT END 22 Character Spacing single character densities CHR$(27);"P";"this is pica sized" CHR$(27);"M";"and this is elite sized" CHR$(27);"g";"and this is 15 cpi"
ESC p Proportional Spacing Data Structure ASCII hex. dec. Description If 1 is specified for n, proportional spacing is ON, if 0 is specified for n, proportional spacing is OFF. When in default font type, all characters are assigned a fixed, equally wide space. When in proportional spacing, the spaces between each character are set to the actual width of the characters; on account of these “proportional” characters reading of the text becomes more easy.
ESC SP Character Spacing Data Structure ASCII hex. dec. Description The size of the spaces between the characters is increased by n ∗ 1⁄180 inch in NLQ and LQ and in Draft by n ∗ 1⁄120 inch. This space is added to the spaces used for character definition. The value specified for n must be in the range of 0 to 127.
Line Spacing ESC 0 ESC 1 ESC 2 Fixed Line Spacing 1/8 Inch Fixed Line Spacing 7/72 Inch Fixed Line Spacing 1/6 Inch Data Structure Description ASCII hex. dec. ESC "0" 1B 30 27 48 set line spacing to 1/8 inch ➊ ASCII hex. dec. ESC "1" 1B 31 27 50 set line spacing to 7/72 inch ➋ ASCII hex. dec. ESC "2" 1B 32 27 50 set line spacing to 1/6 inch ➌ ➊ This code sequence sets line spacing to 1⁄8 inch.
Note that changing the line spacing also changes the number of lines per page. Changing the line spacing does not affect the current tab stops or form length.
ESC 3 ESC A ESC + Variable Line Spacing n/180 Inch or n/216 Inch Variable Line Spacing n/60 Inch or n/72 Inch Variable Line Spacing n/360 Inch Data Structure Description ASCII hex. dec. ESC "3" 1B 33 27 51 set n/180 inch line spacing set n/216 inch line spacing ➊ ASCII hex. dec. ESC "A" 1B 41 27 65 set n/60 inch line spacing set n/72 inch line spacing ➋ ASCII hex. dec.
Example 28 Line Spacing 10 20 30 40 50 60 70 REM FOR N= LPRINT LPRINT LPRINT NEXT END variable line spacing 20 TO 40 STEP 10 CHR$(27);"3";CHR$(N) "these two lines are printed with" "a spacing of";N;"/180 inches" 10 20 30 40 50 60 70 REM FOR N= LPRINT LPRINT LPRINT NEXT END variable line spacing 20 TO 40 STEP 10 CHR$(27);"3";CHR$(N) "these two lines are printed with" "a spacing of";N;"/216 inches"
Character Styling ESC S ESC T Super-/Subscript Mode ON Super-/Subscript Mode OFF Data Structure Description ASCII hex. dec. ESC "S" 1B 53 27 83 ASCII hex. dec. ESC "T" 1B 54 27 84 or n or n or n super/subscript mode ON ➊ super/subscript mode OFF ➋ ➊ This code sequence switches the printer to superscript or subscript mode. The printer is switched to superscript mode when 0 (hex.00 or hex.30) is set for n, and to subscript mode when 1 (hex.01 or hex.31) is set.
Example 10 REM superscript and subscript 20 LPRINT "E=M*C"; 30 LPRINT CHR$(27);"S";CHR$(0); 40 LPRINT "2"; 50 LPRINT CHR$(27);"T"; 60 LPRINT " is Einsteins most famous formula." 70 LPRINT "H"; 80 LPRINT CHR$(27);"S";CHR$(1);"2";CHR$(27);"T"; 90 LPRINT "O is simply water.
ESC G ESC H Double Strike ON Double Strike OFF Data Structure Description ASCII hex. dec. ESC "G" 1B 47 27 71 double strike ON ➊ ASCII hex. dec. ESC "H" 1B 48 27 72 double strike OFF ➋ ➊ This code sequence switches the printer to double strike mode. In double strike mode characters are printed in two printing passes at the same horizontal position; thus print appears thicker and fuller. Print speed is reduced since the characters are printed twice.
ESC X Select Font and Pitch by Point Data Structure ASCII hex. dec. Description Valid values: ESC "X" 1B 58 27 88 5 ≤ m ≤ 127 0 ≤ nL ≤ 255 0 ≤ nH ≤ 127 select font and pitch by point m = 0.1 Selects the pitch and point attributes for scalable fonts.
STOP Not all printer fonts are scaleable. Please refer to the printer’s reference manual which fonts are supported. Scaleable fonts can only be printed in one quality (LQ). Points: Following point sizes (1/72 inch) are available: 8, 10 (10.5), 12, 14, 16, 18, 20 (21), 22, 24, 26, 28, 30, 32 Pitch: Previously set pitch settings will be cancelled.
ESC x Print Quality Data Structure ASCII hex. dec. ESC "x" or n 1B 78 or n 27 120 or n Description n set print quality (PQ) Selected via control panel DPQ NLQ LQ 0 DPQ DPQ DPQ 1 LQ NLQ LQ Valid values for n are either ASCII Code 0 and 1 (hex00 and hex.01) or ASCII characters "0" and "1" (hex.30 and hex.31). Example 10 20 30 40 REM print quality LPRINT CHR$(27);"x1";"This is high print quality " LPRINT CHR$(27);"x0";"and this is draft print quality.
ESC k Font Type Selection Data Structure ASCII hex. dec. Description Corresponding to the value specified for n, one of the printer’s internal fonts or a font of an optional font card is selected. Please refer to the printer’s reference manual which fonts are supported by your printer type. This sequence is not valid in Draft Mode.
Example 10 20 30 40 50 60 70 36 Character Styling REM font selection LPRINT CHR$(27);"x1"; : REM high print quality FOR i=0 TO 9 LPRINT CHR$(27);"k";CHR$(i); LPRINT "This is the font selected with ";i" NEXT i END
ESC q Typestyle Selection Data Structure ASCII hex. dec. Description This sequence selects normal typestyle, outline typestyle, shaded typestyle or shaded outline typestyle. All the characters of the extended EPSON character set with the exception of the characters hex.B0 to hex.DF (dec.176...dec.233), hex.F4 (dec.244) and hex.F5 (dec.245) can be printed in the selected typestyle.
ESC E ESC F Emphasized Mode ON Emphasized Mode OFF Data Structure Description ASCII hex. dec. ESC "E" 1B 45 27 69 emphasized mode ON ➊ ASCII hex. dec. ESC "F" 1B 46 27 70 emphasized mode OFF ➋ ➊ This code sequence switches the printer to emphasized mode. During printing in emphasized mode, each character is printed twice, slightly shifted in horizontal direction. Since the needles in the print head are fired twice (instead of once as in standard mode), print speed is reduced.
ESC - Underline Mode Data Structure ASCII hex. dec. Description This code sequence switches the automatic underline function ON or OFF. When the automatic underline function is ON, all printed characters including spaces are automatically underlined. The automatic underline function is ON when 1 is specified for n, and is OFF when 0 is specified. Once the printer receives ESC -<1>, all subsequent characters including spaces are automatically underlined until ESC -<0> is received.
ESC ( - Score Selection Data Structure ASCII hex. dec. Description This Escape sequence switches on and off the underscore, overscore and strike-through modes. The lines can be single or double, broken or continuous. ESC "(" 1B 28 27 40 "-" 2D 45 <3> NUL <1> 03 00 01 3 0 1 n1 = loc n2 = type loc (n1) The parameter n1 indicates the location of the score to be printed. The following values are avaiable: 1 2 3 (hex.01) (hex.02) (hex.
Example 10 20 30 40 50 60 70 80 90 100 110 120 130 140 150 REM Score Selection LPRINT CHR$(27);"(-";CHR$(3);CHR$(0);CHR$(1);CHR$(1);CHR$(2); LPRINT "1. Underline - Double continous line" LPRINT CHR$(27);"(-";CHR$(3);CHR$(0); CHR$(1);CHR$(2);CHR$(2); LPRINT "2. Strike through and Underline - Double continous line" REM cancel strike through - double continous line LPRINT CHR$(27);"(-";CHR$(3);CHR$(0);CHR$(1);CHR$(2);CHR$(0); LPRINT CHR$(27);"(-";CHR$(3);CHR$(0);CHR$(1);CHR$(2);CHR$(1); LPRINT "3.
ESC 4 ESC 5 Italic Mode ON Italic Mode OFF Data Structure Description ASCII hex. dec. ESC "4" 1B 34 27 52 italic mode ON ➊ ASCII hex. dec. ESC "5" 1B 35 27 53 italic mode OFF ➋ ➊ All characters following this code sequence are printed in italics. Italic characters are also printed, if codes with the eight bit set by ESC > are sent to the printer. The characters hex.B0 to hex.DF (hex.176...dec.223) and hex.F0 to hex.FE (dec.240...dec.
ESC ! Print Mode Selection Data Structure ASCII hex. dec. Description This code sequence allows simultaneous control of print features like the character size and attributes characters. By this code sequence several print features can be simultaneously set via the value of n. This command can also be used to reset all character styling features or to reset the printer to standard Pica font type by specifying n=0. The value specified for n must be in the range of 0 to 255.
Standard ConEndensed larged Cond. Propor- Prop.-/ LQ enlarg. tional enlarg. LQ enlarged Pica - normal - emphas. - double - em./double 0 8 16 24 4 – 20 – 32 40 48 56 36 – 52 – 2 18 – – 34 50 – – 0 8 – – 32 40 – – Pica italic - normal - emphas. - double - em./double 64 72 80 88 68 – 84 – 96 104 112 120 100 – 116 – 66 82 – – 98 114 – – – – – – – – – – Pica underlined - normal - emphas. - double - em.
Example 10 20 30 40 50 60 70 REM print mode selection LPRINT CHR$(27);"D";CHR$(40);CHR$(0); FOR N = 0 TO 255 STEP 7 LPRINT CHR$(27);"!";CHR$(N); LPRINT "Matrix Printer";CHR$(9);CHR$(27);"!";CHR$(0);N NEXT N END Character Styling 45
ESC w Double Height Data Structure ASCII hex. dec. Description By means of this code sequence the characters of the subsequent text are specified with double height. ESC w followed by n=1 (hex.01 or hex.31) sets double height printing. To reset the double height to the normal height, specify n=0 (hex.00 oder hex.30). The line spacing is not altered. This command cannot be combined with superscript/subscript or condensed print commands. ESC w with parameter n=0 (hex.00 or hex.
Print Positioning ESC D Horizontal Tab Stops Data Structure Description ASCII hex. dec. ESC "D" 1B 44 27 68 ... ... ... ASCII hex. dec. ESC "D" 1B 44 27 68 NUL 00 0 NUL 00 0 set horizontal tab stops ➊ clear all horizontal tab stops ➋ ➊ This code sequence is used for setting or clearing horizontal tab stops. It replaces all previous tab stops and can be used to set a maximum of 32 tab stops.
When the printer is switched on or ESC @ is sent, horizontal tab stops are set at every eight position (9, 17, 25, etc.).
ESC e Set Horizontal and Vertical Step Width Data Structure Description ASCII hex. dec. ESC "e" NUL 1B 65 00 27 101 0 Set horizontal step width ➊ ASCII hex. dec. ESC "e" SOH 1B 65 01 27 101 1 Set vertical step width ➋ ➊ This sequence sets the horizontal step width n according to the current character density. When an HT command is received, a horizontal tab stop is carried out.
ESC f Horizontal and Vertical Step Forward Data Structure Description ASCII hex. dec. ESC "f" NUL 1B 66 00 27 102 0 Set horizontal step forward ➊ ASCII hex. dec. ESC "f" SOH 1B 66 01 27 102 1 Set vertical step forward ➋ ➊ At the next print position n spaces without carriage return (CR) are inserted. As soon as this command is received, all data in the buffer are printed. This command is ignored when justification is activated.
ESC $ Absolute Horizontal Step Data Structure ASCII hex. dec. Description This code sequence moves the print head to an absolute print position independent of the current character density. The positioning is in increments of 1⁄60 inches. The print position from the left hand margin is then calculated as: (n1 + n2 ∗ 256). The value specified for n1 must be in the range of 0 to 255, the value specified for n2 must be in the range of 0 to 3.
Example 10 20 30 40 50 60 70 80 90 100 110 120 52 Print Positioning REM absolute horizontal position LPRINT CHR$(27);"x1";:REM select LQ LPRINT CHR$(27);"$";CHR$(10);CHR$(0);"10"; LPRINT CHR$(27);"$";CHR$(100);CHR$(0);"100"; LPRINT CHR$(27);"$";CHR$(170);CHR$(0);"170"; LPRINT LPRINT CHR$(27);"W1"; LPRINT CHR$(27);"$";CHR$(10);CHR$(0);"10"; LPRINT CHR$(27);"$";CHR$(100);CHR$(0);"100"; LPRINT CHR$(27);"$";CHR$(170);CHR$(0);"170"; LPRINT END
ESC \ Relative Horizontal Step Data Structure ASCII hex. dec. Description This code sequence moves the print head to a relative print position without regard to the current character density. This print position is calculated according to the formula (n1 + 256 ∗ n2).Each dot, i. e. each print position has a width of 1⁄120 inch in DPQ and 1⁄180 inch in NLQ and LQ. Calculation of the values of n1 and n2 first requires the prefix (n dots) to be calculated.
n1 = = = 480 MOD 256 dec.224 hex.E0 Movement of 5⁄3 inches (1.67 inches) towards the left side: n = = 65536 - 1.67 * 120 65336 n2 = = = INT (65336⁄256) dec.255 hex.FF n1 = = = 65336 MOD 256 dec.56 hex.38 Note that you obtain the same result by using the formula given for calculating n1 and n2 for absolute horizontal step (see sequence ESC $). Only the method of calculations is different.
ESC B Vertical Tab Stops Data Structure Description ASCII hex. dec. ESC "B" 1B 42 27 66 ... ... ... ASCII hex. dec. ESC "B" 1B 42 27 66 NUL 00 0 NUL 00 0 set vertical tab stops ➊ reset all vertical tab stops ➋ ➊ By means of this code sequence a maximum of 16 vertical tab stops can be set. For example, CHR$(27);"B";CHR$(1);CHR$(11);CHR$(21);CHR$(0); sets vertical tab stops at lines 1, 11 and 21, line 1 being the first line of the page.
When the printer is switched on no vertical tab stops are set.
ESC b ESC / Set/Reset Vertical Tabs in Channels Select Vertical Tab Channel Data Structure Description ASCII hex. dec. ESC "b" 1B 62 27 98 ... NUL ... 00 ... 0 set vertical tabs in channels ASCII hex. dec. ESC "b" 1B 62 27 98 NUL 00 0 clear all tab settings ASCII hex. dec. ESC "/" 1B 2F 27 47 select vertical tab channel ➊ ➋ ➊ Up to 16 vertical tabs for one channel can be set. the number of tab channels m ranges from 0 to 7.
Example 10 20 30 40 50 60 70 80 90 100 110 120 130 140 150 160 170 180 190 200 58 Print Positioning REM vertical tabs in tab channels LPRINT CHR$(27);"C";CHR$(24); ’form length 24 lines LPRINT CHR$(27);"b";CHR$(0);CHR$(2);CHR$(4);CHR$(6);CHR$(0) REM Channels 0 tabs set at lines 2, 4, and 6 LPRINT CHR$(27);"b";CHR$(1);CHR$(9);CHR$(11);CHR$(14);CHR$(0); REM Channel 1 tabs set at lines 9, 11, and 14 LPRINT CHR$(27);"/";CHR$(0); REM Selects channel 0 LPRINT "Channel 0" GOSUB 180 LPRINT CHR$(27);"/";CHR$(1);
ESC ( V Set Absolute Vertical Print Position Data Structure ASCII hex. dec. Description Valid values: ESC "(" 1B 28 27 40 "V" 56 86 set absolute vertical print pos. nL = 2, nH = 0 0 ≤ mL ≤ 255; 0 ≤ mH ≤ 127 Defines the vertical print position in units previously defined with the sequence ESC ( U (see page 62).
ESC ( v Set Relative Vertical Print Position Data Structure ASCII hex. dec. Description Valid values: ESC "(" 1B 28 27 40 "v" 76 118 set relative vertical print pos. nL = 2, nH = 0 0 ≤ mL ≤ 255; 0 ≤ mH ≤ 127 Defines the vertical print position relatively up and down in units previously defined with the sequence ESC ( U (see page 62).
The default unit for this sequence is 1⁄360". Only positions within a valid form can be achieved. The current position is base for the newly defined relative positions. Positions exceeding the defined top margin will be ignored. Positions below bottom margin will a) eject paper (single sheet) and b) set new position to top of form at next page.
ESC ( U Set Unit Data Structure ASCII hex. dec. Description Valid values: ESC "(" 1B 28 27 40 "U" 55 85 nL = 1, nH = 0 m = 10, 20, 30, 40, 50, 60 Sets the units to m⁄3600 inch. Following commands are using this unit: ESC ( V ESC ( v ESC ( C ESC ( c The default values of these sequences is defined at 1⁄360 inch.
Graphics ESC K ESC L ESC Y ESC Z ESC * Graphics 60 dpi Graphics 120 dpi High Speed Graphics 120 dpi Graphics 240 dpi Graphic Modes Data Structure Description ASCII hex. dec. ESC "K" 1B 4B 27 75 graphics 60 dpi ASCII hex. dec. ESC "L" 1B 4C 27 76 graphics 120 dpi ASCII hex. dec. ESC "Y" 1B 59 27 89 high speed graphics 120 dpi ASCII hex. dec.
Special 8 Point Sequences ESC * ... -Sequences Density in dpi (Dots per Inch) Print Mode horizont. Needles in use Adjacent Dots 8 possible 8 possible vertic. ESC K... ESC * <0>... single density 60 72 60 ESC L... ESC * <1>... double density 120 ESC Y... ESC * <2>... double density/ high speed 120 8 not possible ESC Z... ESC * <3>... quadruple density 240 8 not possible – ESC * <4>... screen graphics 80 8 possible – ESC * <5>...
Relationship between bits of graphics data and needles (9 needle version) Each needle in a column is assigned a bit of the data byte. Needle 1 2 3 4 5 6 7 8 • • • • • • • • Data Byte 1 Bit 7 Bit 6 Bit 5 Bit 4 Bit 3 Bit 2 Bit 1 Bit 0 Relationship between bits of graphics data and needles (24 needle version) When using 24-pin graphics modes, three bytes of data are required for each dot column.
Graphics and text can be mixed within one line. If image data, lying outside the printable area, are input these data are ignored.
ESC ( G Select Graphics Mode Data Structure ASCII hex. dec. Description Valid values: ESC "(" 1B 28 27 40 "G" 47 71 select graphics mode nL = 1 nH = 0 m = 1, 49 Enters graphics mode. Prepares printer for the sequence ESC . (see page 76).
The graphics mode can be exited with sequence ESC @ (see page 114). In this mode text and graphics cannot be mixed on the same page. This sequence does not allow text and user defined character printing. Vertical and horizontal tab settings are cleared.
ESC ? Graphics Mode Reassignment Data Structure ASCII hex. dec. Description This code sequence redefines one of the four alternate bit image codes ESC K, ESC L, ESC Y or ESC Z as one of the bit density numbers used with the ESC * ... code sequence.
Example 70 Graphics 10 20 30 40 50 60 70 80 90 100 110 130 140 REM Reassigns graphics sequence LPRINT CHR$(27);"K";CHR$(60);CHR$(0); REM Standard ESC K graphics sequence FOR X=1 TO 60:REM 60 Columns LPRINT CHR$(255);:REM one byte per columns NEXT X:LPRINT LPRINT CHR$(27)"?K";CHR$(3) REM Reassigns ESC K to quadruple density LPRINT CHR$(27)"K";CHR$(60);CHR$(0); FOR Z=1 TO 60:REM 60 Columns LPRINT CHR$(255);CHR$(255);CHR$(255); NEXT Z END
ESC ^ Graphics Printing with 9 Print Dots Data Structure ASCII hex. dec. Description With this Escape sequence, graphics printing with 9 print dots per dot row is selected. For each row of dots two graphics bytes are required. The first byte controls the upper eight print dots and the second controls only the lowest print dot. m = 0 selects normal graphics resolution (60 dpi). m = 1 selects double graphics resolution (120 dpi). The data following the graphics ESC sequence are printed as a dot pattern.
Example for the calculation of n1 and n2: The number of graphics bytes is 80. n2 = = = = number of bytes divided by 256 80⁄256 dec.0 hex.00 n1 = = = remainder from division of n2 dec.80 hex.50 Graphics and text data can be used in combination in a line. For 9-print-dots-graphics-printing, two graphics bytes must be transferred per column.
Download Character Generator General Your printer offers you the possibility to design your own characters in normal print mode (DPQ), in NLQ, NLQ proportional, LQ and LQ proportional. These characters can either represent modified characters of the printer’s internal character sets or can replace other characters. These special characters, symbols, etc., can be defined in the Download Character Generator and then called “download characters” (DLL).
To define download characters it is helpful to do this in a defined way: Draft print quality or letter quality or letter quality proportional characters? Superscript or subscript character, 12 cpi or 15 cpi character (DPQ + LQ)? The desired print mode (DPQ or LQ or LQ proportional) must be selected in the printer. Load characters from ROM to RAM using ESC : if necessary. Define the new character in the RAM using ESC &. Select the RAM character set using ESC %.
ESC : Copy ROM into RAM Data Structure ASCII hex. dec. Description This Escape sequence copies the specified character set (see ESC k ) from ROM or from the font module to RAM. There the individual characters can be altered by the user.
ESC . Print Raster Graphics Data Structure ASCII hex. dec. Description Valid values: ESC "." 1B 2E 27 46 ... ... ... c=0 c=1 v = 10, 20 h = 10, 20 m = 1, 8, 24 0 ≤ nL ≤ 255 0 ≤ nH ≤ 127 0 ≤ d ≤ 255 This sequence supports following print densities: v h v (dpi) h (dpi) m 20 20 180 180 1, 8 or 24 20 20 180 360 1, 8 or 24 10 10 360 360 1, 8 or 24 “ESC .
Description of parameters: c=0 c=1 v h m nL, nH Normal mode (not compressed) Data Length Encoding (DLE, compressed) Vertical resolution in dpi: 360, 180 dpi Horizontal resolution in dpi: 360, 180 dpi Vertical dot count (rows of dot graphics) Horizontal dot count (columns of dot graphics) Calculating algorithm: nH = INT (horizontal dot count) 256 nL = MOD x (horizontal dot count) 256 Total number of data bytes x = m x INT (nH x 256) + nL + 7 8 d During normal mode (c=0) Graphics data d1 ...
STOP “a” Counter specifies the number of data bytes following: (counter byte) + 1 = (number of data bytes to follow) or (counter byte) = (number of data bytes to follow) – 1 128 ≤ (counter byte) ≤ 255 “b” Counter specifies the number of times to repeat the next byte of data: 256 – (counter byte) + 1 = (number of times to repeat next byte) (counter byte) = 257 – (number of times to repeat next byte) Data which will exceed the right margin are discarded.
ESC % Activate User Defined Character Set Data Structure Example ASCII hex. dec. ESC "%" SOH 1B 25 01 27 37 1 activate user defined character set in RAM ASCII hex. dec.
ESC & Download Characters The sequence for the definition of download characters receives different parameters for 9 needle and 24 needle printers. Use the data structure available for your printer. Definition of Draft Characters (9 Needle Printer) Data Structure ASCII hex. dec.
Defining Character (9 Needle Printer) COLUMNS 1 2 3 4 5 6 7 8 9 10 11 12 Each downloaded character is defined in a matrix field of 9 rows high and 12 columns wide. 8 7 R O W S 6 5 4 3 2 1 0 COLUMNS It is only possible to use column 1 up to column 11. Column 12 is the space between one character and the next. Therefore it is always left blank by automatically setting dots in column 12 to zero. Also, only 8 of 9 dots in any one column can be printed (see also “Descenders”).
Example (9 needle printer): COLUMNS 1 2 3 4 5 6 7 8 9 10 11 The following example illustrates the definition of a character, the copyright symbol (a small “c” in a circle), instead of the character “@”.
Example 10 20 30 40 50 60 70 80 90 REM LPRINT LPRINT LPRINT LPRINT LPRINT LPRINT LPRINT END Download Character Definition CHR$(27);"x";CHR$(0);:REM select draft print quality CHR$(27);"&";CHR$(0);"@@";CHR$(139); CHR$(56);CHR$(68);CHR$(146);CHR$(40); CHR$(130);CHR$(40);CHR$(130);CHR$(68); CHR$(56);CHR$(0);CHR$(0); CHR$(27);"%";CHR$(1);CHR$(0); "@ @ @ @ @ @ @ @ @ @" Attribute “A” (9 needle printer) Attribute “A” consists of descender data and proportional data.
Proportional Data (9 needle printer) Not all characters are the same size. “W” is considerably wider than “i”. In the proportional print mode, it is necessary to specify how much space a character takes by specifying the first and last printable columns in that character’s matrix. Seven bits of the attribute are used for specifying the print position of a character within its matrix.
Just add up the values of the three parts of the byte to get the value of A. 1. Normal Descender = = 128 0 2. First column is 1 First column is 2 First column is 3 First column is 4 First column is 5 First column is 6 First column is 7 First column is 8 = = = = = = = = 0 16 32 48 64 80 96 112 3.
Normal matrix field First column is 1 Last column is 12 = = = 128 0 11 Total value of = 139 Normal matrix field First column is 4 Last column is 9 = 48 = 128 = 184 Total value of 86 Download Character Generator = 8 E L E L
Example 10 20 30 40 50 60 70 80 90 100 110 120 130 140 150 160 170 180 190 200 210 220 230 240 250 260 270 280 290 300 REM Copy US ASCII caracter set LPRINT CHR$(27);"R";CHR$(0); LPRINT CHR$(27);":";CHR$(0);CHR$(0);CHR$(0); REM Define character into # code and 4 code LPRINT CHR$(27);"&";CHR$(0);"#$"; REM First character without descenter LPRINT CHR$(137); LPRINT CHR$(56);CHR$(68);CHR$(146);CHR$(40); LPRINT CHR$(130);CHR$(40);CHR$(130);CHR$(68); LPRINT CHR$(56);CHR$(0);CHR$(0); REM Second character with de
Definition of NLQ Characters (9 needle printer) The definition of NLQ characters is more comprehensive than the definition of draft characters, since a larger number of dots is required. User-defined NLQ characters can only be generated in the NLQ mode of the printer. Data structure Description ASCII ESC "&" hex. dez. 1B 27 x y d0 d1 d2 k n1...nk 26 38 NUL ... (data 1. character) ... (data 2.
Definition of the Character Grid NLQ characters consist of 18 vertical dots and 12 horizontal dots. Within this grid every numbered line or gap can be occupied, including the lowest and the furthest right line. You should, however, leave one or two columns empty, so that neighboring characters do not touch. 128 64 32 16 8 4 2 1 128 64 32 16 8 4 2 1 128 64 1 2 3 4 5 6 7 8 9 10 11 12 For each column of the NLQ character it is necessary to define 3 Bytes.
The following example shows a user-defined arrow with the list of the individual column values (each 3 byte) which must be transferred to the printer. 128 64 32 16 8 4 2 1 128 64 32 16 8 4 2 1 128 64 1 2 3 4 5 6 7 8 9 10 11 12 Data byte 1 0 0 0 0 0 255 0 0 0 0 0 0 Data byte 2 8 4 2 1 0 255 0 1 2 4 8 0 Data byte 3 0 0 0 0 128 192 128 0 0 0 0 0 See next page for the corresponding programming example.
Example 100 110 120 130 140 150 160 170 180 190 200 210 220 230 240 250 LPRINT CHR$(27);"x";CHR$(1); LPRINT CHR$(27);"&";CHR$(0);";;"; LPRINT CHR$(0);CHR$(12);CHR$(0); FOR I=1 TO 36 READ D LPRINT CHR$(0); NEXT I LPRINT "; ; ; ; ; ;" LPRINT CHR$(27);"%";CHR$(1); LPRINT "; ; ; ; ; ;" LPRINT CHR$(27);"%";CHR$(0); LPRINT "; ; ; ; ; ;" END DATA 0,8,0,0,4,0,0,2,0,0,1,0 DATA 0,0,128,255,255,192,0,0,128,0,1,0 DATA 0,2,0,0,4,0,0,8,0,0,0,0 Download Character Generator 91
24 needle printer Data Structure Description ASCII ESC "&" hex. dec. 1B 27 x y d0 d1 d2 n1...n3 26 38 NUL n1...n3 (data first character) n1...n3 (data second character) ... ... ...
For LQ proportional only, it is necessary to define all 41 columns; column 42 should be free. All other print modes use the number of columns as defined by d1. Superscript and subscript characters and 15 cpi characters can be assigned needles 1 to 16. The super and sub shifting will be done by corresponding escape sequence. If the same needle is set to print adjacent columns, the printer will ignore one of them, i.e. it will print in alternating order.
Example 10 REM Download Character Definition 20 LPRINT CHR$(27);"x1" 30 LPRINT CHR$(27);"&";CHR$(0);"AA"; 40 LPRINT CHR$(5);CHR$(30);CHR$(0); 50 LPRINT CHR$(15);CHR$(255);CHR$(0); 60 LPRINT CHR$(16);CHR$(0);CHR$(128); 70 LPRINT CHR$(32);CHR$(0);CHR$(64); 80 LPRINT CHR$(64);CHR$(0);CHR$(32); 90 LPRINT CHR$(128);CHR$(0);CHR$(16); 100 LPRINT CHR$(0);CHR$(0);CHR$(8); 110 LPRINT CHR$(128);CHR$(0);CHR$(4); 120 LPRINT CHR$(0);CHR$(0);CHR$(2); 130 LPRINT CHR$(128);CHR$(0);CHR$(1); 140 LPRINT CHR$(0);CHR$(0);CHR$(0
Miscellaneous ESC ( ^ Print Data as Characters Data Structure ASCII hex. dec. Description Valid values: ESC "(" 1B 28 27 40 "^" 54 94 ... ... ... print data as characters 0 ≤ nL ≤ 255 0 ≤ nH ≤ 127 Data bytes d1 to dn are printed as characters rather than control codes. k = ((nH x 256) + nL) nH = INT k 256 nL = MOD k 256 Data is ignored if no character is assigned to that character in the active character table.
ESC < ESC U Printing Direction unidirectional for one line Set/Reset Unidirectional Printing Data Structure Description ASCII hex. dec. ESC "<" 1B 3C 27 60 ASCII hex. dec. ESC "U" 1B 55 27 85 or n or n or n unidirectional printing for one line ➊ set/reset unidirectional printing ➋ ➊ This code sequence sets unidirectional printing mode only for one line. The printing is carried out from left to right. ➋ This code sequence sets or resets unidirectional printing mode.
ESC s Half-Speed Printing Data Structure ASCII hex. dec. Description With n=1 the print speed is reduced by half. The result is a lower printer noise level. With n=0 the normal print speed is set.
ESC J ESC j Single n/180 Inch or n/216 Inch Line Feed Single n/180 Inch or n/216 Inch Back Feed Data Structure Description ASCII hex. dec. ESC "J" 1B 4A 27 74 ASCII hex. dec. ESC "j" 1B 6A 27 106 n/180 inch line feed n/216 inch line feed ➊ n/180 inch back feed n/216 inch back feed ➋ ➊ When the printer receives this code sequence it advances the paper by n⁄180 inches (24 needle printer) or by n⁄216 inches (9 neadle printer).
ESC r Colour Selection Data Structure ASCII hex. dec. Description According to the value specified for n one of the subsequent colours is selected: ESC "r" 1B 72 27 114 0 1 2 3 4 5 6 black magenta cyan blue yellow red green 0 1 2 3 4 5 6 black red blue violet yellow orange green The available colours depend on the ribbon used. The ribbon used must be matched in the user menu (PRINTER OPTIONS, RIBBON OPTIONS).
The relationship between colour selection sequences and the resulting colours for several ribbon cassettes is shown in the following table: * ** *** **** Example 10 20 30 40 50 60 100 Miscellaneous selected colour magenta, cyan, yellow, black ribbon red, green, blue, black ribbon 3 ∗ black, red ribbon black black black black red red *) red red green green **) green ****) yellow yellow green ****) blue blue ***) blue ****) magenta magenta red red cyan cyan blue ****) the
ESC R International Character Sets Data Structure ASCII hex. dec. Description According to the value specified for n the corresponding international character set can be selected: 0 1 2 3 4 5 6 7 8 9 10 11 12 13 64 ESC "R" 1B 52 27 82 select international character set USA France Germany United Kingdom (UK) Denmark I Sweden Italy Spain I Japan Norway Denmark II Spain II Latin America Corea Legal For character sets see Appendix B.
Example 10 20 30 40 50 60 70 80 90 100 110 120 130 140 150 160 170 180 190 102 Miscellaneous REM LPRINT LPRINT LPRINT LPRINT LPRINT LPRINT LPRINT LPRINT LPRINT LPRINT LPRINT LPRINT LPRINT END LPRINT LPRINT LPRINT RETURN international character sets CHR$(27);"R";CHR$(0) ;"ASCII : CHR$(27);"R";CHR$(1) ;"FRANCE : CHR$(27);"R";CHR$(2) ;"GERMANY : CHR$(27);"R";CHR$(3) ;"UK : CHR$(27);"R";CHR$(4) ;"DENMARK I : CHR$(27);"R";CHR$(5) ;"SWEDEN : CHR$(27);"R";CHR$(6) ;"ITALY : CHR$(27);"R";CHR$(7) ;"SPAIN I : CHR$
ESC t Character Sets Data Structure ASCII hex. dec. Description Valid values: ESC "t" 1B 74 27 116 select character table 0 ≤ d1 ≤ 3, 48 ≤ d1 ≤ 51 By means of this code sequence the upper half of character code table (dec. 128 to dec. 255) can be selected. default * Description The Epson Standard Character Set is selected. The upper half contains control codes and italic characters.
You can either register 0 - 3. Register 3 is only available in ESC/P2 mode. The command ESC ( t can be used to assign character sets to character table (d1). If d1 = 2 you cannot use user-defined characters defined previously with ESC ( t (see page 105).
ESC ( t Assign Character Table Data Structure ASCII hex. dec. Description Valid values: ESC "(" 1B 28 27 40 "t" 74 116 assign character table nL = 3, nH = 0 0 ≤ d1 ≤ 3, 48 ≤ d1 ≤ 51 0 ≤ d2 ≤ 255 0 ≤ d3 ≤ 255 Assignes the choosen character table to the register d1 (0 - 3). The ESC t command (see page 103) can be used to activate the defined character set.
d2 d3 Table name 26 0 Abicomp 29 16 ISO 8859-1 (Latin 1) 35 0 Roman 8 127 2 ISO 8859-2 (Latin 2) Please refer to the printer’s reference manual which character sets are supported.
ESC > ESC = ESC # Input Data Control Bit 8 = 1 Input Data Control Bit 8 = 0 Input Data Control Bit 8 unchanged Data Structure Example ASCII hex. dec. ESC ">" 1B 3E 27 62 set bit 8 = 1 ASCII hex. dec. ESC "=" 1B 3D 27 61 set bit 8 = 0 ASCII hex. dec.
ESC EM Sheet Feeder Data Structure Description ASCII hex. dec. ESC EM 1B 19 27 25 "0" 30 48 deactivate sheet feeder operation ASCII hex. dec. ESC EM 1B 19 27 25 "1" 31 49 select magazine 1 (front) ASCII hex. dec. ESC EM 1B 19 27 25 "2" 32 50 select magazine 2 (rear) ASCII hex. dec. ESC EM 1B 19 27 25 "4" 34 51 activate sheet feeder operation ASCII hex. dec. ESC EM 1B 19 27 25 "R" 52 82 eject paper This code sequence should only be used when the sheet feeder is mounted and selected.
Example 10 20 30 40 50 60 70 80 90 REM sheet feeder LPRINT CHR$(27);CHR$(25);"1"; LPRINT "This text is on a form" LPRINT "from magazine one." LPRINT CHR$(12);:REM form feed LPRINT CHR$(27);CHR$(25);"2"; LPRINT "This text is on a form" LPRINT "from magazine two.
ESC 6 ESC 7 Print Code Area Expansion ON Print Code Area Expansion OFF Data Structure Description ASCII hex. dec. ESC "6" 1B 36 27 54 print ASCII codes 128 to 159 and 255 ➊ ASCII hex. dec. ESC "7" 1B 37 27 55 suppress ASCII codes 128 to 159 and 255 ➋ ➊ This code sequence causes the printout of the higher control codes (ASCII 128 to 159 and 255) in the form of characters and symbols instead of the repetition of the functions of ASCII codes 0 to 31 and 127.
Example 10 15 20 30 40 50 60 70 80 90 100 110 120 130 140 REM code aera expansion LPRINT CHR$(27);"t1"; LPRINT CHR$(27);"6"; GOSUB 70 LPRINT CHR$(27);"7"; GOSUB 70 END RESTORE FOR I = 1 TO 12 READ D LPRINT CHR$(D); NEXT I LPRINT RETURN DATA 65,66,67,68,69,128,129,130,131,132,133,134 Miscellaneous 111
ESC m Activate/Deactivate Graphics Characters Data Structure ASCII hex. dec. Description On receipt of this command, the ASCII codes hex.90 to hex.9F can be output as special graphics characters. ESC "m" 1B 6D 27 109 Valid values for n are: n = 0 (hex.00) activates the control codes n = 4 (hex.04) activates the graphics characters ESC i Activate/Deactivate Direct Print Mode Data Structure ASCII hex. dec.
ESC I International Code Table Data Structure ASCII hex. dec. Description The ASCII codes hex.00 to hex.1F (dec.0 to dec.31) and hex.80 to hex.9F (dec.128 to dec.159) are as a rule assigned with non-printable characters. These codes can, however, be converted to printable characters using ESC I. Valid values for n are either ASCII code hex.00 and hex.01 or ASCII characters "0" and "1" (hex.30 and hex.31). ESC "I" 1B 49 27 73 or n or n or n n = 1 (hex.01 or hex.
ESC @ Printer Initialization Data Structure ASCII hex. dec. Description Printer initialization means that the printer is in the same state as it is after switch-on. All parameters set by means of ESC sequences are cleared. ESC "@" 1B 40 27 64 printer initialization All print data transferred after the last print control code (CR, LF ...) are lost. For this reason first send the respective print control code (CR, LF) and then the ESC @ sequence.
ESC 8 ESC 9 Activate Paper End Sensor Deactivate Paper End Sensor Data Structure Description ASCII hex. dec. ESC "8" 1B 38 27 56 Deactivate paper end sensor ➊ ASCII hex. dec. ESC "9" 1B 39 27 57 Activate paper end sensor ➋ ➊ This sequence deactivates the paper end sensor, so that a cut sheet can be printed all the way to the bottom. With the sheet feeder activated this command is ignored. ➋ Activates the paper end sensor.
Control Codes BEL (hex.07) (dec.7) Sounds acoustic signal. BS (hex.08) (dec.8) Print contents of line buffer, then move the print head one position back. When auto right justification is selected by code sequence ESC a<3>, will be ignored. CAN (hex.18) (dec.24) When the printer receives this code, the print buffer is deleted. This code only clears the contents of the print buffer; it does not affect any control codes which have previously been sent to the printer. CR (hex.0D) (dec.
DEL (hex.7F) (dec.127) Clear previous characters in the print buffer. ESC (hex.1B) (dec.27) Start character for a subsequent program sequence. FF (hex.0C) (dec.12) When the printer receives this code, it prints the data in the print buffer, then advances the paper from the current print position to the top-of-form position on the next page. The next line is beginning at the left margin. HT (hex.09) (dec.
SOH (hex.01) (dec.01) Start Of Heading. SP (hex.20) (dec.32) Space VT (hex.0B) (dec.11) When the printer receives this code, it prints the data in the print buffer and then advances the paper to the next vertical tab stop position. The next character is printed in the column following the last print position, if no CR is transmitted. The amount by which the paper is advanced varies depending on line spacing. When the printer is switched on, no vertical tab stops are set.
Appendix A Summary of Possible Codes
Sequence BEL BS CAN CR DEL DC1 DC2 DC3 DC4 ESC ESC ! ESC # ESC $ ESC % NUL ESC % <1> ESC & NUL ... ESC & NUL ... ESC & NUL ...
ESC * <5> ESC * <6> ESC * <7> ESC * <32> ESC * <33> ESC * <38> ESC * <39> ESC * <40> ESC .
ESC 0 ESC 1 ESC 2 ESC 3 ESC 4 ESC 5 ESC 6 ESC 7 ESC 8 ESC 9 ESC A ESC a ESC B NUL ESC B ... NUL ESC b NUL ESC b NUL ESC c ESC C NUL ESC C ESC D NUL ESC D ...
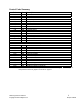
ESC g ESC H ESC I ESC i ESC J ESC j ESC K ESC k <0> ESC k <1> ESC k <2> ESC k <3> ESC k <4> ESC k <5> ESC k <6> ESC k <7> ESC k <8> ESC L ESC l ESC M ESC m ESC N ESC O ESC P ESC p ESC Q ESC q ESC R ESC r ESC S ESC s ESC SI ESC SO FX80+/FX100+ FX85/FX105 FX850/FX1050 LQ850/LQ1050 LQ850+/LQ1050+ LQ2500 LQ2550 LQ2170 Sequence ✔ ✔ ✔ ✔ ✔ ✔ ✔ ✔ ✔ ✔ ✔ ✔ ✔ ✔ ✔ ✔ ✔ ✔ ✔ ✔ ✔ ✔ ✔ ✔ ✔ ✔ ✔ ✔ ✔ ✔ ✔ ✔ ✔ ✔ ✔ ✔ ✔ ✔ ✔ ✔ ✔ ✔ ✔ ✔ ✔ ✔ ✔ ✔ ✔ ✔ ✔ ✔ ✔ ✔ ✔ ✔ ✔ ✔ ✔ ✔ ✔
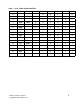
ESC SP ESC T ESC t <0> ESC t <1> ESC t <2> ESC U ESC W ESC w ESC x ESC Y ESC Z ESC X FF HT LF NUL SI SO SOH SP VT FX80+/FX100+ FX85/FX105 FX850/FX1050 LQ850/LQ1050 LQ850+/LQ1050+ LQ2500 LQ2550 LQ2170 Sequence ✔ ✔ ✔ ✔ ✔ ✔ ✔ ✔ ✔ ✔ ✔ ✔ ✔ ✔ ✔ ✔ ✔ ✔ ✔ ✔ ✔ ✔ ✔ ✔ ✔ ✔ ✔ ✔ ✔ ✔ ✔ ✔ ✔ ✔ ✔ ✔ ✔ ✔ ✔ ✔ ✔ ✔ ✔ ✔ ✔ ✔ ✔ ✔ ✔ ✔ ✔ ✔ ✔ ✔ ✔ ✔ ✔ ✔ ✔ ✔ ✔ ✔ ✔ ✔ ✔ ✔ ✔ ✔ ✔ ✔ ✔ ✔ ✔ ✔ ✔ ✔ ✔ ✔ ✔ ✔ ✔ ✔ ✔ ✔ ✔ ✔ ✔ ✔ ✔ ✔ ✔ ✔ ✔ ✔ ✔ ✔ A-6 Summary of Possible Codes ✔ ✔ ✔ ✔ ✔ ✔ ✔ ✔ ✔ ✔ ✔ ✔ ✔ ✔
Sorted by Functions Function Sequence Page absolute horizontal step ASCII character 0 assign character table back feed n/216 inch bell character density 10 cpi (Pica) character density 12 cpi (Elite) character density 15 cpi character set selection character spacing clear all horizontal tab stops clear all tab settings color selection condensed print condensed print ON continuous enlarged print mode ON/OFF control code BS (Backspace) control code CAN (Cancel) control code CR (Carriage Return) control cod
Function Sequence form feed form length in inches form length in lines graphics 120 dpi graphics 120 dpi graphics 120 dpi graphics 120 dpi graphics 144 dpi graphics 180 dpi graphics 240 dpi graphics 240 dpi graphics 360 dpi graphics 60 dpi graphics 60 dpi graphics 60 dpi graphics 72 dpi graphics 80 dpi graphics 90 dpi graphics 90 dpin graphics characters activate/deactivate half-speed printing high speed graphics 120 dpi horizontal and vertical step forward horizontal and vertical step width horizontal ta
Function Sequence Page national character set selection paper end sensor, activation paper end sensor, deactivation perforation skip print ASCII codes 128 to 159 print data as characters print mode selection print raster graphics print quality printer initialization printout of control codes proportional spacing ON/OFF reassign graphics mode relative horizontal step reset all vertical tab stops reset condensed print reset enlarged print mode (set by or ESC ) reset perforation skip right margin s
Function Sequence set unit sheet feeder Space super/subscript mode OFF super/subscript mode ON suppress ASCII codes 128 to 159 typestyle selection underline mode ON/OFF unidirectional printing for one line unidirectional printing ON/OFF variable line spacing n/360 inch vertical tab vertical tab channel selection vertical tab stops vertical tab stops in channels ESC ( U . . . . . . . . . . ESC EM . . . . . . . SP . . . . . . . . . . . . ESC T . . . . . . . . . . ESC S . . . . . . . . ESC 7 . . . .
Appendix B Character Sets Register nur für SNI
The following character sets can be selected via control panel or by Escape sequences, which correspond to the selected emulation mode. The following example shows you how to find the hexadecimal value for a character from the character set table. hex dec 0 1 2 3 B-2 Character Sets 0 1 NUL 2 3 4 5 SP 0 16 32 48 64 80 1 17 33 49 65 81 DC2 2 18 34 50 66 82 3 19 35 51 67 83 ASCII "B" ; dec.66 ; hex.
Standard Character Set hex dec 0 0 1 2 3 4 5 6 7 NUL 0 8 1 32 48 64 80 96 112 128 2 17 33 49 65 81 97 113 129 3 18 34 50 66 82 98 114 130 5 6 D E F 19 144 160 176 192 208 224 240 145 161 177 193 209 225 241 146 162 178 194 210 226 242 163 179 195 211 227 243 DC3 35 51 67 83 99 115 131 DC4 4 C DC2 DC3 3 B DC1 DC2 2 A NUL 16 DC1 1 9 147 DC4 4 20 36 52 68 84 100 116 132 148 164 180 196 212 228 244 5 21
International Substitution Table - normal font dec 35 36 64 91 92 93 94 96 123 124 125 126 hex 23 24 40 5B 5C 5D 5E 60 7B 7C 7D 7E US ASCII French German UK Danish I Swedish Italian Spanish I Japanese Norwegian Danish II Spanish II L.
International Substitution Table - italic font dec 163 164 192 219 220 221 222 224 251 252 253 254 hex A3 A4 C0 DB DC DD DE E0 FB FC FD FE US ASCII French German UK Danish I Swedish Italian Spanish I Japanese Norwegian Danish II Spanish II L.
Graphics Character Set hex dec 0 0 1 2 3 4 5 6 7 NUL 0 8 1 32 48 64 80 96 112 128 2 17 33 49 65 81 97 113 129 3 18 34 50 66 82 98 114 130 5 6 D E F 19 144 160 176 192 208 224 240 145 161 177 193 209 225 241 146 162 178 194 210 226 242 163 179 195 211 227 243 DC3 35 51 67 83 99 115 131 DC4 4 C DC2 DC3 3 B DC1 DC2 2 A NUL 16 DC1 1 9 147 DC4 4 20 36 52 68 84 100 116 132 148 164 180 196 212 228 244 5 21
Standard Character Set, extended hex dec 0 0 1 2 3 4 5 6 7 8 9 A B C D E F NUL 0 16 32 48 64 80 96 112 128 144 160 176 192 208 224 240 33 49 65 81 97 113 129 145 161 177 193 209 225 241 34 50 66 82 98 114 130 146 162 178 194 210 226 242 35 51 67 83 99 115 131 147 163 179 195 211 227 243 DC1 1 1 17 DC2 2 2 18 DC3 3 3 19 DC4 4 5 6 4 20 36 52 68 84 100 116 132 148 164 180 196 212 228 244 5 21 37 53 69 8
Graphics Character Set, extended hex dec 0 0 1 2 3 4 5 6 7 8 9 A B C D E F NUL 0 16 32 48 64 80 96 112 128 144 160 176 192 208 224 240 33 49 65 81 97 113 129 145 161 177 193 209 225 241 34 50 66 82 98 114 130 146 162 178 194 210 226 242 35 51 67 83 99 115 131 147 163 179 195 211 227 243 DC1 1 1 17 DC2 2 2 18 DC3 3 3 19 DC4 4 5 6 4 20 36 52 68 84 100 116 132 148 164 180 196 212 228 244 5 21 37 53 69 8
International Code Table hex dec 0 0 1 0 1 1 2 3 4 5 6 7 8 16 32 48 64 80 96 112 128 17 33 49 65 81 97 113 129 DC2 2 2 18 3 19 34 50 66 82 98 114 130 5 6 B C D E F 144 160 176 192 208 224 240 145 161 177 193 209 225 241 162 178 194 210 226 242 163 179 195 211 227 243 146 DC3 35 51 67 83 99 115 131 DC4 4 A DC2 DC3 3 9 147 DC4 4 20 36 52 68 84 100 116 132 148 164 180 196 212 228 244 5 21 37 53 69 85
International Code Table, extended hex dec 0 1 2 3 4 5 6 7 8 9 A B C D E F SP 0 0 1 1 16 32 48 64 80 96 112 128 144 160 176 192 208 224 240 17 33 49 65 81 97 113 129 145 161 177 193 209 225 241 34 50 66 82 98 114 130 146 162 178 194 210 226 242 35 51 67 83 99 115 131 147 163 179 195 211 227 243 DC2 2 2 18 DC3 3 3 19 DC4 4 5 6 4 20 36 52 68 84 100 116 132 148 164 180 196 212 228 244 5 21 37 53 69 85
Table of Character Width for Proportional Printing On the following pages you will find tables of character widths for proportional printing. The characters are represented by the printout, the decimal and the hexadecimal value. Characters without decimal and hexadecimal codes are international characters or graphics. Please note the International Substitution Characters on pages B-3 and B-4 and the International Code Tables on page B-8 and B-9.
Proportional width during scaleable font mode The values of the character widths are depending on the selected point size at your printer. The width of the scaleable fonts are based on the width of a proportional 10.5 point character. Calculate the width as follows: (point size) x (base width) + 0.5 INT 10.5 inch (character width) = 360 Example for a 24 point "0" *) (24) x (30) INT + 0.5 10.5 inch (character width) = 360 (character width) = INT (69.
24 Needle Printer Code hex. dec. Width in 1⁄360" 20 32 21 33 22 23 Code Code hex. dec.
Code Code hex. dec. 71 113 36/24 18/12 30/20 72 114 30/20 36/24 30/20 73 115 30/20 36/24 30/20 74 116 24/16 36/24 30/20 75 117 36/24 42/28 30/20 76 118 36/24 42/28 30/20 77 119 42/28 30/20 30/20 78 120 30/20 30/20 30/20 hex. dec. Char. Width in 1⁄360" Code Width in 1⁄360" Char. hex. Char. dec.
Code Code hex. dec. Width in 1⁄360" C3 195 30 DE 222 C4 196 30 DF 223 C5 197 30 E0 224 C6 198 30 E1 225 C7 199 30 E2 C8 200 30 C9 201 30 CA 202 Char. hex. dec. Width in 1⁄360" Code hex. dec. Width in 1⁄360" 30 F9 249 30 30 FA 250 30 30/20 FB 251 30 30/20 FC 252 30 226 30/20 FD 253 30 E3 227 30/20 FE 254 E4 228 30/20 24/16 30 E5 229 30/20 30/20 Char. Char.
9 Needle Printer Code hex. dec. Width in 1⁄120" 20 32 21 33 22 23 Character Code Character Code Width in 1⁄120" hex. dec. Width in 1⁄120" Character hex. dec.
Code Code Character Character hex. dec. 71 113 11 12 11 72 114 11 11 12 73 115 12 12 12 74 116 11 12 12 75 117 12 12 11 76 118 12 12 12/12 77 119 12 12 10/8 78 120 10 11 10/10 hex. dec. italic graph. Width in 1⁄120" Code Width in 1⁄120" Character hex. dec. italic graph.
Code Character italic graph. Code Width in 1⁄120" hex. dec. Character italic graph. Code Width in 1⁄120" hex. dec. Character italic graph. Width in 1⁄120" hex. dec.
“All rights reserved. Translations, reprinting or copying by any means of this manual complete or in part or in any different form requires our explicit approval. We reserve the right to make changes to this manual without notice. All care has been taken to ensure accuracy of information contained in this manual. However, we cannot accept responsibility for any errors or damages resulting from errors or inaccuracies of information herein.
Programmer’s Reference Tally ANSI (MTPL) Emulation
Table of Contents Description of MTPL-Sequences Introduction . . . . . . . . . . . . . . . . . . . . . . . . . . . . . . . . . . . 2 Paper and Text Formatting . . . . . . . . . . . . . . . . . . . . . . . . . . 5 Form Length . . . . . . . . . . . . . . Turn ON Positioning Unit Mode (SM) . Turn OFF Positioning Unit Mode (RM) Select Size Unit (SSU) . . . . . . . . Set Top and Bottom Margin . . . . . . Clear Top and Bottom Margin . . . . . Set Left and Right Margin . . . . . . . Clear Left and Right Margin .
Line Spacing . . . . . . . . . . . . . . . . . . . . . . . . . . . . . . . . . . 24 Vertical Spacing (SVS) Line Density 6 lpi . . . Line Density 8 lpi . . . Set Line Spacing (SLS) . . . . . . . . . . . . . . . . . . . . . . . . . . . . . . . . . . . . . . . . . . . . . . . . . . . . . . . . . . . . . . . . . . . . . . . . . . . . . . . . . . . . . . . . . . . . . . . . . . . . . . . . 24 25 25 26 Character Styling . . . . . . . . . . . . . . . . . . . . . . . . . . . . . . . .
Horizontal Tab Stop . . . . . . . . . . . . . . . Set Horizontal Tab Stop at Current Position . . . Horizontal Tab Stops ON . . . . . . . . . . . . Horizontal Tab Stops OFF (TBC) . . . . . . . . Line Feed . . . . . . . . . . . . . . . . . . . . Vertical Tab Stop . . . . . . . . . . . . . . . . Set Vertical Tab Stop at Current Position . . . . Vertical Index . . . . . . . . . . . . . . . . . . Vertical Tab Stops ON . . . . . . . . . . . . . . Vertical Tab Stops OFF (TBC) . . . . . . . . .
Color Selection (Option) . . . . . . . . . . . . . . . . Input Data Control . . . . . . . . . . . . . . . . . . . Sheet Feeder/Paperway . . . . . . . . . . . . . . . . Eject Form . . . . . . . . . . . . . . . . . . . . . . . Reset to Initial State (RIS) . . . . . . . . . . . . . . . Command Set . . . . . . . . . . . . . . . . . . . . . Activation of Character Sets . . . . . . . . . . . . . Designation of Character Set G0 . . . . . . . . . . . Designation of Character Set G1 . . . . . . . . . . .
Appendix A Summary of Possible Codes Sorted by Sequences . . . . . . . . . . . . . . . . . . . . . . . . . . . . . A-2 Sorted by Functions . . . . . . . . . . . . . . . . . . . . . . . . . . . . . A-8 Appendix B Character Sets Standard Character Set . . . . . . . . . . . . . . . . . . . . . . . . . . . . B-2 International Substitution Table – normal font . . . . . . . . . . . . . . .
Description of MTPL-Sequences Introduction Paper and Text Formatting Character Spacing Line Spacing Character Styling Print Positioning Graphics Miscellaneous
Introduction Regardless of the specific MTPL sequences of your printer, this User’s Manual describes the sum of all MTPL sequences and control codes. The only differentiation is made between 9 and 24 needle printers as well as the maximum possible paper width of 8 inches (80 column printer) or 13.6 inches (132 column printer). Please note that the print quality LQ (Letter Quality) is only available in the 24 needle printer.
CSI means “Control Sequence Introducer” and is described by the code 9B (hex.) or ESC [ : 7-Bit-environment ➛ hex. 1B, hex. 5B (= ESC [ ) 8-Bit-environment ➛ hex. 9B It is sensible to use only ESC [ as “Control Sequence Introducer” if MTPL is used associated with any other printer emulation. STOP The last character (in the following example t) specifies the function of the sequence. The header is followed by the Data Structure in ASCII, hexadecimal und decimal syntax with the necessary parameters, e.g.
Character explanation and symbol description l Lower case “ l ” Informations Sequence only applies for 9 needle printer Sequence only applies for 24 needle printer In the following you will find an example for a MTPL sequence with a Basic programming example: Set to a form length of 72 lines: MTPL-Sequence Transmission 100 110 120 130 140 150 160 170 180 190 200 210 4 Introduction CSI ASCII hex. dec.
Paper and Text Formatting CSI ... t Form Length Data Sructure ASCII hex. dec. CSI n 9B n 155 n Description PUM turned OFF: "t" 74 116 [A] set form lenght in lines n = 1...132 lines at a line spacing of 1⁄6 inch (6 lpi) = 1...176 lines at a line spacing of 1⁄8 inch (8 lpi) This MTPL-sequence sets the form length to n times the current line feed pitch (in inches). Also the current print position is simultaneously defined as top of form. The value specified for n must be in the range 1 to 255.
Example 10 20 30 40 50 60 70 80 90 100 110 120 130 REM form length LPRINT CHR$(27);"[4t"; FOR F=1 TO 2 FOR L=1 TO 3 LPRINT "length 4:form";F;" line";L NEXT L:LPRINT CHR$(12);:NEXT F LPRINT LPRINT CHR$(27);"[3t"; FOR F=1 TO 3 FOR L=1 TO 2 LPRINT "length 3:form";F;" line";L NEXT L:LPRINT CHR$(12);:NEXT F END 6 Paper and Text Formatting
CSI 11 h CSI 11 l Turn ON Positioning Unit Mode (SM) Turn OFF Positioning Unit Mode (RM) Data Structure Description ASCII hex. dec. CSI "1" 9B 31 155 49 "1" 31 49 "h" 68 104 ASCII hex. dec.
CSI ... SP I Select Size Unit (SSU) Data Structure ASCII hex. dec. CSI n 9B n 155 n SP SP SP "I" 49 73 [B] select size unit Description For n the following parameters are available: n hex. dec.
CSI ... r CSI r Set Top and Bottom Margin Clear Top and Bottom Margin Data Structure Description ASCII hex. dec. CSI n1 9B n1 155 n1 ASCII hex. dec. CSI "r" 9B 72 155 114 ";" 3B 59 n2 n2 n2 "r" 72 114 [A] set top and bottom margin [A] clear top and bottom margin n1 specifies the value of the top margin n2 specifies the value of the bottom margin n1, n2 = = Examples: CSI n1 r CSI ; 0 r CSI ; n2 r 1...132 lines at a line spacing of 1⁄6 inch (6 lpi) 1...
Example 10 20 30 40 50 60 70 80 90 100 110 120 130 140 REM top and bottom margin LPRINT CHR$(27);"[6t";:REM form length LPRINT CHR$(27);"[2;5r":REM set margins FOR F=1 TO 2 FOR L=2 TO 5 LPRINT "form";F;" line ";L NEXT L:NEXT F LPRINT LPRINT CHR$(27);"[0;0r";:REM clear margins FOR F=1 TO 2 FOR L=1 TO 6 LPRINT "form";F;" line ";L NEXT L:NEXT F END 10 Paper and Text Formatting
CSI ... s CSI s Set Left and Right Margin Clear Left and Right Margin Data Structure Description ASCII hex. dec. CSI n1 9B n1 155 n1 ASCII hex. dec. CSI "s" 9B 73 155 115 ";" 3B 59 n2 n2 n2 "s" 73 115 [A] set left and right margin [A] clear left and right margin n1 specifies the value of the left margin n2 specifies the value of the right margin n1, n2 Print width 8 inches = 1... 80 at 10 cpi = 1... 96 at 12 cpi = 1...120 at 15 cpi = 1...136 at 17.1 cpi = 1...
If only one margin is changed, the other margin will be reset to default value. If there are any logical problems (for example, left margin > right margin), the sequence is ignored. Example 10 20 30 40 50 60 70 80 90 REM left and right margin WIDTH "LPT1:",255 LPRINT CHR$(27);"[10;53s"; LPRINT "Now the left margin is set to column 10 and the "; LPRINT "right margin is set to column 53.
CSI ... SP U CSI ... SP V Set Line Home (SLH) Set Line Limit (SLL) Data Structure Description ASCII hex. dec. CSI n 9B n 155 n SP 20 32 "U" 55 85 [A] set line home ➊ ASCII hex. dec. CSI n 9B n 155 n SP 20 32 "V" 55 85 [A] set line limit ➋ n = 1...maximal print area ➊ Default setting: Physical left margin of medium or device. n specifies the left margin. The first position is 1.
CSI 8 y CSI 9 y CSI 10 y CSI : y Right Justification ON Centering ON Right Justification and Centering OFF Right Justification and Centering OFF Data Structure ASCII hex. dec. CSI n 9B n 155 n "y" 79 121 justification Description For n the following characters are available: n hex. dec.
Character Spacing CSI ... SP G Spacing Increment (SPI) Data Structure ASCII hex. dec. Description n1 n2 CSI n1 9B n1 155I n1 ";" 3B 59 n2 n2 n2 SP 20 32 "G" 47 71 [B] [C] set spacing increment specifies the line spacing specifies the character spacing The unit is expressed in decipoints or other units defined by SSU (Select Size Unit, see page 8). For this note also the sequence “Set Line Spacing (SLS)” on page 26.
CSI ... w Horizontal Spacing Data Structure ASCII hex. dec. CSI n 9B n 155 n "w" 77 119 [A] set cpi Description For n the following parameters are available: n hex. dec.
Example 10 20 30 40 50 60 70 80 90 100 110 120 REM LPRINT LPRINT LPRINT LPRINT LPRINT LPRINT LPRINT LPRINT LPRINT LPRINT END character densities CHR$(27);"[4wthis is 10 cpi, "; CHR$(27);"[12wthis is 10 cpi (high resolution), " CHR$(27);"[5wthis is 12 cpi, "; CHR$(27);"[6wthis is 15 cpi, "; CHR$(27);"[7wthis is 17.1 cpi, "; CHR$(27);"[11wthis is 20 cpi, " CHR$(27);"[0wthis is 5 cpi, "; CHR$(27);"[1wthis is 6 cpi, " CHR$(27);"[2wthis is 7.5 cpi, "; CHR$(27);"[3wand 8.
CSI ... SP K Horizontal Character Spacing (SHS) Data Structure ASCII hex. dec. CSI n 9B n 155 n SP 20 32 "K" 4B 75 [A] set cpi Description For n the following parameters are available: n hex. dec. character spacing 0 1 2 3 30 31 32 33 10 cpi 6 cpi 12 cpi 15 cpi 48 49 50 51 With this sequence the horizontal character spacing is defined. The change of the character dimensions is implementation dependent.
CSI ... SP g Character Spacing (SCS) Data Structure ASCII hex. dec. Description n CSI n 9B n 155 n SP 20 32 "g" 67 103 [A] set character spacing specifies the character spacing The unit is either decipoints or depends on the SSU selection (Select Size Unit, see page 8). The character size will not be changed.
CSI ... SP \ Additional Character Spacing (SACS) Data Structure ASCII hex. dec. Description n CSI n 9B n 155 n SP 20 32 " \" 5C 92 [A] set additional character spacing specifies the additional character spacing The units are either decipoints or defined by SSU (Select Size Unit, see page 8). This function enlarges the inter character spacing. The function will typically be used with proportional spacing to get effects like “spaced out” or right justification.
CSI ... SP f Reduced Character Spacing (SRCS) Data Structure ASCII hex. dec. Description n CSI n 9B n 155 n SP 20 32 "f" 66 102 [B] set reduced character spacing specifies the reduced character spacing The units are either decipoints or defined by SSU (Select Size Unit, see page 8). This function reduces the inter character spacing. The function will typically be used with proportional spacing to get special effects like e.g. kerning.
CSI ... p Horizontal Motion Index (HMI) Data Sructure ASCII hex. dec. CSI 9B 155 Description n = 0...20 n n n "p" 70 112 [C] set HMI The normal character density is enlarged by n ∗1⁄120 inch. If n is set to zero (default setting), HMI is disabled.
CSI ... q Horizontal Step (Microspace) Data Structure ASCII hex. dec. CSI n 9B n 155 n Description n = 1...255 "q" 71 113 [C] set horizontal step The space between characters is enlarged by n ∗1⁄120 inch at the current print position.
Line Spacing CSI ... SP L Vertical Spacing (SVS) Data Structure ASCII hex. dec. CSI n 9B n 155 n SP 20 32 "L" 4C 76 [A] set vertical spacing (lpi) Description For n the following parameters are available: n hex. dec. vertical spacing 0 1 2 3 4 9 30 31 32 33 34 39 6 lpi 4 lpi 3 lpi 12 lpi 8 lpi 2 lpi 48 49 50 51 52 57 Note that changing the line spacing also changes the number of lines per page. Changing of line spacing does not affect the form length set before hand.
Line Density 6 lpi Line Density 8 lpi Data Structure Description CSI 3 z CSI 4 z ASCII hex. dec. CSI "3" 9B 33 155 51 "z" 7A 122 [C] line density 6 lpi (= line spacing 1/6 inch) ASCII hex. dec. CSI "4" 9B 34 155 52 "z" 7A 122 [C] line density 8 lpi (= line spacing 1/8 inch) These sequences set the line spacing to 1⁄6 inch (6 lpi line density) or 1⁄8 inch (8 lpi line density). Note that changing the line spacing also changes the number of lines per page.
CSI ... SP h Set Line Spacing (SLS) Data Structure ASCII hex. dec. Description n CSI n 9B n 155 n SP 20 32 "h" 68 104 [A] set line spacing specifies the line spacing The unit is either decipoints or depends on the SSU selection (Select Size Unit, see page 8). Note also the sequence SPI (Spacing Increment, see page 15).
Character Styling CSI 0 z CSI 1 z CSI 10 z CSI 2 z Superscript ON Subscript ON Microscript ON Super-/Sub-/Microscript OFF Data Structure ASCII hex. dec. CSI n 9B n 155 n "z" 7A 122 [A] character styling Description For n the following parameters are availble: n hex. dec. character styling 0 1 2 10 30 31 32 31 30 48 49 50 49 48 superscript ON subscript ON super-/sub-/microscript OFF microscript ON ➊ ➊ ➋ ➊ ➊ These sequences switch the printer to superscript, subscript or microscript mode.
Example 10 20 30 40 50 60 70 80 90 100 110 120 28 Character Styling REM LPRINT LPRINT LPRINT LPRINT LPRINT LPRINT LPRINT LPRINT LPRINT LPRINT END super/sub/microscript "E=M*C"; CHR$(27);"[0z"; "2"; CHR$(27);"[2z"; " is Einsteins most famous formula." "H"; CHR$(27);"[1z";"2";CHR$(27);"[2z"; "O is simply water.
CSI 12 z CSI 13 z CSI 2 z Double Height ON (Upper Half) Double Height ON (Lower Half) Double Height OFF Data Structure Description ASCII hex. dec. CSI "1" 9B 31 155 49 "2" 32 50 "z" 7A 122 [C] double height ON (upper half) ➊ ASCII hex. dec. CSI "1" 9B 31 155 49 "3" 33 51 "z" 7A 122 [C] double height ON (lower half) ➊ ASCII hex. dec. CSI "2" 9B 32 155 50 "z" 7A 122 [A] double height OFF ➋ ➊ The same character must be sent to both lines to form a full character.
Example 10 20 30 40 50 60 30 Character Styling REM double height LPRINT "For ";CHR$(27);"[12zHeadlines ";CHR$(27);"[2z"; LPRINT "printing in double" LPRINT CHR$(27);"[13z Headlines";CHR$(27);"[2z" LPRINT "height is recommended" END
CSI ... SP X CSI ... y Print Quality Data Structure Description ASCII hex. dec. CSI n 9B n 155 n SP 20 32 ASCII hex. dec. CSI n 9B n 155 n "y" 79 121 "X" 58 88 [A] select print quality ➊ select print quality ➋ ➊ This sequence defines the print quality. Print throughput changes with the print quality. For n the following parameters are available: (printer menu setting is valid) n hex. dec.
Example 10 20 30 40 50 REM LPRINT LPRINT LPRINT END 32 Character Styling print quality CHR$(27);"[0yThis is draft quality "; CHR$(27);"[1yand this is NLQ printing." CHR$(27);"[5yThis is NLQ with 12 cpi.
CSI ... m Select Typestyle Data Structure ASCII hex. dec. CSI n 9B n 155 n "m" 6D 109 [A] select typestyle Description This sequence defines the typestyle. For n the following parameters are available: n hex. dec.
Example Valid for most MTPL printers.
CSI = z CSI > z Emphasized Mode ON Emphasized Mode OFF Data Structure Description ASCII hex. dec. CSI "=" 9B 3D 155 61 "z" 7A 122 [C] emphasized mode ON ASCII hex. dec. CSI ">" 9B 3E 155 62 "z" 7A 122 [C] emphasized mode OFF During printing in emphasized mode, each dot is printed twice, slightly shifted in horizontal direction. Emphasized mode can be used in all print qualities and character densities.
CSI 3 m CSI 23 m Italic Mode ON Italic Mode OFF Data Structure ASCII hex. dec. CSI "3" 9B 33 155 51 "m" 6D 109 ASCII hex. dec. CSI "2" 9B 32 155 50 "3" 33 51 [A] italic mode ON "m" 6D 109 [A] italic mode OFF The sequence CSI 0 m resets all CSI...m-sequences! A maximum of 16 CSI...m -sequences can be joined in one sequence, e.g.
CSI CSI CSI CSI Proportional Mode ON (SGR) Proportional Mode OFF Data Structure Description ASCII hex. dec. CSI "2" 9B 32 155 50 "6" 36 54 ASCII hex. dec. CSI "2" 9B 32 155 50 "y" 79 121 ASCII hex. dec. CSI "5" 9B 35 155 53 "0" 30 48 ASCII hex. dec.
Example 10 20 30 40 50 60 REM LPRINT LPRINT LPRINT LPRINT END 38 Character Styling proportional spacing CHR$(27);"[2y"; "this is an example with proportional spacing" CHR$(27);"[7y"; "this is an example with normal spacing"
CSI 4 m CSI 21 m CSI 24 m Underline Mode ON (SGR) Underline Double Mode Underline Mode OFF Data Structure Description ➊ ASCII hex. dec. CSI "4" 9B 34 155 52 "m" 6D 109 [A] underline mode ON ASCII hex. dec. CSI "2" 9B 32 155 50 "1" 31 49 "m" 6D 109 [A] underline double mode ASCII hex. dec. CSI "2" 9B 32 155 50 "4" 34 52 "m" 6D 109 [A] underline mode OFF ➊ All printed characters including spaces are automatically unerlined. Spaces between tab codes (HT) are underlined.
CSI 53 m CSI 55 m Overline Mode ON (SGR) Overline Mode OFF Data Structure Description ASCII hex. dec. CSI "5" 9B 35 155 53 "3" 33 51 "m" 6D 109 [A] overline mode ON ASCII hex. dec. CSI "5" 9B 35 155 53 "5" 35 53 "m" 6D 109 [A] overline mode OFF This sequence switches the automatic overline function on or off. When the automatic overline function is on, all printed characters including spaces are automatically underlined (also see SGR, Underline Mode ON, previous page 39).
CSI 9 w CSI 8 w Double Strike ON Double Strike OFF Data Structure Description ASCII hex. dec. CSI "9" 9B 39 155 57 "w" 77 119 [B] [C] double strike print mode ON ASCII hex. dec. CSI "8" 9B 38 155 56 "w" 77 119 [B] [C] double strike print mode OFF In double strike mode characters are printed twice in two printing passes. Double strike mode can be used in all print qualities and character densities. Double strike mode can also be used in combination with emphasized mode.
CSI ... SP C CSI ... SP B Graphic Size Selection (GSS) Graphic Size Modification (GSM) Data Structure Description ASCII hex. dec. CSI n 9B n 155 n SP 20 32 "C" 43 67 ASCII hex. dec. CSI n1 9B n1 155 n1 ; 3B 59 n2 n2 n2 SP 20 32 "B" 42 66 [B] graphic size selection ➊ [A] graphic size modification ➋ ➊ n specifies the hight of the used font The units are either decipoints or defined by the SSU function (Select Size Unit, see page 8). The width is implicitly defined by the height.
CSI ... SP D Font Designation (FNT) Data Structure Description ASCII hex. dec. CSI n1 9B n1 155 n1 ; 3B 59 n2 n2 n2 SP 20 32 "D" 44 68 [A] designate font n1 = font number 0...9 n2 = identification (ID) of the desired font For n2 the following parameters are available: n2 hex. dec.
Font attributes, e.g. “bold” can be specified after designation through corresponding ESC sequences. Technical Details Font Designation Codes The use of the font designation code CSIn1;n2space D needs further explanation. (Note: CSI is 9B; you can use ESC[, 1B 5BH, instead if you wish.) The parameter n1 Register to use. This paramer can take values of 0 to 9. The default allocation of fonts to these registers is given in the printer’s manual. The parameter n2 What to put in the register.
Print Positioning HT Horizontal Tab Stop Data Structure ASCII hex. dec. HT 09 9 [A] horizontal tab stop Description The HT-Code moves the active print position to the next horizontal tabulation stop on the same line. If there is no tab stop reachable - no more tab stops are set or the next tab stop is beyond the defined right margin - spaces are inserted. The graphic renditions, e.g. underlining, overscoring etc.
CSI ... u ESC H CSI ... g Horizontal Tab Stops ON Horizontal Tab Stops OFF (TBC) Data Structure Description ASCII hex. dec. CSI n1 9B n1 155 n1 ASCII hex. dec. ESC "H" 1B 48 27 72 ASCII hex. dec. CSI n 9B n 155 n ➊ n1 "u" 75 117 "g" 67 103 [A] set horizontal tab stop ➊ [C] set horizontal tab stop at current position ➋ [A] clear all horizontal tab stops ➌ Print width 8 inches = 1... 80 at 10 cpi = 1... 96 at 12 cpi = 1...120 at 15 cpi = 1...136 at 17.1 cpi = 1...
➌ With the sequence CSI n g for n the following parameters are available: n hex. dec.
Example 1 10 20 30 40 50 60 70 80 90 100 110 120 130 140 Example 2 10 20 30 40 50 60 70 80 90 48 Print Positioning REM horizontal tabs LPRINT CHR$(27);"[4w";:REM 10 cpi LPRINT CHR$(27);"[10;20;30u"; LPRINT "123456789012345678901234567890123456789" GOSUB 110 LPRINT CHR$(27);"[0w";:REM 5 cpi GOSUB 110 LPRINT CHR$(27);"[11w";:REM 20 cpi GOSUB 110 END LPRINT CHR$(9);"tab1"; LPRINT CHR$(9);"tab2"; LPRINT CHR$(9);"tab3" RETURN FOR I=1 TO 3 LPRINT "1234567890";CHR$(27);"H"; NEXT I LPRINT FOR J=1 TO 3 LPRINT
LF Line Feed Data Structure ASCII hex. dec. LF 0A 10 [A] line feed Description When the printer receives this code, it prints all the data in the print buffer, then advances the paper one line. The LF code can also give a carriage return if automatic carriage return is selected. If no CR is given, the next printing starts in the column following the end of printing. The amount by which the paper is advanced depends on the current line spacing. The default line spacing of the printer is 1⁄6 inch.
VT Vertical Tab Stop Data Structure ASCII hex. dec. VT 0B 11 vertical tab stop Description When the printer receives this code, it prints all the data in the print buffer, then advances the paper to the next vertical tab stop position. The VT code can also give a carriage return if automatic carriage return is selected (refer to Operator’s Manual). If no CR is given, the next printing starts in the column following the end of printing.
VTS Set Vertical Tab Stop at Current Position Data Structure ASCII hex. dec. VTS 8A 138 [A] set vertical tab stop Description This code sets an horizontal tab stop at the current vertical position. IND Vertical Index Data Structure ASCII hex. dec. IND 84 132 [A] vertical index Description The code IND moves the active print position to the following line. The difference to Line Feed (LF) is that IND does not permit an CR option.
CSI ... v CSI 1 g CSI 4 g Vertical Tab Stops ON Vertical Tab Stops OFF (TBC) Data Structure Description ➊ ASCII hex. dec. CSI n 9B n 155 n "v" 76 118 [A] set vertical tab stop ASCII hex. dec. CSI "1" 9B 31 155 49 "g" 67 103 [A] clear all vertical tab stops at current position ASCII hex. dec. CSI "4" 9B 34 155 52 "g" 67 103 [A] clear all vertical tab stops n = 1...132 lines at a line spacing of 1⁄6 inch (6 lpi) = 1...
A vertical tabulation is executed by the VT control code (hex.0B, dec.11); also see page 50, Vertical Tab Stop.
CSI ... ’ Horizontal Posititon Absolute (HPA) Data Structure Description ASCII hex. dec. CSI n 9B n 155 n "‘" 60 96 [A] set horizontal position absolute n = 1 (default setting) ∧ = current left margin This sequence moves the print head to a horizontal print position absolute. The unit depends on PUM (Positioning Unit Mode) and is either character positions or defined by the SSU-function (Select Size Unit, see page 8).
CSI ... a Horizontal Position Relative (HPR) Data Structure ASCII hex. dec. CSI n CSI n CSI n Description n = 1 (default setting) "a" 61 97 [A] set horizontal position relative This sequence moves the print head to the right. The unit depends on PUM (Positioning Unit Mode) and is either character positions or defined by the SSU-function (Select Size Unit, see page 8).
CSI ... j Horizontal Position Backward (HPB) Data Structure ASCII hex. dec. CSI n 9B n 155 n Description n = 1 (default setting) "j" 6A 106 [A] set horizontal position backward This sequence moves the print head to the left. The unit depends on PUM (Positioning Unit Mode) and is either character positions or defined by the SSU-function (Select Size Unit, see page 8).
CSI ... d Vertical Position Absolute (VPA) Data Structure Description ASCII hex. dec. CSI n 9B n 155 n d 64 100 [A] set vertical position absolute n = 1 (default setting) ∧ = current top margin This sequence moves the print head to a vertical print position absolute. The unit depends on PUM (Positioning Unit Mode) and is either lines or defined by the SSU-function (Select Size Unit, see page 8).
CSI ... e Vertical Position Relative (VPR) Data Structure ASCII hex. dec. CSI n 9B n 155 n Description n = 1 (default setting) "e" 65 101 [A] set vertical position relative This sequence moves the print head lines or vertical positions down. The unit depends on PUM (Positioning Unit Mode) and is either lines or defined by the SSU-function (Select Size Unit, see page 8).
CSI ... k Vertical Position Backward (VPB) Data Structure ASCII hex. dec. CSI n 9B n 155 n Description n = 1 (default setting) "k" 6B 107 [A] set vertical position backward This sequence moves the print head lines or vertical positions upward. The unit depends on PUM (Positioning Unit Mode) and is either lines or defined by the SSU-function (Select Size Unit, see page 8). Positions beyond the top margin are ignored. This sequence is not valid in Single Sheet Mode.
Horizontal and Vertical Position Absolute (HVP) Data Structure ASCII hex. dec. CSI n1 9B n1 155 n1 ; n2 3B n2 59 n2 Description n1 = vertical position n2 = horizontal position "f" 66 102 CSI ... f [B] [C] set horizontal and vertical position absolute This sequence moves the print head to a horizontal and vertical print position absolute. The unit depends on PUM (Positioning Unit Mode) and is either lines or defined by the SSU-function (Select Size Unit, see page 8).
BS Backspace Data Structure ASCII hex. dec. BS 08 8 [A] Backspace Description After receiving this code the content of line buffer is printed out. Then, the print head is moved one position to the left (depending on the current values of cpi). CR Carriage Return Data Structure ASCII hex. dec. CR 0D 13 [A] carriage return Description When the printer receives this code, it prints any data in the print buffer and resets the line pointer.
FF Form Feed Data Structure ASCII hex. dec. FF 0C 12 [A] form feed Description When the printer receives this code, it prints the data in the print buffer, then advances the paper from the current pritn position to the top-of-form position on the next page. Cut sheet: Forms are ejected. The first print position on the following paper is the first (top) physically possible position. Fanfold paper: The paper is moved by the form length given before.
PLD Partial Line Down Data Structure ASCII hex. dec. PLD 8B 139 [A] partial line down Description If the preceding character is in normal position, PLD moves the active position down to a sufficient distance to give the following characters the appearence of being subscripted. If the preceding character is in a superscript position, PLD moves to normal position. PLU Partial Line Up Data Structure ASCII hex. dec.
RI Reverse Index Data Structure ASCII hex. dec. RI 8D 141 [B] reverse index Description The code RI moves the active position to the preceding line. An CR option is not permitted. NEL Next Line Data Structure ASCII hex. dec. Description The code NEL moves the active position to the left margin of the next line. This gives the same result as the combination of CR (Carrigage Return) and LF (Line Feed).
Graphics ESC % ... CSI 6 z CSI 5 z Graphic Modes Data Structure Description ASCII hex. dec. ESC "%" n 1B 25 n 27 37 n n1 n1 n1 ; 3B 59 n2 n2 n2 ; 3B 59 DATA DATA DATA [C] set dpi for graphics ASCII hex. dec. CSI "6" 9B 36 155 54 "z" 7A 122 [C] graphics invers ASCII hex. dec.
The vertical resolution is 72 dpi. The graphics image is printed vertically closed at a line feed of 80⁄720 inch. (Also see the sequences Spacing Increment (SPI), page 15, and Set Line Spacing (SLS), page 26. Example: CSI 80 ; SP G). Example for calculation of n1 and n2: The length of graphics is 80 bytes. n2 = = = = number of bytes divided by 256 int (80⁄256) dec.0 hex.00 n1 = = = = remainder of division of n2 80 mod 256 dec.80 hex.50 Graphics data and text data can be mixed within one line.
Relationship between graphics data and needles: Needle 1 2 3 4 5 6 7 8 Example 1 10 20 30 40 50 60 70 80 90 100 110 120 130 • • • • • • • • Data byte Bit 7 Bit 6 Bit 5 Bit 4 Bit 3 Bit 2 Bit 1 Bit 0 REM bit image print WIDTH "LPT1:",255 LPRINT CHR$(27);"%3";CHR$(80);CHR$(0); GOSUB 100:LPRINT " 60 dpi" LPRINT CHR$(27);"%4";CHR$(80);CHR$(0); GOSUB 100:LPRINT " 120 dpi" LPRINT CHR$(27);"%7";CHR$(80);CHR$(0); GOSUB 100:LPRINT " 240 dpi" END FOR N=1 TO 80 LPRINT CHR$(255); NEXT N RETURN Graphics 67
Example 2 68 Graphics 10 20 30 40 50 60 70 80 90 100 110 120 130 140 150 160 170 180 190 200 REM bit image print WIDTH "LPT1:",255 LPRINT CHR$(27);"%3";CHR$(10);CHR$(0); GOSUB 130:REM 60 dpi LPRINT CHR$(27);"%4";CHR$(10);CHR$(0); GOSUB 130:REM 120 dpi LPRINT CHR$(27);"[6z"; LPRINT CHR$(27);"%3";CHR$(10);CHR$(0); GOSUB 130:REM reverse 60 dpi LPRINT CHR$(27);"[5z"; LPRINT END RESTORE FOR I=1 TO 10 READ D LPRINT CHR$(D); NEXT I LPRINT " "; RETURN DATA 34,80,138,0,143,0,138,80,34,0
Miscellaneous CSI ... SP q Load Menu Data Structure ASCII hex. dec. CSI n 9B n 155 n SP 20 32 "q" 71 113 [B] load menu Description For n the following parameters are available: n hex. dec. Loading of 0 1 2 3 4 30 31 32 33 34 Default menu Menu No. 1 Menu No. 2 Menu No. 3 Menu No. 4 (reserved) 48 49 50 51 52 Up to 3 (4) various configurations can be saved with the printer. Setting the configuration is made by the control panel of the printer (refer to Operator’s Manual, chapter 2, “Menu”).
CSI ... + z CSI ... + y Automatic Gap Adjustment (AGA) Direct Setting of the Print Head Distance Data Structure Description ASCII hex. dec. CSI n 9B n 155 n "+" 2B 43 "z" 7A 122 [B] automatic gap adjustment ➊ ASCII hex. dec. CSI n 9B n 155 n "+" 2B 43 "y" 79 121 [B] direct setting of the print head distance ➋ ➊ For the sequence CSI n + z the following parameters are available for n: n hex. dec.
CSI Ps1 Ps2 Ps3 Pn4 Pn5 + v Paper Handling Data Structure ASCII hex. dec.
CSI ... m Color Selection (Option) Data Structure ASCII hex. dec. CSI n 9B n 155 n "m" 6D 109 [A] set colors Description For n the following parameters are available: n hex. dec.
The relationship between color selection sequences and the resulting colors for several ribbon cassettes is shown in the following table: selected color black red green yellow blue magenta cyan * ** *** **** yellow, magenta, cyan, black (YMCK) black red *) green **) yellow blue ***) magenta cyan red = yellow + magenta green = yellow + cyan blue = magenta + cyan sequence is ignorered } red, green, blue, black (RGBK) black red green green blue red blue 3 ∗ black, red black red ****) ****) ****) red ****
CSI ... z Input Data Control Data Structure Description ASCII hex. dec. CSI "9" 9B 39 155 57 "z" 7A 122 [C] set bit 8 = 1 ➊ ASCII hex. dec. CSI "8" 9B 38 155 56 "z" 7A 122 [C] set bit 8 = 0 ➋ ASCII hex. dec. CSI "7" 9B 37 155 55 "z" 7A 122 [C] bit 8 unchanged ➊ By means of this MTPL-sequence the eighth data bit is set to “1”. This results in accordance with the selected character set characters from the national character set or italic characters to be printed.
Example 10 20 30 40 50 60 70 80 90 100 110 120 REM input data control LPRINT CHR$(27);"[7z"; GOSUB 90 LPRINT CHR$(27);"[9z"; GOSUB 90 LPRINT CHR$(27);"[8z"; GOSUB 90 END FOR I=97 TO 103:LPRINT CHR$(I);:NEXT I FOR I=161 TO 167:LPRINT CHR$(I);:NEXT I LPRINT:LPRINT RETURN Miscellaneous 75
CSI ... { CSI 2 J Sheet Feeder/Paperway Eject Form Data Structure Description ASCII hex. dec. CSI n 9B n 155 n ; 3B 59 ASCII hex. dec. CSI "2" 9B 32 155 50 "J" 4A 74 n1 n1 n1 ; 3B 59 n2 n2 n2 "{" 7B 123 [A] set sheed feeder ➊ [C] eject form With the sequence CSI n ; n1 ; n2 { for n the following parameters are available: n hex. dec.
➊ Paper is ejected also by FF or the limit, fixed by the form length or the bottom margin. ➋ This sequence selects manual cut sheet paper process. ➌ This sequence selects fanfold paper process for tractor 1. ➍ This sequence selects fanfold paper process for optional tractor 2. If an optional tractor 2 is installed, sequences for selecting the automatic single sheet feeder (ASF) are ignored. ➎ Selection of bin 1 or 2.
For compatibility to former printers a sequence like CSI 21 ; x ; n { will also be accepted. In this case, the parameter x will be ignored. Paper is inserted on receipt of: CR (hex.0D; dec.13) if CR = LF is selected LF (hex.0A; dec.10) VT (hex.0B; dec.11) print data Example 10 15 20 30 40 50 60 70 80 90 78 Miscellaneous REM LPRINT LPRINT LPRINT LPRINT LPRINT LPRINT LPRINT LPRINT END sheet feeder CHR$(27);"[3t";:REM set form length CHR$(27);"[21{"; "This text is on a form" "from magazine one.
ESC c CSI 6 ~ Reset to Initial State (RIS) Data Structure ASCII hex. dec. ESC "c" 1B 63 27 99 ASCII hex. dec. CSI "6" 9B 36 155 54 [A] reset to initial state "~" 7E 126 [C] reset to initial state Description The printer is initialized, which means it has the same status as just after power switch-on. All parameters set by CSI-sequences are cleared. The active print position is set on the top position of a page (document).
CSI ? ... ~ Command Set CSI "?" 9B 3F 155 63 n n n "~" 7E 126 Data Structure ASCII hex. dec. [B] command set Description For n the following parameters are available: n hex. dec. command set 1 2 3 4 5 6 7 10 31 32 33 34 35 36 37 31 30 49 50 51 52 53 54 55 49 48 11 31 31 49 49 MTPL MTPL + IBM-Graphics-Printer MTPL + IBM-Proprinter XL MTPL + IBM-Proprinter XL 24e MTPL + EPSON FX MTPL + EPSON LQ MTPL + NEC P60/70 end of special command interpretations and return to standard command set, e.g.
SI SO ESC ... Activation of Character Sets Data Structure Description ASCII hex. dec. SI 0F 15 ZG locking shift LS0 ➊ ASCII hex. dec. SO 0E 14 ZG locking shift LS1 ➋ ASCII hex. dec. ESC n 1B n 27 n ZG locking shift LS2, LS3, LS1R, LS2R, LS3R ➌ ➊ Activation of G0 for codes 21 - 7E ➋ Activation of G1 for codes 21 - 7E ➌ For n the following parameters are available: n hex. dec.
A set of up to 94 characters is made ready for use.
ESC ( ... ESC ) ... ESC * ... ESC + ... Designation of Character Set G0 Designation of Character Set G1 Designation of Character Set G2 Designation of Character Set G3 Data Structure ASCII hex. dec. ESC n 1B n 27 n F F F Description Designation of character sets is a process by which a set of graphic symbols is connected to the usable character set registers G0, G1, G2 and G3. For n and F the following parameters are available: n hex. dec. character set ( ) * + 28 29 2A 2B F hex. dec.
F hex. dec.
Example 10 20 30 40 50 60 70 80 90 100 110 120 130 140 150 160 170 REM LPRINT LPRINT LPRINT LPRINT LPRINT LPRINT LPRINT LPRINT LPRINT LPRINT END LPRINT LPRINT LPRINT LPRINT RETURN character sets CHR$(27);"(B"; "US-ASCII: ";:GOSUB CHR$(27);"(A"; "UK-ASCII: ";:GOSUB CHR$(27);"(K"; "GERMAN : ";:GOSUB CHR$(27);"(R"; "FRENCH : ";:GOSUB CHR$(27);"(Y"; "ITALIAN : ";:GOSUB 130 130 130 130 130 CHR$(35);CHR$(36);CHR$(64); CHR$(91);CHR$(92);CHR$(93); CHR$(94);CHR$(96);CHR$(123); CHR$(124);CHR$(125);CHR$(126) Mis
SO SI Activation of Characters Data Structure Description ASCII hex. dec. SO 8E 142 [B] ZG single shift SS2 ➊ ASCII hex. dec. SI 8F 143 [B] ZG single shift SS3 ➋ ➊ Activation of one single character from G2 (“single shift 2”). ➋ Activation of one single character from G3 (“single shift 3”). The functions SO and SI each activate one single character of the graphic character set into the codes 21 - 7E. The character following the code for the changeover is replaced once.
Graphic description of locking shift/single shift (pages 81 - 86): Active character set Invocation of one graphic character Invocation of graphic sets Designation of graphic sets Repertoire of graphic sets C = control code set G = graphic sets Miscellaneous 87
CSI ? 50 h CSI ? 50 l Size of Character Set (1 Character Set) Size of Character Set (2 Character Sets) Data Structure Description ASCII hex. dec. CSI "?" 9B 3F 155 63 "5" 35 53 "0" 30 48 "h" 68 104 ASCII hex. dec. CSI "?" 9B 3F 155 63 "5" 35 53 "0" 30 48 "l " 69 105 [A] loading a character set with 256 characters ➊ [A] loading 2 character sets with 94 characters each ➋ In an 8 bit environment, the MTPL standard allows the use of 2 character sets at the same time.
CSI ? 51 h CSI ? 51 l Proportional Spacing (Draft) OFF Proportional Spacing (Draft) ON Data Structure Description ASCII hex. dec. CSI "?" 9B 3F 155 63 "5" 35 53 "1" 31 49 "h" 68 104 ASCII hex. dec. CSI "?" 9B 3F 155 63 "5" 35 53 "1" 31 49 "l " 69 105 [A] disabling proportional spacing in print quality DRAFT ➊ [A] enabling proportional spacing in print quality DRAFT (default) ➋ ➊ This sequence disables proportional spacing for the print quality DRAFT.
CSI ? 53 h CSI ? 53 l Print Code Area Expansion ON Print Code Area Expansion OFF Data Structure Description ASCII hex. dec. CSI "?" 9B 3F 155 63 "5" 35 53 "3" 33 51 "h" 68 104 ASCII hex. dec.
CSI ... c Printer Identification (DA) Data Structure Description ASCII hex. dec. CSI "0" 9B 30 155 48 "c" 63 99 ASCII hex. dec. CSI "?" 9B 3F 155 63 ... ... ... [B] request for printer indentification "c" 63 99 Response from printer By this functions it is possible to get for example informations of device type and firmware revision or some capabilities like paper supply bins of the connected printer.
CSI ... n Device Status Report (DSR) Data Structure ASCII hex. dec. CSI n 9B n 155 n "n" 6E 110 [B] device status report Description For n the following parameters are available: n hex. dec.
ENQ Enquiry for Status Data Structure ASCII hex. dec. ENQ 05 5 Description With this code it is possible to get a status byte from the printer: Status byte: enquiry for status Bit 0 1 = BUSY Bit 1 1 = offline Bit 2 0 = paper end Bit 3 1 = always 1 Bit 4 1 = cover open Bit 5 1 = buffer overflow Bit 6 1 = parity or framing error Bit 7 0 = always 0 This code concerns only serial data transfer with ENQ/STX protocol.
NUL Fill Character Data Structure ASCII hex. dec. NUL 80 128 fill character without further meaning STX Start of Text Block Data Structure ASCII hex. dec. STX 02 2 start of text block Description Start of a text block. With this code any error message (parity error, memory overflow) is cleared. This code concerns only serial data transfer with ENQ/STX protocol.
ETX End of Text Block Data Structure ASCII hex. dec. ETX 03 3 Description End of a text block. end of text block This code concerns only serial data transfer with ACK/NAK protocol. For a detailed description see the documentation which comes with your printer. ACK Positive Acknowledge Data Structure ASCII hex. dec.
NAK Negative Acknowledge Data Structure ASCII hex. dec. NAK 15 21 negative acknowledge Description By sending the negative acknowledge code NAK a parity error (character with the wrong parity) is indicated in the data block to be transmitted and then the data block is deleted. This code concerns only serial data transfer with ACK/NAK protocol. For a detailed description see the documentation which comes with your printer. CAN Clear Print Buffer Data Structure ASCII hex. dec.
DEL Delete Data Structure ASCII hex. dec. DEL 7F 127 [A] delete Description With this code the line buffer is cleared. BEL Acoustic Alarm Data Structure ASCII hex. dec. BEL 07 7 [A] acoustic alarm Description This code causes an acoustic alarm.
Start Character “Escape” ESC 1B 27 ESC Data Structure ASCII hex. dec. [A] start character ESC Description ESC is the start character for a subsequent program sequence (the string $$ can be used instead of ESC if option is selected in the printer setup). MTPL-Start Character “Control Sequence Introducer” Data Structure ASCII hex. dec. Description MTPL-start character for a subsequent program sequence.
Appendix A Summary of Possible Codes
Sorted by Sequences Function Sequence ACK BEL BS CAN CR CSI CSI % 3 n1 ; n2 ; DATA CSI % 4 n1 ; n2 ; DATA CSI % 5 n1 ; n2 ; DATA CSI % 6 n1 ; n2 ; DATA CSI % 7 n1 ; n2 ; DATA CSI % 8 n1 ; n2 ; DATA CSI % 9 n1 ; n2 ; DATA CSI : y CSI = z CSI > z CSI ? 1 ~ CSI ? 10 ~ CSI ? 11 ~ CSI ? 2 ~ CSI ? 3 ~ CSI ? 4 ~ CSI ? 5 ~ CSI ? 50 l CSI ? 50 h CSI ? 51 h CSI ? 51 l CSI ? 52 h CSI ? 52 l CSI ? 53 h CSI ? 53 l CSI ? 6 ~ CSI ? 7 ~ CSI 0 + y CSI 0 + z control code ACK (Positive Acknowledge) . . . . . .
Sequence Function Page CSI 0 c CSI 0 g CSI 0 m CSI 0 m CSI 0 n CSI 0 n1 ; n2 { CSI 0 SP I CSI 0 SP K CSI 0 SP L CSI 0 SP q CSI 0 SP X CSI 0 w CSI 0 y CSI 0 z CSI 1 + z CSI 1 g CSI 1 m CSI 1 n CSI 1 SP I CSI 1 SP K CSI 1 SP L CSI 1 SP q CSI 1 SP X CSI 1 w CSI 1 y CSI 1 z CSI 10 m CSI 10 y CSI 10 z CSI 11 l CSI 11 h CSI 11 m CSI 11 w CSI 11 y CSI 12 m CSI 12 w CSI 12 y request for printer identification . . . . . . . clear horizontal tab stop at current position . clear all selected fonts . . . . . . . .
Sequence Function CSI 12 z CSI 13 m CSI 13 y CSI 13 z CSI 14 m CSI 15 m CSI 16 m CSI 17 m CSI 18 m CSI 19 m CSI 2 g CSI 2 J CSI 2 m CSI 2 SP I CSI 2 SP K CSI 2 SP L CSI 2 SP q CSI 2 SP X CSI 2 w CSI 2 y CSI 2 z CSI 2 z CSI 21 m CSI 21 n1 ; n2 { CSI 22 m CSI 22 n1 ; n2 { CSI 23 m CSI 23 n1 ; n2 { CSI 24 m CSI 26 m CSI 3 g CSI 3 m CSI 3 n CSI 3 SP I CSI 3 SP K CSI 3 SP L CSI 3 SP q double height ON (upper half) . . . . . . . . . . . font 3 . . . . . . . . . . . . . . . . . . . . . . . .
Sequence Function CSI 3 w CSI 3 z CSI 30 m CSI 31 m CSI 31 n1 ; n2 { CSI 32 m CSI 33 m CSI 34 m CSI 35 m CSI 36 m CSI 37 m CSI 39 m CSI 4 g CSI 4 m CSI 4 SP I CSI 4 SP L CSI 4 SP q CSI 4 w CSI 4 y CSI 4 z CSI 5 n CSI 5 n1 ; n2 { CSI 5 SP I CSI 5 w CSI 5 y CSI 5 z CSI 50 m CSI 50 n1 ; n2 { CSI 51 n1 ; n2 { CSI 52 n1 ; n2 { CSI 53 m CSI 55 m CSI 6 ~ CSI 6 SP I CSI 6 w CSI 6 z CSI 7 SP I horizontal spacing 8,6 cpi . . . . . line density 6 lpi . . . . . . . . . . color black . . . . . . . . . . . . .
Sequence Function CSI 7 w CSI 7 y CSI 7 z CSI 8 w CSI 8 y CSI 8 z CSI 9 SP L CSI 9 w CSI 9 y CSI 9 z CSI n ’ CSI n + y CSI n a CSI n d CSI n e CSI n j CSI n k CSI n p CSI n q CSI n SP \ CSI n SP C CSI n SP f CSI n SP g CSI n SP h CSI n SP U CSI n SP V CSI n t CSI n v CSI n1 ; n2 SP B CSI n1; n2 f CSI n1 ; n2 r CSI n1 ; n2 s CSI n1 ; n2 SP D CSI n1 ; n2 SP G CSI n1 u CSI Pn … SP r CSI Pn + w CSI Ps1 Ps2 Ps3 Pn4 Pn5 + v horizontal spacing 17,1 cpi . . . . . . . . . . . . . proportional mode OFF . . . . . .
Sequence Function Page DEL ENQ ESC ESC ( F ESC ) F ESC * F ESC + F ESC | ESC } ESC ~ ESC c ESC H ESC n ESC o ETX FF HT HTS IND LF NAK NEL NUL PLD PLU RI SI SO STX VT VTS control code DEL (Delete) . . . . . . . . . . control code ENQ (Enquiry for Status) . . . MTPL-start character for program sequence designate character set G0 . . . . . . . . . designate character set G1 . . . . . . . . . designate character set G2 . . . . . . . . . designate character set G3 . . . . . . . . .
Sorted by Functions Function Sequence acoustic alarm additional character spacing automatic gap adjustment OFF automatic gap adjustment ON Basic Measuring Unit BMU bin 1 (front) bin 2 (rear) bin 3 (option) bold or increased intensity centering ON change color character spacing clear all horizontal tab stops clear all horizontal tab stops at current line clear all selected fonts clear all vertical tab stops clear all vertical tab stops clear horizontal tab stop at current position color black color blue co
Function Sequence Page control code HTS control code IND (Vertical Index) control code LF (Line Feed) control code NAK (Negative Acknowledge) control code NEL (Next Line) control code NUL (fill character) control code PLD (Partial Line Down) control code PLU (Partial Line Up) control code RI (Reverse Index) control code STX (Start of Text Block) control code VT (Vertical Tab Stop) control code VTS cut sheet paper default color black designate character set G0 designate character set G1 designate characte
Function Sequence font 1 font 2 font 3 font 4 font 5 font 6 font 7 font 8 font 9 font selection for NLQ/LQ font selection form lenght in lines graphic size modification graphic size selection graphics 120 dpi graphics 240 dpi graphics 240 dpi graphics 60 dpi graphics 72 dpi graphics 80 dpi graphics 90 dpi graphics invers graphics normal high print quality high resolution print quality horizontal character spacing 10 cpi horizontal character spacing 15 cpi horizontal character spacing 6 cpi horizontal char
Function Sequence Page horizontal spacing 17,1 cpi horizontal spacing 20 cpi horizontal spacing 5 cpi horizontal spacing 6 cpi horizontal spacing 7,5 cpi horizontal spacing 8,6 cpi horizontal step horizontal- and vertical position absolute italic mode OFF italic mode ON left and right margin letter print quality (LQ) line density 6 lpi line density 8 lpi line home line limit line spacing load default menu load menu No. 1 load menu No. 2 load menu No. 3 load menu No.
Function Sequence MTPL + IBM-Proprinter XL command set MTPL + NEC P60/70 command set MTPL command set MTPL-start character for program sequence MTPL-start character for program sequence near letter quality (NLQ) NLQ at 10 cpi NLQ at 12 cpi normal color or normal intensity output paper to stacker 1 (sorter) overline mode OFF overline mode ON paper handling print code area expansion ON print code area expansion OFF print transparent characters proportional mode OFF proportional mode OFF proportional mode ON
Function Sequence Page shared interface single shift 2 (SS2) single shift 3 (SS3) size of character set (1 character set) size of character set (2 character sets) size unit Decididots size unit Decipoints size unit Decipoints size unit Micrometers size unit Millimeters size unit Mils size unit Pixels spacing increment start of Barcode interpretation subscript ON super-/sub- and microscript OFF superscript ON top and bottom margin turn OFF positioning unit mode turn ON positioning unit mode underline mode
Appendix B Character Sets
Standard Character Set hex dec 0 1 0 1 NUL 0 1 2 3 ETX 2 3 4 5 6 7 SP 16 8 9 A B C D E F NUL 32 48 64 80 96 112 128 144 160 176 192 208 224 240 33 49 65 81 97 113 129 145 161 177 193 209 225 241 34 50 66 82 98 114 130 146 162 178 194 210 226 242 35 51 67 83 99 115 131 147 163 179 195 211 227 243 36 52 68 84 100 116 148 164 180 196 212 228 244 21 37 53 69 85 101 117 133 149 165 181 197 213 229 245 22
International Substitution Table - normal font dec 35 36 64 91 92 93 94 96 123 124 125 126 hex 23 24 40 5B 5C 5D 5E 60 7B 7C 7D 7E USA Great Britain Sweden Germany Portugal France Italy Spain Norway The contents of the columns 8 and 9 depend on the settings in the printer’s menue.
Programmer’s Reference Tally ANSI Barcode and LCP
Table of Contents Barcode and LCP Printing Introduction Secured/Unsecured Mode Data Structure . . . . . . . . . . . . . . . . . . . . . . . . . . . 6 Description . . . . . . . . . . . . . . . . . . . . . . . . . . . . . 6 Barcode Printing Barcode Header . . . . . . . . . . . . . . . . . . . . . . . . . . . . . 8 Header Format . . . . . . . . . . . . . . . . . . . . . . . . . . . 8 Transparent Barcode/LCP commands . . . . . . . . . . . . . . . 9 Barcode Print Feature F for Selection of F-Code . .
Code EAN 13 with HRI . . . . . . . . . . . . . . . . . . . . . . 23 Code EAN 13 without HRI . . . . . . . . . . . . . . . . . . . . . 24 Code MSI / modified Plessey . . . . . . . . . . . . . . . . . . . 25 . . . . . . . . . . . . . . . . . . . . . . . 26 Code UPCA without HRI . . . . . . . . . . . . . . . . . . . . . . 27 Code UPCE with HRI . . . . . . . . . . . . . . . . . . . . . . . 28 Code UPCE without HRI . . . . . . . . . . . . . . . . . . . . . . 29 Delta distance (IBM) . . . . . . .
Appendix Character Sets LCP Character Set, German . . . . . . . . . . . . . . . . . . . A-3 LCP Character Set, US-ASCII . . . . . . . . . . . . . . . . . . . A-4 OCR-A Character Set . . . . . . . . . . . . . . . . . . . . . . . A-5 OCR-B Character Set . . . . . . . . . . . . . . . . . . . . . . .
Barcode and LCP Printing Introduction Secured/Unsecured Mode Barcode Printing US Postnet Barcode Large Character Printing (LCP)
Introduction This User’s Manual describes all barcode and LCP sequences and control codes, regardless of your printer’s special barcode and LCP implementation (LCP = Large Character Printing). Be sure to observe the notes in the operator’s manual regarding the special barcode/LCP Types implemented in your printer and which of the sequences described here are not available as a result. Select the Barcode Mode as described in the operator’s manual.
This may cause conflict with other emulations, since the above commands may have different functions in these emulations, for example: SI DC4 ESC P ESC P Condensed print Reset expanded print Proportional spacing ON/OFF Pica In barcode mode the barcode sequences have priority. The barcode interpreter can be switched on or off with the MTPL sequences ESC [ ? 11 ~ (Barcode ON) and ESC [ ? 10 ~ (Barcode OFF).
The syntax for the parameters, the start, separate and stop code is represented as follows: ASCII hex. dec.
Special Feature If you not get the required control codes for Barcode of ASCII code table columns 0 and 1 out of your computer you can use in addition to these Barcode control codes a set of MTPL sequences to generate these control codes by printable ASCII characters. By this measure the Barcode programs will remain fully compatible in spite of the additional MTPL sequences.
Secured/Unsecured Mode Unsecured mode Secured mode Data Structure Description ESC PSC0 ESC \ ESC PSC1 ESC \ ASCII hex. dec. ESC "P" 1B 50 27 80 "S" 53 83 "C" 43 67 "0" 30 48 ESC "\" 1B 5C 27 92 Unsecured mode ASCII hex. dec. ESC "P" 1B 50 27 80 "S" 53 83 "C" 43 67 "1" 31 49 ESC "\" 1B 5C 27 92 Secured mode In secured mode, the amount of space the barcode or LCP character requires is "secured". In each line, additional barcode and normal characters can be printed.
Example 1 10 20 30 40 50 60 70 80 REM LCP unsecured mode LPRINT CHR$(27); "[?11~"; REM select unsecured mode LPRINT CHR$(27); "PSC0"; CHR$(27); "\"; REM set character size to 5 LPRINT CHR$(16); "5"; CHR$(25); LPRINT "Example for " LPRINT CHR$(15); "LCP"; CHR$(15); " unsecured mode" Example 2 10 20 30 40 50 60 70 80 90 100 110 REM LCP secured mode LPRINT CHR$(27); "[?11~"; REM select secured mode LPRINT CHR$(27); "PSC1"; CHR$(27); "\"; REM set character size to 5 LPRINT CHR$(16); "5"; CHR$(25); LPRINT "
Barcode Printing Barcode Header Before the data, which contains the barcode information, are transmitted to the printer, the barcode header must be sent. Otherwise the standard parameter values are used (see section "Header Format"). In the header, the printing parameters, the barcode size and the barcode type are defined. This header only needs to be transferred once, unless settings are to be changed or the printer has been turned off.
The default parameter values are the following: Unsecured mode (see section "Secured/Unsecured mode") HRI OFF, Normal Print, Double Pass (F = SP) Barcode Type 2/5 matrix (a = "A") Barcode height 1/6 inch (n = "1") Narrow bar (x = "0") Narrow space (y = "0") Ratio of wide to narrow 2 to 1 (z = "0") When only parts of the header are to be changed, copy the header up to the parameter which must be changed, and then close the header with the end-of-header character.
Barcode Print Feature F for Selection of F-Code HRI or normal/compressed as well as single or double pass is switched via character F according to the following table. ASCII Char. SP ! " # $ % & ‘ ( ) * + , . / 0 1) 1 1) HRI 2) Pass 3) Print HexValue On Off 20 21 22 23 24 25 26 27 28 29 2A 2B 2C 2D 2E 2F 30 31 – – x x – – x x – – x x – – x x – x x x – – x x – – x x – – x x – – x – Normal Compr.
Barcode Types A B C D E F G H I J K L M N O P Q R S T = = = = = = = = = = = = = = = = = = = = 2/5 matrix (default) 2/5 industrial 2/5 interleaved Code 11 Code BCD matrix Code 39 Codabar EAN 8 with HRI EAN 8 without HRI 2/5 matrix (default) EAN 13 with HRI EAN 13 without HRI MSI/modified Plessey UPC A with HRI UPC A without HRI UPC E with HRI UPC E without HRI Delta Distance (IBM) Code 128 EAN 128 All commercial barcodes (for labeling systems) of the H, I, K, L, N, O, P, Q Types can be extended using the
Barcode Width By specifying an ASCII value from 0 to 3, the barcode width can be defined. This allows ideal adaption to the scanner specifications, particularly for long-range scanners. Table 1 Compressed1) Normal Header Parameter older printer types (e.g.MT230) older printer types (e.g.MT230) x=0 Width of x = 1 the x=2 narrow bar x = 3 0.53 mm 0.74 mm 1.16 mm 1.38 mm 0.54 mm 0.67 mm 1.09 mm 1.30 mm 0.48 mm 0.69 mm 1.16 mm 1.33 mm 0.32 mm 0.53 mm 0.74 mm 0.95 mm 0.33 mm 0.43 mm 0.65 mm 0.
All values are only valid when a new colour ribbon is used. They change depending on the degree of wear: narrow bar: approx. -0.05 mm narrow space: approx. +0.05 mm. The Code EAN 128, as the EAN/UPC, is based on module widths. Therefore only the X parameter is valid for this type. This parameter is also used for the Y parameter (narrow bar width). The Z parameter has no meaning. In combination with the normal/condensed feature, 8 widths result (see table 1).
Data Formats of Barcode Types Code 2/5 Matrix Type A Syntax ASCII hex. dec. Data Structure ASCII hex. dec. Example 10 20 30 40 50 Figures (n) Start code Stop code "0" to "9" 30 to 39 48 to 57 ":" 3A 58 ":" 3A 58 DC4 Start code 14 Start code 20 Start code n ... n n ... n n ...
Code 2/5 Industrial Type B Syntax ASCII hex. dec. Data Structure ASCII hex. dec. Example 10 20 30 40 50 Figures (n) Start code Stop code "0" to "9" 30 to 39 48 to 57 ":", "<" or ">" 3A, 3C or 3E 58, 60 or 62 ";", "=" or "?" 3B, 3D or 3F 59, 61 or 63 DC4 Start code 14 Start code 20 Start code n ... n n ... n n ...
Code 2/5 Interleaved Type C Syntax ASCII hex. dec. Data Structure ASCII hex. dec. Example 10 20 30 40 50 Figures (n) Start code Stop code "0" to "9" 30 to 39 48 to 57 ":" or "<" 3A or 3C 58 or 60 ";" or "=" 3B or 3D 59 or 61 DC4 Start code 14 Start code 20 Start code n ... n n ... n n ...
Code 11 Type D Syntax ASCII hex. dec. Data Structure ASCII hex. dec. Example 10 20 30 40 50 Figures/Characters (n) Start code Stop code "0" to "9" and "-" 30 to 39 and 2D 48 to 57 and 45 ":" 3A 58 ":" 3A 58 DC4 Start code 14 Start code 20 Start code n ... n n ... n n ...
Code BCD Matrix Type E Syntax ASCII hex. dec. Data Structure ASCII hex. dec. Example 10 20 30 40 50 Figures (n) Start code Stop code "0" to "9" 30 to 39 48 to 57 ":" 3A 58 ":" 3A 58 DC4 Start code 14 Start code 20 Start code n ... n n ... n n ...
Code 39 Type F Syntax Numbers/Character (n) Start code Stop code not fixed, recommended: "*" not fixed, recommended: "*" ASCII "0" to "9", "A" to "Z" and "$", "%", "*", "+", "-", ".", "/" hex. 30 to 39, 41 to 5A and 24, 25, 2A, 2B, 2D, 2E, 2F 2A 2A dec. 48 to 57, 65 to 90 and 36, 37, 42, 43, 45, 46, 47 42 42 Data Structure ASCII hex. dec. Example 10 20 30 40 50 DC4 Start code 14 Start code 20 Start code n ... n n ... n n ...
CODABAR Type G Syntax Numbers/Character (n) Start code Stop code not fixed, recommended: not fixed, recommended: "0" to "9", "A" to "D" and "$", "+", "-", ".", "/", ":" "a" to "e" and "n", "t", "*" "a" to "e" and "n", "t", "*" hex. 30 to 39 and 24, 2B, 2D, 2E, 2F, 3A 61 to 65 and 6E, 74, 2A 61 to 65 and 6E, 74, 2A dec. 48 to 57 and 36, 43, 45, 46, 47, 58 97 to 101 and 110, 116,42 97 to 101 and 110, 116,42 ASCII Data Structure ASCII hex. dec.
Code EAN 8 with HRI Type H Syntax ASCII hex. dec. Data Structure ASCII hex. dec.
Code EAN 8 without HRI Type I Syntax ASCII hex. dec. Data Structure ASCII hex. dec.
Code EAN 13 with HRI Type K Syntax ASCII hex. dec. Data Structure ASCII hex. dec.
Code EAN 13 without HRI Type L Syntax ASCII hex. dec. Data Structure ASCII hex. dec.
Code MSI / modified Plessey Type M Syntax ASCII hex. dec. Data Structure ASCII hex. dec. Example 10 20 30 40 50 Figures (n) Start code Stop code "0" to "9" 30 to 39 48 to 57 ":" 3A 58 ";" 3B 59 DC4 Start code 14 Start code 20 Start code n ... n n ... n n ...
Code UPC A with HRI Type N Syntax ASCII hex. dec. Data Structure ASCII hex. dec.
Code UPC A without HRI Type O Syntax ASCII hex. dec. Data Structure ASCII hex. dec.
Code UPC E with HRI Type P Syntax ASCII hex. dec. Data Structure ASCII hex. dec.
Code UPC E without HRI Type Q Syntax ASCII hex. dec. Data Structure ASCII hex. dec.
Code Delta distance (IBM) Type R Syntax ASCII hex. dec. Data Structure ASCII hex. dec. Example 10 20 30 40 50 Figures/Characters (n) Start code Stop code "0" to "9" and "A" to "F" 30 to 39 and 41 to 46 48 to 57 and 65 to 70 "F" 46 70 "D" 44 68 DC4 Start code 14 Start code 20 Start code n ... n n ... n n ...
Code 128 Type S Syntax ASCII hex. dec. Figures/Characters (n) Start code Stop code see table section "Description" none none Data Structure ASCII hex. dec. DC4 n ... n 14 n ... n 20 n ... n DC4 14 20 Description While many barcode styles are limited to numbers, Code 128 can encode numbers, letters, and other symbols commonly found on keyboards, such as @, # and %. The Code 128 barcode is like three barcodes in one. The three barcode styles are called Code A, Code B, and Code C.
Example If you need to print a Carriage Return (hex.0D, dec.13), as part of a barcode, you need to send ">M" (13 + 64 = 77, see character set table to verify that decimal 77 equals the capital letter "M"). This substitution process can be carried out throughout the range of decimal values, i.e., ">d" (decimal 100) equates to the dollar symbol (decimal 36). If the greater-than symbol itself must be transmitted, send ">0" (the 0 will not be part of the printed data).
Code 128 translation table Wert 0 1 2 3 4 5 6 7 8 9 10 11 12 13 14 15 16 17 18 19 20 21 22 23 24 25 26 27 28 29 30 31 32 33 34 35 Code A Code B Code C Space Space ! ! " " # # $ $ % % & & ‘ ‘ ( ( ) ) * * + + ‘ ‘ hyphen hyphen period period / / 0 0 1 1 2 2 3 3 4 4 5 5 6 6 7 7 8 8 9 9 : : ; ; < < = = > > ? ? @ @ A A B B C C 00 01 02 03 04 05 06 07 08 09 10 11 12 13 14 15 16 17 18 19 20 21 22 23 24 25 26 27 28 29 30 31 32 33 34 35 Wert 36 37 38 39 40 41 42 43 44 45 46 47 48 49 50 51 52 53 54 55 56 57 58 59 6
Example 10 20 30 40 50 REM code 128 LPRINT CHR$(27);"[?11~"; LPRINT CHR$(26);" S3;111";CHR$(25); LPRINT CHR$(20);"ABCD0123";CHR$(20); LPRINT CHR$(27);"[?10~" 34 Barcode Printing
EAN 128 Type T Syntax Figures/Characters (n) Start code Stop code see Code 128 none none ASCII hex. dec. Data Structure ASCII hex. dec. DC4 n ... n 14 n ... n 20 n ... n Description The only difference between both types of barcodes is the initial sequence. Code 128 starts with Code A, Code B or Code C followed by character information. Barcode EAN 128 requires the code FNC1 between Startcode and character information. The Code 128 translation table remains valid.
Add-On Barcodes UPC and EAN barcodes (commercial barcodes) can be extended with Add-On barcodes. The following barcodes can be extended with Add-On barcodes: Barcode Types H, I, K, L, N, O, P and Q In the data formats the numbers are generally given in the sequence they are printed from left to right in the barcode, i.e. in the case of the EAN13 code, the 13. figure is transferred first and the 1. figure last.
Example 2 EAN13 barcode with HRI and Add On 5 extention Format: 10 20 30 40 50 DC4:nnnnnnn:nnnnnn:cnnnnn:DC4 REM code EAN 13 with add-on-5 extention LPRINT CHR$(27);"[?11~"; LPRINT CHR$(26);" K3;111";CHR$(25); LPRINT CHR$(20);":0123456:789012:012345:";CHR$(20); LPRINT CHR$(27);"[?10~" Barcode Printing 37
Check Number Calculation The following barcode types must be given a check number for transfer to the printer: Type H and I (EAN 8) Type K and L (EAN 13) Type N and O (UPC A) Type P and Q (UPC E) The check number (c) is transferred after the barcode information (n). For the "EAN" type, this is printed as the last figure in the HRI data line. For the "UPC" type, the check number is not printed in the HRI data line.
EAN 8 7 numbers are transferred for the EAN 8 code. The 8. digit represents the check number. The even figures of the information have a factor of "3", the uneven figures a factor of "1". Counting begins from the left. The resulting cross sum is divided by 10. The remaining figure is subtracted from the modul (10). If the remainder is "0", the check number is also "0".
UPCE For the UPCE barcode type, 7 numbers are transmitted. The 8. digit is the check number. The uneven figures of the information have a factor of "3", the even figures a factor of "1". Counting begins from the left. The resulting cross sum is divided by 10. The remaining integer value is subtracted from the modul (10). The result is transmitted as the check number (c).
Add-On 2 3 numbers are transmitted: check number (c) and 2 informations (n). The check number results from the remaining integer value of modul (4). Example 1 Information 0 Remainder (0) 0 4 0 Example 2 Information 2 Remainder (2) 0 6 2 Example 3 Information 3 Remainder (3) 9 9 3 Example 4 Information Remainder (1) 1 0 9 1 The check number always lies between "0" and "3"; it is not printed in the HRI line.
US Postnet Barcode US Postnet Barcode ESC "[" 1B 5B 27 91 ESC [ 1 SP p Data Structure ASCII hex. dec. "1" 31 49 SP 20 32 "p" 70 112 Description After receiving this sequence numeric characters from 0 (hex. 30) to 9 (hex. 39) are interpreted as barcode figures. Other Alpha characters are ignored. Control characters from hex.00 (dec.9) to hex.1F (dec.31) terminates this barcode mode. You may use this sequence in every emulation. The printer can print barcode in NLQ and LQ.
Large Character Printing (LCP) Before you can transfer the LCP data (Large Character Printing) data to the printer, the LCP header must be sent. The LCP header is made up of a series of max. 5 characters. In the header, the printing parameters and the LCP character size are defined. This header only needs to be transferred once, unless settings are to be changed or the printer has been turned off.
Refer to the section "Secured/Unsecured Mode" at the front of the Manual for detailed description of the secured/unsecured mode. Data Structure ASCII hex. dec. SI 0F 15 n ... n n ... n n ... n SI 0F 15 n = all printable characters (> hex.1F, dec.
LCP Character Set US-ASCII LCP Character Set German Data Structure ESC P L S 0 1 ESC \ ESC P L S 0 2 ESC \ ASCII hex. dec. ESC "P" 1B 50 27 80 "L" 4C 76 "S" 53 83 "0" 30 48 "1" 31 49 ESC "\" 1B 5C 27 92 character set US-ASCII ASCII hex. dec.
Various Examples Example 1 10 20 30 40 50 60 70 80 90 100 110 120 130 140 150 160 170 46 Various Examples LPRINT "Example for different LCP character sizes" LPRINT CHR$(27); "[?11~"; LPRINT CHR$(27); "PSC0"; CHR$(27); "\"; REM set character size to 3 LPRINT CHR$(16); "3"; CHR$(25); LPRINT CHR$(15); "3"; CHR$(15); REM set character size to 4 LPRINT CHR$(16); "4"; CHR$(25); LPRINT CHR$(15); "4"; CHR$(15); REM set character size to 5 LPRINT CHR$(16); "5"; CHR$(25); LPRINT CHR$(15); "5"; CHR$(15); REM set ch
Example 2 REM Example 2 for unsecured printing OPEN "lpt1:" FOR RANDOM AS #1 WIDTH #1, 255 PRINT #1, CHR$(27); "[?11~"; PRINT #1, CHR$(27); "PSCO"; CHR$(27); "\"; PRINT #1, CHR$(16); "5"; CHR$(25); PRINT #1, "Example for "; PRINT #1, CHR$(15); "LCP"; CHR$(15);" unsecured mode"; PRINT #1, CHR$(10); CHR$(13); END Example 3 REM Example 3 for secured printing OPEN "lpt1:" FOR RANDOM AS #1 WIDTH #1, 255 PRINT #1, CHR$(27); "[?11~"; PRINT #1, CHR$(27); "PSC1"; CHR$(27); "\"; PRINT #1, CHR$(16); "5"; CHR$(25);
Example 4 Unsecured Mode, vertical spacing with various enlargement factors D B A Legend A – a single line Feed (1/6") 1 B – Factor 6 character; heigth 6 × 12 ü 3 × 61 LF 1 C – Factor 7 character; height 7 × 12 additional space is added to gain a full Line Feed 1 D – Factor 4 character; height 4 × 12 ü 2 × 61 LF 1 E – Factor 5 character; height 5 × 12 additional space is added to gain a full Line Feed ▲ – start, actual print (cursor)-position ● – end, actual print-position Description The room will b
Appendix Character Sets
The following symbol sets are available in the barcode mode. The LCP symbol sets can only be selected via Escape sequences. The OCR-A and OCR-B fonts can be selected via control panel or by Escape sequences, which correspond to the selected emulation mode. The codes hex.A0 up to hex.FE correspond to the selected character set. The following example shows you how to find the hexadecimal value for a character from the character set table.
LCP Character Set, german hex dec 0 0 1 2 3 4 5 6 7 NUL 0 16 32 48 64 80 96 112 1 1 17 33 49 65 81 97 113 2 2 18 34 50 66 82 98 114 3 3 19 35 51 67 83 99 115 4 4 20 36 52 68 84 100 116 5 5 21 37 53 69 85 101 117 6 6 22 38 54 70 86 102 118 7 7 23 39 55 71 87 103 119 8 8 24 40 56 72 88 104 120 9 9 25 41 57 73 89 105 121 A 10 26 42 58 74 90 106 122 B 11 27 43 59 75 91 107 123 C 12 28 44 60
LCP Character Set, US-ASCII hex dec 0 0 1 2 3 4 5 6 7 NUL 0 16 32 48 64 80 96 112 1 1 17 33 49 65 81 97 113 2 2 18 34 50 66 82 98 114 3 3 19 35 51 67 83 99 115 4 4 20 36 52 68 84 100 116 5 5 21 37 53 69 85 101 117 6 6 22 38 54 70 86 102 118 7 7 23 39 55 71 87 103 119 8 8 24 40 56 72 88 104 120 9 9 25 41 57 73 89 105 121 A 10 26 42 58 74 90 106 122 B 11 27 43 59 75 91 107 123 C 12 28 44 6
OCR-A Character Set (Code Page 437) hex dec 0 0 1 2 3 4 5 6 7 NUL 0 16 32 48 64 80 96 112 1 1 17 33 49 65 81 97 113 2 2 18 34 50 66 82 98 114 3 3 19 35 51 67 83 99 115 4 4 20 36 52 68 84 100 116 5 5 21 37 53 69 85 101 117 6 6 22 38 54 70 86 102 118 7 7 23 39 55 71 87 103 119 8 8 24 40 56 72 88 104 120 9 9 25 41 57 73 89 105 121 A 10 26 42 58 74 90 106 122 B 11 27 43 59 75 91 107 123 C 12 2
OCR-B Character Set (Code Page 437) hex dec 0 0 1 2 3 4 5 6 7 NUL 0 16 32 48 64 80 96 112 1 1 17 33 49 65 81 97 113 2 2 18 34 50 66 82 98 114 3 3 19 35 51 67 83 99 115 4 4 20 36 52 68 84 100 116 5 5 21 37 53 69 85 101 117 6 6 22 38 54 70 86 102 118 7 7 23 39 55 71 87 103 119 8 8 24 40 56 72 88 104 120 9 9 25 41 57 73 89 105 121 A 10 26 42 58 74 90 106 122 B 11 27 43 59 75 91 107 123 C 12 2