TallyGenicom Intelliprint 8026DN Color Laser Printer User Guide Jun 06
ii TallyGenicom Intelliprint 8026DN Color Laser Printer User Guide Trademarks Trademarks The following are trademarks or registered trademarks of their respective owners. Other product names mentioned in this manual may also be trademarks or registered trademarks of their respective owners. Registered trademarks are registered in the United States Patent and Trademark Office; some trademarks may also be registered in other countries. TallyGenicom, is registered trademarks of TallyGenicom.
TallyGenicom Intelliprint 8026DN Color Laser Printer User Guide iii Copyright Notice Copyright Notice This manual is Copyrighted © 2006 by TallyGenicom. All Rights Reserved. This manual may not be copied in whole or in part, nor transferred to any other media or language, without the express written permission of TallyGenicom. The specifications of your printer and the content of this publication are subject to change without prior notice.
iv TallyGenicom Intelliprint 8026DN Color Laser Printer User Guide Important Important c This manual is copyrighted with all rights reserved. Under the copyright laws, this manual may not be copied or modified in whole or part, without the written consent of the publisher. d Parts of this manual are subject to change without prior notice. e We welcome any comments on ambiguities, errors, omissions, or missing pages.
TallyGenicom Intelliprint 8026DN Color Laser Printer User Guide v Preface Preface Thank you for choosing the 8026DN. This is a guide on operating the 8026DN and the important points to note. To understand the features fully and to use the machine correctly and effectively, please read this guide before using it. Keep this guide handy for use as a quick reference on using the machine.
vi TallyGenicom Intelliprint 8026DN Color Laser Printer User Guide About this Manual About this Manual Scope This User Guide contains all of the information necessary to operate and care for your printer and accessories. It is intended to be used with the pictorial unpacking instructions and the Installation Guide, both included in the printer packaging. If you have not already unpacked and installed the printer, please refer to these documents.
TallyGenicom Intelliprint 8026DN Color Laser Printer User Guide vii Organization Organization The following is a summary of each chapter: Safety Notes This section explains the items of which to take note to ensure that you use this printer safely and correctly. Be sure to read this section to prevent serious injuries and accidents.
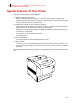
viii TallyGenicom Intelliprint 8026DN Color Laser Printer User Guide Special Features of This Printer Special Features of This Printer This printer has the following special features: ■ Quality printing at a high speed With its 1,200 dpi laser-style resolution, it can print in high definition and high quality (optional feature). Attains high-speed printing of 35/25 sheets per minute when printing the same A4-sized document by long edge feed.
Table of Contents Safety Notes i-1 This Chapter contains the Safety Notes i-1 Safety Notes i-2 For Installation & Relocation i-3 For Power & Earth Connection i-6 For Machine Operation i-9 Illegal Copies and Printouts i-12 Chapter 1 Installing the Printer 1-1 About this Chapter 1-2 Installation Location 1-2 Connect the Printer to Its Own AC Outlet 1-2 Unsuitable locations 1-3 When Using an Ultrasonic Water Vaporizer 1-3 Safety Precautions 1-3 Handling the Printer 1-3 Printer Location Requirements 1-4
2 TallyGenicom Intelliprint 8026DN Color Laser Printer User Guide Table of Contents Carrying the Printer 1-6 Front Side of the Printer is Heavier Than the Rear 1-6 Installation Procedure 1-7 Removing the Tape 1-7 Installing the Optional Accessories 1-7 550 Sheet Tray Module / 1100 Sheet Tray Module 1-7 Installing the Drum Cartridge 1-7 Preparing the Toner Cartridges 1-10 Loading Paper 1-12 Loading Paper in the Multipurpose Feeder 1-12 Loading Envelopes in the Multipurpose Feeder 1-15 Loading Paper in th
TallyGenicom Intelliprint 8026DN Color Laser Printer User Guide Table of Contents Storing Paper 2-11 Loading Paper 2-11 Loading Paper in the Multipurpose Feeder 2-11 Loading Envelopes in the Multipurpose Feeder 2-13 Loading Paper in Paper Tray 2-14 Cleaning the Printer 2-17 Cleaning the exterior 2-17 Cleaning the interior 2-17 Cleaning the Density Sensor 2-18 Cleaning the Drum Cartridge 2-21 Moving the Printer 2-25 Chapter 3 Troubleshooting 3-1 Dealing With Problems 3-2 Power Problems 3-2 Cannot Print
4 TallyGenicom Intelliprint 8026DN Color Laser Printer User Guide Table of Contents Chapter 5 About Consumables 5-1 Consumables Overview 5-2 Toner Cartridges 5-2 Drum Cartridge 5-3 Fuser Unit 5-3 Transfer Roll Cartridge 5-4 Retard Roll 5-4 Replacing the Toner Cartridges 5-5 Toner Cartridge Handling Precautions 5-5 Handling Precautions 5-5 Storage Precautions 5-5 Replacing Toner Cartridges 5-6 Drum Cartridge 5-9 Handling Precautions 5-9 Replacing the Drum Cartridge 5-9 Storage Precautions 5-12 Transfer
TallyGenicom Intelliprint 8026DN Color Laser Printer User Guide Table of Contents Chapter 7 Understanding and Navigating the Control Panel Menus 7-1 About this Chapter 7-2 Control Panel Features 7-2 LCD Display 7-2 LED Indicators 7-3 Pushbuttons 7-3 Navigating the Control Panel Menus 7-5 Menu Structure 7-7 Status Menu 7-8 Job Library 7-9 At the Computer 7-9 Procedure – PCL 7-9 Procedure – TallyGenicom PS 7-11 Operation on the control panel – for both PCL and PS 7-13 Output print data stored – for both P
6 TallyGenicom Intelliprint 8026DN Color Laser Printer User Guide Table of Contents Chapter 8 Optional Extended Features 8-1 About this Chapter 8-2 Installing DRAM Memory DIMMS 8-2 Installing the Hard Disk/Compact Flash Option 8-4 Installing the Flash Option in the Printer 8-6 Using the Hard Disk/Compact Disk Option and User Flash DIMM Module 8-9 Operator Panel MENU Structure 8-9 Using the Disk Menu 8-10 Using the Flash Menu 8-10 Using the FLASH SIMM or Hard Disk/Compact Flash Option as a PostScript Dev
Safety Notes This Chapter contains the Safety Notes Jun 06
2 TallyGenicom Intelliprint 8026DN Color Laser Printer User Guide Safety Notes Safety Notes For your own safety, please read this page carefully before using the machine. Do not place the machine in a hot, humid, dusty, or poorly ventilated environment. Prolonged exposure to these adverse conditions can cause fire or electric shock. Do not place the machine near heaters or volatile, flammable, or combustible materials such as curtains that may catch fire.
TallyGenicom Intelliprint 8026DN Color Laser Printer User Guide 3 Safety Notes For Installation & Relocation CAUTION Do not place the machine in a hot, humid, dusty, or poorly ventilated environment. Prolonged exposure to these adverse conditions can cause fire or electric shock. Do not place the machine near heaters, combustible spray, flammable thinner or materials such as curtains that may catch fire easily. Place the machine on a level and sturdy surface that can withstand the machine weight.
4 TallyGenicom Intelliprint 8026DN Color Laser Printer User Guide Safety Notes 600 mm/1'11.6" 100 mm 3.9" 100 mm 3.9" 100 mm/3.9" 100 mm/3.9" 100 mm 3.9" 600 mm/1'11.6" 350 mm 1'1.8" 100 mm 3.9" When moving the machine, be sure to unplug the power cord from the outlet. If the machine is moved with the power cord connected, it can cause damage to the cord which could result in fire or electric shock.
TallyGenicom Intelliprint 8026DN Color Laser Printer User Guide 5 Safety Notes • The machine is capable of operating normally within the following recommended environmental limits. Temperature range: 15 – 28 °C (59 – 82°F) Humidity range: 20 – 70% (no condensation) • Sudden temperature fluctuations can affect copy quality. Rapid heating of a cold room can cause condensation inside the machine, directly interfering with image transfer. • Do not expose the machine to direct sunlight.
6 TallyGenicom Intelliprint 8026DN Color Laser Printer User Guide Safety Notes For Power & Earth Connection WARNING Use only the power cord specified for this printer. Using a different cord may cause fire or electric shock. Also, do not use the machine’s power cord with other equipment. The power specifications are listed below. The specifications that apply to your machine depend on your machine configuration. Connect the power plug only to a properly rated power outlet.
TallyGenicom Intelliprint 8026DN Color Laser Printer User Guide 7 Safety Notes Stop operation immediately if your machine produces smoke, excessive heat, unusual noise, or smell, or if water or foreign object (e.g. metal strip, liquid) enters the machine. These conditions can cause fire. Immediately switch off and unplug the machine, and contact our Customer Support Center or your dealers. To prevent fire or electric shock, follow the instruction below based on your machine configuration.
8 TallyGenicom Intelliprint 8026DN Color Laser Printer User Guide Safety Notes Once a month, unplug the machine and check the power cord for the following: • The power cord is plugged firmly into a receptacle. • The plug is not excessively heated, rusted, or bent. • The plug and receptacle are free of dust. • The cord is not cracked or frayed. If you notice any unusual conditions, contact our Customer Support Center or your dealers.
TallyGenicom Intelliprint 8026DN Color Laser Printer User Guide 9 Safety Notes For Machine Operation WARNING Do not place any liquid container such as a vase or coffee cup on the machine. Split water can cause fire or electric shock. Do not place any metal parts such as staples or clips on the machine. If metal and flammable parts get into the machine, they can short-circuit internal components, and cause fire or electric shock.
10 TallyGenicom Intelliprint 8026DN Color Laser Printer User Guide Safety Notes When removing jammed paper, make sure that no pieces of torn paper are left in the machine. A piece of paper remaining in the machine can cause fire. If a sheet of paper is wrapped around the heat roller, or when clearing a jammed paper that is difficult or impossible to see, do not try to remove it by yourself. Doing so can cause injuries or burns.
TallyGenicom Intelliprint 8026DN Color Laser Printer User Guide 11 Safety Notes Never throw toner or a toner container into an open flame. It can cause an explosion and you can get burnt. Do not use a vacuum cleaner for cleaning a toner spilled on the floor. Use a broom to sweep it out, or a cloth soaked with soap water to wipe it out. The vacuumed toner may cause a fire in the cleaner due to its electrical sparks.
12 TallyGenicom Intelliprint 8026DN Color Laser Printer User Guide Illegal Copies and Printouts Illegal Copies and Printouts Copying or printing certain documents may be illegal in your country. Penalties of fines or imprisonment may be imposed on those found guilty. The following are examples of items that may be illegal to copy or print in your country.
Chapter 1 Installing the Printer In this Chapter . . .
1-2 TallyGenicom Intelliprint 8026DN Color Laser Printer User Guide Installation Location About this Chapter This chapter reviews the contents of the printer packaging, explains the parts of the printer, and describes the space and environment requirements of the printer. For safe and convenient printer operation, take time to read the information in this section when deciding where to place your printer.
TallyGenicom Intelliprint 8026DN Color Laser Printer User Guide 1-3 Safety Precautions Unsuitable locations ■ Locations with direct exposure to sunlight ■ Locations close to cooling/heating appliances ■ Locations with direct exposure to drafts ■ Locations susceptible to vibrations ■ Dusty and dirty locations ■ Locations close to open flame ■ Damp locations ■ Locations exposed to magnetic forces ■ Locations susceptible to sudden changes in temperature or humidity When Using an Ultrasonic
1-4 TallyGenicom Intelliprint 8026DN Color Laser Printer User Guide Printer Location Requirements Printer Location Requirements Printer Weight and Dimensions This printer weighs approximately 70 lbs (31,5 kg) and should always be lifted by two people. The dimensions of the printer are listed below. ■ Printer Height: 16.3 in (413 mm) ■ Printer Width (left to right): 16.6 in (422 mm) ■ Printer Depth (front to back): 17.
TallyGenicom Intelliprint 8026DN Color Laser Printer User Guide 1-5 Accessories Accessories The standard configuration of the printer is as follows. Ensure that all the parts are available before installation. NOTE: Retain the packaging material and box for future use if there is a possibility that the printer will be moved over long distances. See “Options” (P. 6-2) for details on the optional accessories. The standard printer package consists of the following items.
1-6 TallyGenicom Intelliprint 8026DN Color Laser Printer User Guide Carrying the Printer Carrying the Printer When moving the printer to a place for installation, take note of the following points. Hold the recessed areas on the left and right sides of the printer. CAUTION • Bend your knees when lifting the printer to avoid back injury. • To move the printer safety, remove the optional 550 sheet tray module and 1100 sheet tray module before moving the printer.
TallyGenicom Intelliprint 8026DN Color Laser Printer User Guide 1-7 Installation Procedure Installation Procedure This section describes how to install the printer. Removing the Tape When the printer is first taken out of the packaging box, the covers of the printer are taped. Remove the tapes. Installing the Optional Accessories If you have purchased any optional accessories, install them before the drum cartridge, and before loading paper.
1-8 TallyGenicom Intelliprint 8026DN Color Laser Printer User Guide Installation Procedure 2. Press the button as shown in the diagram and open the output tray cover. 3. Hold the protective cover by the handle and pull it upward out of the printer. 4. Take the new drum cartridge out of the packaging box by holding its handle and remove the protective cover from the drum cartridge.
TallyGenicom Intelliprint 8026DN Color Laser Printer User Guide 1-9 Installation Procedure 5. Holding the drum cartridge by the handle and the flat part facing the back of the printer, align the bosses, indicated by the arrows, on both sides of the drum cartridge with the slots that are indicated by the arrows on the printer. Gently lower the drum cartridge into the printer.
1-10 TallyGenicom Intelliprint 8026DN Color Laser Printer User Guide Installation Procedure 8. Close the front cover. Preparing the Toner Cartridges Refer to • Replacing the toner cartridges: “Replacing Toner Cartridges” on page 5-6 1. To prepare the toner cartridge, remove the top cover. 2. Pull the toner seal for each toner cartridge straight up to remove it.
TallyGenicom Intelliprint 8026DN Color Laser Printer User Guide 1-11 Installation Procedure 3. Replace the top cover by inserting its front side into the printer first.
1-12 TallyGenicom Intelliprint 8026DN Color Laser Printer User Guide Loading Paper Loading Paper This section describes how to load paper. Load paper correctly to reduce troubles such as paper jams. Important • See the package of paper to determine the front and back sides of the paper when loading it. Refer to • Types of paper suitable for printing: “Loading Paper” (P. 2-11) • Loading paper in the multipurpose feeder: “Loading Envelopes in the Multipurpose Feeder” (P.
TallyGenicom Intelliprint 8026DN Color Laser Printer User Guide 1-13 Loading Paper 1. Gently pull open the multipurpose feeder cover, and pull out the extension tray. 2. Slide the width guides to the edge of the tray. The width guides should be fully extended. 3. Insert all media face down and top edge first into the multipurpose feeder. Important • Do not force the print media.
1-14 TallyGenicom Intelliprint 8026DN Color Laser Printer User Guide Loading Paper 4. Slide the width guides until they rest lightly against the edge of the print media stack. Important • Be careful not to bend the print media.
TallyGenicom Intelliprint 8026DN Color Laser Printer User Guide 1-15 Loading Paper Loading Envelopes in the Multipurpose Feeder To load envelopes that are under 220 mm (8.66 inches) in width in the multipurpose feeder, insert the envelopes with the flaps open and at the rear. To load envelopes that are over 220 mm (8.66 inches) in width in the multipurpose feeder, insert the envelopes with the flaps closed and at the right side. The print side must be facing down.
1-16 TallyGenicom Intelliprint 8026DN Color Laser Printer User Guide Loading Paper Loading Paper in the Paper Tray This section describes how to load paper in the standard and optional paper trays. All trays are loaded the same way. Important • Do not remove the tray during printing. It may cause a paper jam. 1. Pull the tray out of the printer until it stops. Hold the tray with both hands, lift the front slightly, and remove it from the printer. 2. Slide the width guides to the edge of the tray.
TallyGenicom Intelliprint 8026DN Color Laser Printer User Guide 1-17 Loading Paper 3. Squeeze the length guide and slide it to the edge of the tray. 4. Before loading the print media, flex the sheets back and forth, and then fan them. Straighten the edges of the stack on a level surface. 5. Place the print media into the tray with the recommended print side face up. Important • Do not exceed the maximum fill line in the tray. Overfilling the tray may cause paper jams. 6.
1-18 TallyGenicom Intelliprint 8026DN Color Laser Printer User Guide Loading Paper 7. Insert the tray into the printer, and push until it stops. Important • Do not use excessive force on the tray. Doing so could damage the tray or the inside the printer.
TallyGenicom Intelliprint 8026DN Color Laser Printer User Guide 1-19 Loading Paper Connecting the Power Cord WARNING • The Power specifications are listed below. The specifications that apply to your machine depend on your machine configuration. Connect the power plug only to a properly rated power outlet. Otherwise, it can cause fire or electric shocks.
1-20 TallyGenicom Intelliprint 8026DN Color Laser Printer User Guide Loading Paper Turning the Printer On Switch on the power before operating the printer. When you have finished using the printer for the day or you do not intend to use it for a long period of time, switch off the power. 1. On the printer’s right side, press the side of the power switch marked [I] to turn the printer on. Switching Off the Power 1. Make sure that the printer is not in processing. 2.
TallyGenicom Intelliprint 8026DN Color Laser Printer User Guide 1-21 Adjusting Colour Alignment Adjusting Colour Alignment This allows adjustment of the horizontal (K-H) and vertical (K-V) images on an A4 or Letter based page. The adjustment allows the printed images to be centered on the pages and applies the adjustment to all paper sources.
1-22 TallyGenicom Intelliprint 8026DN Color Laser Printer User Guide Adjusting Colour Alignment Adjustments Select the paper tray to be used for the test. 1. From the Ready status, press MENU, the control panel display will read: Menu Job Library 2. Press PREVIOUS or NEXT until the display reads: Menu Paper Menu 3. Press SELECT, the display will read: Paper Menu Copies 4. Press PREVIOUS or NEXT until the display reads: Paper Default Source 5. Press SELECT, the display will read: Default Source Tray 2 6.
TallyGenicom Intelliprint 8026DN Color Laser Printer User Guide 1-23 Adjusting Colour Alignment 5. Press SELECT, the display will read: Alignment Alignment Page 6. Press SELECT to print out an Alignment page. Use the outermost border to determine whether or not the image is centered on the page. Use the adjustments below (K-V) and (K-H) to centralize the image. Set the K-V Adjustment Adjust the vertical position of the image. 1.
1-24 TallyGenicom Intelliprint 8026DN Color Laser Printer User Guide Adjusting Colour Alignment 1. From the Ready status, press MENU, the control panel display will read: Menu Job Library 2. Press PREVIOUS or NEXT until the display reads: Menu Colour Menu 3. Press SELECT, the display will read: Colour Menu Rendering Intent 4. Press PREVIOUS or NEXT until the display reads: Colour Menu Alignment 5. Press SELECT, the display will read: Alignment Alignment Page 6.
TallyGenicom Intelliprint 8026DN Color Laser Printer User Guide 1-25 Adjusting Colour Registration Adjusting Colour Registration After printing out the alignment page, determine the correct values for colour alignment. Determining Values There are two sets of colour registration bars, one vertical set and one horizontal set. Under the horizontal bars are a number of vertical lines, Yellow, Magenta and Cyan. Find the values of the straightest lines. These are the vertical registration values.
1-26 TallyGenicom Intelliprint 8026DN Color Laser Printer User Guide Adjusting Colour Registration NOTE: When “0” is the value nearest the straight line, you do not need to adjust the colour registration. If “0” is not next to the straightest lines, determine the values and adjust again. Important • After printing the Colour Registration Adjustment Chart, do not turn off the printer until the motor has stopped running.
TallyGenicom Intelliprint 8026DN Color Laser Printer User Guide 1-27 Selecting a Display Language Selecting a Display Language The default language for all LCD display messages and the Configuration Summary and Test Page is English. You can change the language to German, French, Italian, Spanish, Portuguese, Dutch, Danish, Norwegian, Swedish, Greek, Polish, Russian, Turkish or Brazil.
1-28 TallyGenicom Intelliprint 8026DN Color Laser Printer User Guide Printing PCL and PostScript Font Lists Printing PCL and PostScript Font Lists Your printer has the capability of printing lists of all installed PCL or PostScript fonts. To print a Font List, follow these steps: 1. From the Ready status, press MENU, the control panel display will read: Menu Job Library 2. Press PREVIOUS or NEXT until the display reads: Menu Functions 3. Press SELECT, the display will read: Functions Reset Printer 4.
Chapter 2 Daily Care In this Chapter . . .
2-2 TallyGenicom Intelliprint 8026DN Color Laser Printer User Guide Main Components and Their Function Main Components and Their Function Front view 1 2 9 3 4 5 7 8 6 9 10 11 12 13 No. Name Description 1 Center output tray Print jobs are output with the printed side facing down. 2 Control panel Consists of operation buttons, indicators, and the display. 3 Button A Push up this button when opening the front cover. 4 Multipurpose feeder Load paper here.
TallyGenicom Intelliprint 8026DN Color Laser Printer User Guide 2-3 Main Components and Their Function No. Name Description 6 Front cover Open this when replacing the drum cartridge and removing jammed paper. 7 Paper stopper Raise this when printing on paper larger than Letter size. 8 Top cover Open this when replacing the toner cartridges. 9 Ventilation hole Releases heat to prevent the interior of the printer from heating up.
2-4 TallyGenicom Intelliprint 8026DN Color Laser Printer User Guide Main Components and Their Function Rear view 6 1 3 2 4 5 No. Name Description 1 Ventilation hole Releases heat to prevent the interior of the printer from heating up. 2 Power cord connector Connect the power cord here. 3 USB port Connect the USB cable here. 4 Parallel port Connect the parallel cable here. 5 Ethernet port Connect the Ethernet cable here.
TallyGenicom Intelliprint 8026DN Color Laser Printer User Guide 2-5 Main Components and Their Function Internal view 3 1 4 2 5 Jun 06 No. Name Description 1 Output tray cover Open this when replacing the drum cartridge and removing jammed paper. 2 Drum cartridge Consists of the light-sensitive drum and the intermediate transfer roller. Images are initially created as an electrical charge on the surface of this drum.
2-6 TallyGenicom Intelliprint 8026DN Color Laser Printer User Guide Paper Handling Paper Handling Using paper that is unsuitable for printing can cause paper jams and deteriorate print quality. We recommend using the types of paper listed below to obtain the best results from your printer. Suitable Paper Types Plain Paper This printer can print on paper that is commonly sold. Select paper suitable for use by referring to the table below.
TallyGenicom Intelliprint 8026DN Color Laser Printer User Guide 2-7 Paper Handling Special Media In addition to plain paper, you can use the following types of special paper. Paper size Paper type Letter (215.9 × 279.4 mm/8.5" × 11") / A4 (210 × 297 mm/8.3" × 11.7") 3M PP-2500 A4 (210 × 297 mm/8.3" × 11.7") V516 Letter (215.9 × 279.4 mm/8.5" × 11") XEROX 3R12520 A4 (210 × 297 mm/8.3" × 11.7") XEROX V862 XEROX 3R97408 Com#10 (104.8 × 241.3 mm/4.1" × 9.5") Columbia 3B1183 C5 (162 × 229 mm/6.
2-8 TallyGenicom Intelliprint 8026DN Color Laser Printer User Guide Paper Trays and Types Paper Trays and Types You can load the following types of paper into the paper tray or multipurpose feeder. Multipurpose Feeder Paper that can be loaded in the multipurpose feeder is as follows: Paper type Maximum capacity Standard paper 150 sheets Other paper Up to a height of 15 mm/0.
TallyGenicom Intelliprint 8026DN Color Laser Printer User Guide 2-9 Paper Trays and Types Available Paper Sizes The following paper sizes can be loaded in the paper tray and multipurpose feeder: Loadable: {Not loadable: × Multipurpose feeder Paper tray (550 sheets) Paper tray (1100 sheets) A4 { { B5 { { A5 { { Letter { { Legal (8.5 × 13 in.) { { Legal (8.5 × 14 in.) { { Executive { { Width: 90 to 215.9 mm/3.5" to 8.5" Length: 148 to 355.6 mm/5.
2-10 TallyGenicom Intelliprint 8026DN Color Laser Printer User Guide Paper Trays and Types Unsuitable Paper types Avoid using the following paper types as they can cause paper jams or damage to the printer.
TallyGenicom Intelliprint 8026DN Color Laser Printer User Guide 2-11 Storing Paper Storing Paper Failure to properly store paper can result in paper jams, impaired print quality, or damage to the printer. Store paper under the following conditions: • Temperature 10o to 30oC (50o to 86oF) • In a dry place • After opening the package, wrap unused sheets in their original package and store in a cabinet or other dry place. • Store paper on a flat surface.
2-12 TallyGenicom Intelliprint 8026DN Color Laser Printer User Guide Loading Paper 1. Gently pull open the multipurpose feeder cover, and pull out the extension tray. 2. Slide the width guides to the edge of the tray. The width guides should be fully extended. 3. Insert all media face down and top edge first into the multipurpose feeder. Important • Do not force the print media.
TallyGenicom Intelliprint 8026DN Color Laser Printer User Guide 2-13 Loading Paper 4. Slide the width guides until they rest lightly against the edge of the print media stack. Important • Be careful not to bend the print media. Loading Envelopes in the Multipurpose Feeder To load envelopes that are under 220 mm (8.66 inches) in width in the multipurpose feeder, insert the envelopes with the flaps open and at the rear. To load envelopes that are over 220 mm (8.
2-14 TallyGenicom Intelliprint 8026DN Color Laser Printer User Guide Loading Paper NOTE: Make sure set the envelope flaps are completely unfolded when loading envelopes that are under 220 mm in width. Loading Paper in Paper Tray This section describes how to load paper in the standard and optional paper trays. All trays are loaded the same way. NOTE: Do not remove the tray during printing. It may cause a paper jam. 1. Pull the tray out of the printer until it stops.
TallyGenicom Intelliprint 8026DN Color Laser Printer User Guide 2-15 Loading Paper 3. Squeeze the length guide and slide it to the edge of the tray. 4. Before loading the print media, flex the sheets back and forth, and then fan them. Straighten the edges of the stack on a level surface. 5. Place the print media into the tray with the recommended print side face up. NOTE: Do not exceed the maximum fill line in the tray. Overfilling the tray may cause paper jams. 6.
2-16 TallyGenicom Intelliprint 8026DN Color Laser Printer User Guide Loading Paper 7. Insert the tray into the printer, and push until it stops. NOTE: Do not use excessive force on the tray. Doing so could damage the tray or the inside the printer.
TallyGenicom Intelliprint 8026DN Color Laser Printer User Guide 2-17 Cleaning the Printer Cleaning the Printer This section describes how to clean the printer in order to maintain the printer in good condition and print clean printouts all the time. CAUTION • Be sure to switch off and unplug the machine before accessing the interior of the machine for cleaning, maintenance, or fault clearance. Access to a live machine’s interior can cause electric shock.
2-18 TallyGenicom Intelliprint 8026DN Color Laser Printer User Guide Cleaning the Printer Cleaning the Density Sensor When the printers density sensor is dirty, follow the procedure below to clean it. CAUTION • Do not touch the edge of the plate at the upper side of the transfer roll cartridge because it is sharp. 1. Turn off the printer. 2. Push up the button 1 and fully open the front cover 2. 3. Grip the tabs at both ends of the transfer roll cartridge and gently lift it out of the printer.
TallyGenicom Intelliprint 8026DN Color Laser Printer User Guide 2-19 Cleaning the Printer 4. Gently wipe the density sensor window with a clean dry cloth or cotton swab. NOTE: Do not allow anything hard to come in contact with the density sensor window. Do not use excessive force to clean the window. 5. Replace the transfer roll cartridge. Grip the tabs as shown in the diagram. 6.
2-20 TallyGenicom Intelliprint 8026DN Color Laser Printer User Guide Cleaning the Printer 7. To lock the transfer roll cartridge into the printer push down the tabs until you hear a click. 8. Close the front cover. 9. Turn on the printer.
TallyGenicom Intelliprint 8026DN Color Laser Printer User Guide 2-21 Cleaning the Printer Cleaning the Drum Cartridge When the colored dots appears on the printed paper at regular intervals (about 30 mm), clean the drum cartridge as following procedure. NOTE: Remove any print jobs from the center output tray, close the multipurpose feeder cover before opening the front cover. 1. Push up the button 1 and fully open the front cover 2. 2.
2-22 TallyGenicom Intelliprint 8026DN Color Laser Printer User Guide Cleaning the Printer CAUTION • Do not touch inside the printer with your hands. Some parts may be hot. Allow time for the printer to cool before attempting to remove parts in this area. 4. Place the drum cartridge next to the print sample on which the colored dots appear to find the part that needs to be cleaned. 1 2 3 4 NOTE: -You must find the part to be cleaned yourself.
TallyGenicom Intelliprint 8026DN Color Laser Printer User Guide 2-23 Cleaning the Printer 6. Determine the position where colored dots were printed. Then turn the gray-colored part on the charge roll (black-colored roller) by rolling it with your finger on its left side to find the dirt. 7. Clean any dirt from the roller. NOTE: Use a soft cloth, such as cotton for cleaning.
2-24 TallyGenicom Intelliprint 8026DN Color Laser Printer User Guide Cleaning the Printer 9. Close the output tray cover. 10. Close the front cover.
TallyGenicom Intelliprint 8026DN Color Laser Printer User Guide 2-25 Moving the Printer Moving the Printer Before transporting the printer by car or truck over long distances, follow the procedure below to prevent strong vibrations from damaging the printer. Carry out the following procedure when moving the printer. CAUTION • Bend your knees when lifting the printer to avoid back injuries.
2-26 TallyGenicom Intelliprint 8026DN Color Laser Printer User Guide Moving the Printer WARNING • To prevent electric shock, never touch the power plug with wet hands. CAUTION • When removing the power cord, make sure that you pull the plug and not the cord. Pulling the cord can damage it, which can lead to fire or electrical shock. 3. Remove any paper in the center output tray and return the paper stopper to its original position, if it is extended. 4. Remove any paper in the multipurpose feeder.
TallyGenicom Intelliprint 8026DN Color Laser Printer User Guide 2-27 Moving the Printer 6. Push up the button and fully open the front cover 1, then press the button as shown in the diagram and open the output tray cover 2. 7. Grab the drum cartridge by the handle, and pull it up and out. Important • Do not touch inside the printer with your hands. Some parts may be hot. 8. Close the output tray cover and the front cover.
2-28 TallyGenicom Intelliprint 8026DN Color Laser Printer User Guide Moving the Printer 9. Lift the printer and move it gently. If the printer is to be moved over a long distance, pack it inside a box. 10. After transporting the printer, adjust the color registration before using it.
Chapter 3 Troubleshooting In this Chapter . . .
3-2 TallyGenicom Intelliprint 8026DN Color Laser Printer User Guide Power Problems Dealing With Problems When your printer suffers from a problem, refer to one of the four categories below to determine the cause of your problem, and the action needed to rectify it.
TallyGenicom Intelliprint 8026DN Color Laser Printer User Guide 3-3 Cannot Print Cannot Print Status Items to check Action Print instruction was sent but processing did not start. Is the error indicator lit? Is the error indicator blinking? Is the print-ready indicator off? Carry out the action according to the status of the indicator. Is there any message Check the message, then carry displayed on the control panel? out the action.
3-4 TallyGenicom Intelliprint 8026DN Color Laser Printer User Guide Print Quality Problems Print Quality Problems Description Cause Action Faded printouts The media is outside the recommended specification range. Replace the media with a recommend size and type, and confirm that your printer driver settings are correct. Refer to • “Paper Handling” on page 2-6 The paper is damp. Replace the paper.
TallyGenicom Intelliprint 8026DN Color Laser Printer User Guide 3-5 Print Quality Problems Description Cause Action Vertical black or color streaks The drum cartridge, transfer roll cartridge, or fuser unit is old or damaged. Check the condition of the drum cartridge, transfer roll cartridge and fuser unit, and replace as necessary. Refer to • “Drum Cartridge” on page 5-9 • “Transfer Roll Cartridge” on page 5-13 • “Fuser Unit” on page 5-16 Recurring smudges Dirt in the paper path.
3-6 TallyGenicom Intelliprint 8026DN Color Laser Printer User Guide Print Quality Problems Description Cause Action Blank pages Two or more sheets may be feeding at once. Remove the paper stack from the tray, fan it, and reinsert it. The drum cartridge or transfer roll cartridge is old or damaged. Replace the drum cartridge or transfer roll cartridge.
TallyGenicom Intelliprint 8026DN Color Laser Printer User Guide 3-7 Print Quality Problems Jun 06 Description Cause Action Color around the edge of printing is incorrect The color registration is incorrect. Adjust the color registration. Colored dots are printed at regular intervals (about 30 mm/1.2") The drum cartridge is dirty. Refer to • “Adjusting Colour Alignment” on page 1-21 Clean the drum cartridge.
3-8 TallyGenicom Intelliprint 8026DN Color Laser Printer User Guide Print Quality Problems Description Cause Action Partial blanks, creased paper or blotted printing The paper is damp. Replace the paper. Refer to • “Paper Handling” on page 2-6 The paper is outside the recommended specification range. Replace the paper with a recommend size and type. Refer to • “Paper Handling” on page 2-6 The transfer roll cartridge or fuser unit is not installed correctly.
TallyGenicom Intelliprint 8026DN Color Laser Printer User Guide 3-9 Print Quality Problems Jun 06 Description Cause Action Slanted printing The paper guides in the paper tray or multipurpose feeder are not set correctly. Reset the paper guides in the paper tray or multipurpose feeder.
3-10 TallyGenicom Intelliprint 8026DN Color Laser Printer User Guide Printing Is Not Clear Printing Is Not Clear Status Items to check Action Transparencies are not printed clearly. Are the correct type of transparencies used? Load the correct type of transparencies. Refer to • “Special Media” on page 2-7 Postcards are not printed clearly. Are the correct type of postcards used? Load the correct type of postcards. Refer to • “Special Media” on page 2-7 Envelopes are not printed clearly.
TallyGenicom Intelliprint 8026DN Color Laser Printer User Guide 3-11 Paper Transport Problems Paper Transport Problems Description Cause Action Paper does not feed Paper jams Several sheets feed at once Paper does not feed straight The paper is not loaded correctly. Reload the paper in the paper tray or multipurpose feeder. Refer to • “Loading Paper in Paper Tray” on page 2-14 The paper is outside the recommended specification range. Replace the paper with a recommend size and type.
3-12 TallyGenicom Intelliprint 8026DN Color Laser Printer User Guide Other Problems Other Problems WARNING • Do not try to alter the machine configuration, or modify any parts. An unauthorized modification can cause smoke or fire. CAUTION • Be sure to switch off and unplug the machine before accessing the interior of the machine for cleaning, maintenance, or fault clearance. Access to a live machine's interior can cause electric shocks.
TallyGenicom Intelliprint 8026DN Color Laser Printer User Guide 3-13 Warning Messages and Error Messages Warning Messages and Error Messages The control panel display shows a warning message or error message when there is a problem with the printer. Some messages indicate routine status conditions such as an empty paper tray, while others indicate that a sheet of paper has jammed in a specific area of the printer.
3-14 TallyGenicom Intelliprint 8026DN Color Laser Printer User Guide Warning Messages and Error Messages Error Messages The table below lists error messages, the possible causes of each error, and the actions required to recover from each error.
TallyGenicom Intelliprint 8026DN Color Laser Printer User Guide 3-15 Warning Messages and Error Messages Error Message Possible Cause Action PHD Type Err Install / Reset Wrong PHD (process) unit installed Re-install or replace the PHD unit Toner [x] Type Err Install / Reset Wrong Toner [x] cartridge installed Re-install or replace the toner cartridge CRUM ID: Fuser Replace Fuser Wrong Fuser unit installed Replace with correct fuser CRUM ID: PHD Replace PHD Wrong PHD installed Replace with th
3-16 TallyGenicom Intelliprint 8026DN Color Laser Printer User Guide Warning Messages and Error Messages Error Message Possible Cause Action Fuser Failure Call Service Fuser unit faulty Call for service MCU/NVRAM Error Call Service Problem with engine controller board Call for service CTD Sensor Error Call Service CTD sensor faulty MCU SW Error Call Service Problem with engine controller board Call for service Env Sensor Error Call Service Envelope sensor faulty Call for service Low Densit
Chapter 4 Clearing Paper Jams In this Chapter . . .
4-2 TallyGenicom Intelliprint 8026DN Color Laser Printer User Guide Clearing Paper Jams Clearing Paper Jams If a paper jam occurs, refer to the illustration below to select the appropriate corrective action and clear the paper the paper jam immediately. NOTE: The illustration below shows the printer with the optional 550 sheet and 1100 sheet tray modules are installed.
TallyGenicom Intelliprint 8026DN Color Laser Printer User Guide 4-3 Paper Jams in the Multipurpose Feeder Paper Jams in the Multipurpose Feeder Follow the procedure below to remove paper jammed in the multipurpose feeder. 1. Pull the jammed paper out of the multipurpose feeder, and remove any remaining paper from the multipurpose feeder. 2. Close the multipurpose feeder once. 3. Push up the button 1 and fully open the front cover 2. Confirm that there are no scraps of paper remaining inside the printer.
4-4 TallyGenicom Intelliprint 8026DN Color Laser Printer User Guide Paper Jams in the Standard Tray Paper Jams in the Standard Tray Follow the procedure below to remove paper jammed in the standard tray. 1. Slowly, completely remove the tray from the printer. 2. Remove all the jammed and/or creased paper from the tray. 3. If there is jammed paper remaining inside the printer, pull it out carefully to avoid tearing it.
TallyGenicom Intelliprint 8026DN Color Laser Printer User Guide 4-5 Paper Jams in the Standard Tray 4. If jammed paper cannot be found, pull down the green cover along the top of the hole where the tray cartridge was in the printer, and pull the jammed paper out carefully. 5. Push up the button 1 and fully open the front cover 2. Confirm that there are no scraps of paper remaining inside the printer. 6. Close the front cover. 7. Insert the tray into the printer, and push until it stops.
4-6 TallyGenicom Intelliprint 8026DN Color Laser Printer User Guide Paper Jams between Drum Cartridge and Fuser Unit Paper Jams between Drum Cartridge and Fuser Unit 1. Push up the button 1 and fully open the front cover 2. 2. Move the levers at both ends of the fuser to their open position and remove the jammed paper. If the paper is torn, remove any scraps of paper remaining inside the printer. Important • The fuser is hot. Do not touch, doing so may cause burns.
TallyGenicom Intelliprint 8026DN Color Laser Printer User Guide 4-7 Paper Jams at the Fuser Unit Paper Jams at the Fuser Unit 1. Press the button 1 and open the upper part of the front cover 2. 2. Lift the levers at both ends of the fuser unit, and remove the jammed paper. If the paper is torn, remove any scraps of paper remaining inside the printer. Important • The fuser is hot. Do not touch, doing so may cause burns.
4-8 TallyGenicom Intelliprint 8026DN Color Laser Printer User Guide Paper Jams at the Fuser Unit 4. Close the front cover. 5. Push up the button 1 and fully open the front cover 2. 6. Remove the jammed paper if you see it and proceed to the step 7. If you cannot see the jammed paper, close the front cover and skip the rest of the procedure.
TallyGenicom Intelliprint 8026DN Color Laser Printer User Guide 4-9 Paper Jams at the Fuser Unit 7. Close the front cover. NOTE: If a paper jam occurs in the fuser area, a sheet of paper may already have been fed from the tray. Make sure there is no paper remaining inside the printer, using step 8 through 14. 8. Slowly, completely remove the tray from the printer. If the printer is equipped with an optional tray module, remove the trays sequentially, starting with the bottom one.
4-10 TallyGenicom Intelliprint 8026DN Color Laser Printer User Guide Paper Jams at the Fuser Unit 10. If there is jammed paper remaining inside the printer, pull it out carefully to avoid tearing it. 11. If jammed paper cannot be found, pull down the green cover along the top of the hole where the tray cartridge was in the printer, and pull the jammed paper out carefully. 12. Push up the button 1 and fully open the front cover 2. Confirm that there are no scraps of paper remaining inside the printer.
TallyGenicom Intelliprint 8026DN Color Laser Printer User Guide 4-11 Paper Jams at the Fuser Unit 13. Close the front cover. 14. Insert the trays into the printer. Push the trays in until they stop. Important • Do not use excessive force on the tray. Doing so could damage the tray or the inside the printer. When Long Paper Jams When long paper (longer than 355.6 mm/14") jams inside the printer, cut the paper as needed, then remove it in the proper way depending on the place that the paper jam occurs.
4-12 TallyGenicom Intelliprint 8026DN Color Laser Printer User Guide Paper Jams at the Paper Inverter Paper Jams at the Paper Inverter 1. Press the button 1 and open the upper part of the front cover 2. 2. Remove the jammed paper. If the paper is torn, remove any scraps of paper remaining inside the printer. 3. Close the front cover.
TallyGenicom Intelliprint 8026DN Color Laser Printer User Guide 4-13 Paper Jams in the Optional Tray Module Paper Jams in the Optional Tray Module 1. Open the trays until you find the jammed paper. NOTE: Paper in the tray module feeds to the printer from the front of the trays, therefore paper jammed in the lower tray can block the upper tray of the module or the tray in the printer, preventing you from opening them. Look for the jammed paper sequentially, starting with the lowest tray. 2.
4-14 TallyGenicom Intelliprint 8026DN Color Laser Printer User Guide Paper Jams in the Optional Tray Module 4. Push up the button 1 and fully open the front cover 2. Confirm that there are no scraps of paper remaining inside the printer. 5. Close the front cover. 6. Insert the trays into the printer. Push the trays in until they stop. Important • Do not use excessive force on the tray. Doing so could damage the tray or the inside the printer.
Chapter 5 About Consumables In this Chapter . . .
5-2 TallyGenicom Intelliprint 8026DN Color Laser Printer User Guide Consumables Overview Consumables Overview The following consumables are provided with the printer. For replacements, contact your dealer. Toner Cartridges The printer uses four toner cartridges: black, yellow magenta, and cyan. When the toner supply in a cartridge begins to run out, an error message appears. At this stage, confirm that you have a replacement toner cartridge available.
TallyGenicom Intelliprint 8026DN Color Laser Printer User Guide 5-3 Consumables Overview Drum Cartridge The drum cartridge is composed of a light-sensitive drum and an intermediate transfer roller. Images are initially created as an electrical charge on the surface of this drum. When the drum cartridge reaches the end of its life span, print quality begins to deteriorate. Replace the drum cartridge at this stage. About 35,000 pages for a drum cartridge can be printed.
5-4 TallyGenicom Intelliprint 8026DN Color Laser Printer User Guide Consumables Overview Transfer Roll Cartridge About 35,000 pages for a transfer roll cartridge can be printed. When the transfer roll cartridge have reached this limit, replace it with new one. The number of pages that actually can be printed varies according to the conditions of use. Refer to • “Transfer Roll Cartridge” on page 5-13 Retard Roll About 100,000 pages for a retard roll can be printed.
TallyGenicom Intelliprint 8026DN Color Laser Printer User Guide 5-5 Replacing the Toner Cartridges Replacing the Toner Cartridges This section describes how to handle, store and replace toner cartridges. It is necessary to replace a Toner Cartridge only when the printer stops printing and has the error led lit together with a mesage requesting to change the toner. Toner Cartridge Handling Precautions The printer uses four toner cartridges: black, yellow, magenta, and cyan.
5-6 TallyGenicom Intelliprint 8026DN Color Laser Printer User Guide Replacing the Toner Cartridges Replacing Toner Cartridges 1. Remove any paper in the center output tray. 2. Remove the top cover. 3. Grip the levers at the ends of the toner cartridge that you want to replace and pull them up. 4. Pull out the toner cartridge.
TallyGenicom Intelliprint 8026DN Color Laser Printer User Guide 5-7 Replacing the Toner Cartridges 5. Select the new toner cartridge whose color matches the cartridge holder and remove it from its packaging. 6. Shake the toner cartridge several times as illustrated to distribute the toner evenly. 7. Align the toner cartridge with the corresponding insertion point in the printer and insert it.
5-8 TallyGenicom Intelliprint 8026DN Color Laser Printer User Guide Replacing the Toner Cartridges 8. Grip the levers at each end of the toner cartridge with your fingers, then push down firmly to rotate the levers forward. 9. Pull the toner seal straight up to remove it. NOTE: Pull the toner seal straight up. Pulling the toner seal diagonally may tear the seal.
TallyGenicom Intelliprint 8026DN Color Laser Printer User Guide 5-9 Drum Cartridge Drum Cartridge This section describes procedures for handling, storing and replacing the drum cartridge. Handling Precautions When handling the drum cartridge, take note of the following points: CAUTION • Never throw an drum cartridge into an open flame. It can cause an explosion and you can get burnt. • Do not subject it to direct sunlight or strong light.
5-10 TallyGenicom Intelliprint 8026DN Color Laser Printer User Guide Drum Cartridge 4. Grab the drum cartridge by the handle, and pull it up and out. Important • Do not touch inside the printer with your hands. Some parts may be hot. • Hold the handle to avoid dropping the drum cartridge. 5. Take the new drum cartridge out of the packaging box by holding its handle and remove the protective cover from the drum cartridge.
TallyGenicom Intelliprint 8026DN Color Laser Printer User Guide 5-11 Drum Cartridge 6. Holding the drum cartridge by the handle and the flat part facing the back of the printer, align the bosses that arrow marks are attatched on both sides of the drum cartridge with the slots that are indicated by the arrow marks on the printer. Gently lower the drum cartridge into the printer.
5-12 TallyGenicom Intelliprint 8026DN Color Laser Printer User Guide Drum Cartridge 8. Close the output tray cover. 9. Close the front cover. Storage Precautions • Do not unpack the new drum cartridge until you are ready to install it. If the drum cartridge is unpacked put it in its aluminum package for storage.
TallyGenicom Intelliprint 8026DN Color Laser Printer User Guide 5-13 Transfer Roll Cartridge Transfer Roll Cartridge This section describes procedures for replacing the transfer roll cartridge. Transfer Roller Cartridge Handling Precautions The transfer roller cartridge consists of a transfer roller and a waste toner collection box.
5-14 TallyGenicom Intelliprint 8026DN Color Laser Printer User Guide Transfer Roll Cartridge 3. Grip the tabs at both ends of the transfer roll cartridge and gently lift it out of the printer. Important • Do not touch inside the printer with your hands. Some parts may be hot. 4. Unpack a new transfer roll cartridge and grip the tabs as shown in the diagram. 5. Align the arrow marks on the transfer roll cartridge to the marks on the printer, and gently push the roller into the printer.
TallyGenicom Intelliprint 8026DN Color Laser Printer User Guide 5-15 Transfer Roll Cartridge 6. To lock the transfer roll cartridge into the printer push down the tabs until you hear a click. 7. Close the front cover.
5-16 TallyGenicom Intelliprint 8026DN Color Laser Printer User Guide Fuser Unit Fuser Unit This section describes procedures for replacing the fuser unit. NOTE: To avoid burns, do not replace the fuser immediately after printing, as the fuser unit gets very hot during this process. CAUTION • To prevent burns, never touch the fuser unit until at least 30 minutes after you have turned off the printer.
TallyGenicom Intelliprint 8026DN Color Laser Printer User Guide 5-17 Fuser Unit 4. Grip the knobs and gently lift the fuser unit out of the printer. 5. Unpack a new fuser unit, grip the fuser by the knobs, align it with the slots in the printer, and slowly push it in. 6. Completely push down the fuser unit by holding the knobs at both ends of the fuser unit until the fuser unit stops. NOTE: Make sure that the levers that are lifted up in step3 return to their original position.
5-18 TallyGenicom Intelliprint 8026DN Color Laser Printer User Guide Fuser Unit 7. Close the front cover.
TallyGenicom Intelliprint 8026DN Color Laser Printer User Guide 5-19 Retard Roll Retard Roll This section describes procedures for replacing the retard roll. Replacing the Retard Roll 1. Remove any print jobs from the tray before pulling the tray out of the printer. 2. Pull the tray out of the printer until it stops. Hold the tray with both hands, lift the front slightly, and remove it from the printer. 3. Hold the tabs of the retard roll cover and pull open the cover. 4.
5-20 TallyGenicom Intelliprint 8026DN Color Laser Printer User Guide Retard Roll 5. Align the holes of the new retard roll with the bosses in the tray and slide the retard roll until it stops. Then, release your hand from the retard roll. 6. Close the retard roll cover. 7. Replace the printer's tray into the printer. Push the tray until it stops. Important • Do not use excessive force on the tray. Doing so could damage the tray or the inside the printer.
Chapter 6 Optional Accessories In this Chapter . . .
6-2 TallyGenicom Intelliprint 8026DN Color Laser Printer User Guide Options Options Options Overview The following optional dedicated accessories are available with this printer. To order any of the options, contact your dealer. 550 Sheet Tray Module Install the tray module to the printer to use the 550 sheet tray module.
TallyGenicom Intelliprint 8026DN Color Laser Printer User Guide 6-3 Tray Module Tray Module The optional 550 sheet tray module and 1100 sheet tray module are available for this printer. NOTE: Only one optional 550 sheet tray module and one optional 1100 sheet tray module can be installed under the printer. CAUTION • Be sure to switch off the power and unplug the power cord from the outlet before carrying out the operations. • If not, you might get an electric shock.
6-4 TallyGenicom Intelliprint 8026DN Color Laser Printer User Guide Tray Module CAUTION • To lift the printer safely, remove the drum cartridge and lift it with two people. Never try to lift the printer while facing its right and left sides. NOTE: Be careful not to pinch your fingers when lowering the printer onto the optional 550 sheet tray module. 3. Hold the upper side of the tray rear cover and pull it forward to remove it from the back of the printer. 4. Pull the printer's tray out until it stops.
TallyGenicom Intelliprint 8026DN Color Laser Printer User Guide 6-5 Tray Module 5. Insert the four screws provided into the four holes inside the printer and tighten them with a coin to secure the printer to the optional 550 sheet tray module. NOTE: Make sure the screws are firmly tightened. 6. Insert the tray into the printer. 7. Reattach the tray rear cover to the back of the printer. 8. Turn on the printer.
6-6 TallyGenicom Intelliprint 8026DN Color Laser Printer User Guide Tray Module Installing the Optional 1100 Sheet Tray Module 1. Turn off the printer. 2. Turn the dials of the four feet at the bottom of optional 1100 sheet tray module to privent it from slipping. Important • Failure to adjust the feet can cause the printer to move unexpectedly, resulting in injury. 3. Lift the printer and align the four guide pins of the optional 1100 sheet tray module with the holes at the bottom of the printer.
TallyGenicom Intelliprint 8026DN Color Laser Printer User Guide 6-7 Tray Module 4. Pull the tray rear cover so that the top edge tilts out, then lift the tray rear cover off its hinges. 5. Pull the printer's tray out until it stops. Hold the tray with both hands, lift the front slightly and remove it from the printer. 6. Insert the four screws provided into the four holes inside the printer and tighten them with a coin to secure the printer to the optional 1100 sheet tray module.
6-8 TallyGenicom Intelliprint 8026DN Color Laser Printer User Guide Tray Module 7. Insert the tray into the printer. 8. Reattach the tray rear cover to the back of the printer. 9. Peel off the peel-off paper on the double-sided adhesive tape on the cable hook, and affix the cable hook on the back of the printer.
TallyGenicom Intelliprint 8026DN Color Laser Printer User Guide 6-9 Tray Module 10. Plug the power cable into the power cable connector at the back of the printer, wind the power cable onto the cable hook as shown in the graphic, and lightly pull the power cable. Then, plug the other end of the cable into the grounded outlet. 11. Turn on the printer.
6-10 TallyGenicom Intelliprint 8026DN Color Laser Printer User Guide Tray Module Installing the Optional 550 Sheet and 1100 Sheet Tray Module 1. Turn off the printer. 2. Turn the dials of the four feet at the bottom of optional 1100 sheet tray module to privent it from slipping. Important • Failure to adjust the feet can cause the printer to move unexpectedly, resulting in injury. 3. Remove the tray rear cover from the back of the optional 550 sheet tray module. 4.
TallyGenicom Intelliprint 8026DN Color Laser Printer User Guide 6-11 Tray Module 5. Lift the optional 550 sheet tray module and align the four guide pins of the optional 1100 sheet tray module with the holes at the bottom of the 550 sheet tray module. Gently lower the 550 sheet tray module onto the 1100 sheet tray module. 6.
6-12 TallyGenicom Intelliprint 8026DN Color Laser Printer User Guide Tray Module NOTE: Be careful not to pinch your fingers when lowering the printer onto the optional 1100 sheet tray module. 8. Remove the tray rear cover from the back of the printer. 9. Pull the printer's tray out until it stops. Hold the tray with both hands, lift the front slightly and remove it from the printer. 10.
TallyGenicom Intelliprint 8026DN Color Laser Printer User Guide 6-13 Tray Module 11. Insert the trays into the printer and optional 550 sheet tray module. Push the trays in until they stop. 12. Reattach the tray rear covers to the back of the printer and the optional 550 sheet tray module. 13. Peel off the peel-off paper on the double-sided adhesive tape on the cable hook, and affix the cable hook on the back of the printer.
6-14 TallyGenicom Intelliprint 8026DN Color Laser Printer User Guide Tray Module 14. Plug the power cable into the power cable connector at the back of the printer, wind the power cable onto the cable hook as shown in the graphic, and lightly pull the power cable. Then, plug the other end of the cable into the grounded outlet. 15. Turn on the printer.
TallyGenicom Intelliprint 8026DN Color Laser Printer User Guide 6-15 Tray Module Removing the Tray Module 1. Turn off the printer and unplug the printer power cable. 2. Remove the tray rear cover from the back of the printer. 3. Pull the printer’s tray out until it stops. Hold the tray with both hands, lift the front slightly and remove it from the printer. 4. Using a coin, remove the four screws inside the printer.
6-16 TallyGenicom Intelliprint 8026DN Color Laser Printer User Guide Tray Module 5. Gently lift the printer off the tray module, and place it on a level surface. 6. Insert the trays into the printer. Push the trays in until they stop. Important • Do not use excessive force on the tray. Doing so could damage the tray or the inside the printer. The following optional dedicated accessories are available with this printer. To order any of the options, contact your dealer.
Chapter 7 Understanding and Navigating the Control Panel Menus In this Chapter . . .
7-2 TallyGenicom Intelliprint 8026DN Color Laser Printer User Guide Control Panel Features About this Chapter This chapter explains the control panel and its functions, and also demonstrates how to navigate through the control panel menus and submenus that allow you to view and change the printer settings. Web access to the printer is also discussed.
TallyGenicom Intelliprint 8026DN Color Laser Printer User Guide 7-3 Control Panel Features LED Indicators The LED indicators also indicate printer status. The three indicators can each be on, off, or blinking, indicating different phases of printer operation. The table below explains the LED indicators.
7-4 TallyGenicom Intelliprint 8026DN Color Laser Printer User Guide Control Panel Features PUSHBUTTON FUNCTION SELECT—Push this button to select the menu or submenu that is shown on the second line of the display or to choose and save the setting shown on the second line of the display. CANCEL—Push this button to cancel the print job. STATUS—Push this button to enter the Status Menu.
TallyGenicom Intelliprint 8026DN Color Laser Printer User Guide 7-5 Navigating the Control Panel Menus Navigating the Control Panel Menus When you press the MENU button on the control panel, you enter the printer’s menu system. At that point, the first line of the display contains the text “Menu”, indicating that you are in the menu system. The second line of the display lists the active menu, which you can change by pressing the NEXT or PREVIOUS button.
7-6 TallyGenicom Intelliprint 8026DN Color Laser Printer User Guide Navigating the Control Panel Menus The following figure shows the sequence of pushbuttons and display messages that would allow you to change the number of copies printed. This example illustrates the basic relationship between menus and submenus and demonstrates how the NEXT, SELECT, and START/ STOP buttons help you to navigate through the menus.
TallyGenicom Intelliprint 8026DN Color Laser Printer User Guide 7-7 Menu Structure Menu Structure The following figure shows the structure of the control panel main menus and submenus.
7-8 TallyGenicom Intelliprint 8026DN Color Laser Printer User Guide Status Menu Status Menu In addition to the main menus listed above, the printer also provides a status menu that allows you to view the current settings of the paper trays and the remaining supply of toner in each of the toner cartridges. Push the STATUS button to enter the Status Menu.
TallyGenicom Intelliprint 8026DN Color Laser Printer User Guide 7-9 Job Library Job Library The job library feature can either be used for storing commonly used forms or for secure printing. Stored forms can be stored on the printer and printed out at any time by all users. Secured jobs can only be printed out by the job owner and only after providing a pin number. This section describes how to save and print jobs. First create the Print Jobs on the computer, then send and save them on the printer.
7-10 TallyGenicom Intelliprint 8026DN Color Laser Printer User Guide Job Library NOTE: Although you need to check the Hard Disk box, the feature will work without a hard disk installed. If a hard disk is fitted then more forms can be stored on the printer. 6. In Wordpad select [Print] from the [File] menu. 7. Select [8026 PCL] and click [Properties] 8. On the [Paper] tab, check [Enable Advanced Features] 9. On the [Options] tab click [Job Storage Settings] 10.
TallyGenicom Intelliprint 8026DN Color Laser Printer User Guide 7-11 Job Library Procedure – TallyGenicom PS 1. From Windows select [Start], [Settings], [Printers], and select the 8026 PS driver 2. Select [Printer – Properties] 3. Select the [Device Settings] tab 4. Select [Hard Disk] and [Installed] 5. Click [OK] and close the Printers dialog 6. In Wordpad select [Print] from the [File] menu 7. Select [8026 PS] and click [Properties] 8.
7-12 TallyGenicom Intelliprint 8026DN Color Laser Printer User Guide Job Library 9. Select [Job Name] and enter a name, select [User ID] and enter a name. The printer will create a directory using the User ID you provided and will store a job within this directory using the Job Name you provided. When entering the Job Name and UserID, do not use spaces (example Job 1) 10. Click [OK] and the job will be sent and stored on the printer.
TallyGenicom Intelliprint 8026DN Color Laser Printer User Guide 7-13 Job Library Operation on the control panel – for both PCL and PS 1. Press the MENU button on the control panel. 2. “MENU” is shown on the first line and “Job Library” is shown on the second line of the display. 3. Press the SELECT button to enter the Job Library menu. 4. Press the NEXT button to move through the submenus: Print & Delete, Print, or Delete. 5. Press the SELECT button to enter a submenu.
7-14 TallyGenicom Intelliprint 8026DN Color Laser Printer User Guide Job Library SUBMENU DEFAULT SETTING AVAILABLE SETTINGS PROCEDURE FOR CHANGING SETTING Delete User Folder 1 1. Press NEXT or PREVIOUS to scroll through the User Folder Names. 2. Press SELECT to choose the desired User Folder. Delete Job1 1. Press NEXT or PREVIOUS to scroll through the Print Job Names. 2. Press SELECT to choose the desired Print Job to Delete. Job Name PIN This step is necessary if the job is a PRIVATE job. 1.
TallyGenicom Intelliprint 8026DN Color Laser Printer User Guide 7-15 Job Library 8. Press
7-16 TallyGenicom Intelliprint 8026DN Color Laser Printer User Guide Job Library Procedure – PCL 1. From Windows select [Start], [Settings], [Printers], and select the 8026 PCL driver 2. Select [Printer] and [Properties] 3. Select the [Setup] tab 4. Check the Hard Disk box and the Job Storage Enabled box. 5. Click [OK] and close the Printers dialog box. This procedure will only need to be carried out once.
TallyGenicom Intelliprint 8026DN Color Laser Printer User Guide 7-17 Job Library 9. On the [Options] tab click [Job Storage Settings] 10. Check the [Private Job] box and then enter a [User Name] , [Job Name] and a [Job Pin]. The printer will create a directory using the User Name you provided and will store a job within this directory using the job number you provided, the job is printed after you provide the Job PIN you provided. 11. Click [OK] and the job will be sent and stored on the printer.
7-18 TallyGenicom Intelliprint 8026DN Color Laser Printer User Guide Job Library Procedure – TallyGenicom PS 1. From Windows select [Start], [Settings], [Printers], and select the 8026 PS driver 2. Select [Printer – Properties] 3. Select the [Device Settings] tab 4. Select [Hard Disk] and [Installed] 5. Click [OK] and close the Printers dialog 6. In Wordpad select [Print] from the [File] menu 7.
TallyGenicom Intelliprint 8026DN Color Laser Printer User Guide 7-19 Job Library 8. On the [Options] tab select [Job Type:] and select [Private] 9. Select [Job Name] and enter a name, select [User ID] and enter a name, select [PIN:] and enter a 4 digit number. The printer will create a directory using the User ID you provided and will store a job within this directory using the Job Name you provided and will print out the job once you have entered the PIN you provided.
7-20 TallyGenicom Intelliprint 8026DN Color Laser Printer User Guide Job Library Output print data stored – for both PCL and PS This section describes the procedure to output print data stored inside the machine using the Store Print feature. NOTE: You can also delete stored print data without printing. 1. Press
TallyGenicom Intelliprint 8026DN Color Laser Printer User Guide 7-21 Job Accounting Job Library Errors When a Job Library error occurs, the following message will be displayed: JOBLIB Error XX Press Start This is a continuable-fault, which means the START key must be pressed to allow operations to continue. If the current job is aborted as a result of the error, the message"Canceling Job" may be displayed after START is pressed. "XX" in the error display above is an error code.
7-22 TallyGenicom Intelliprint 8026DN Color Laser Printer User Guide Paper Menu Paper Menu The Paper Menu provides access to the printer settings for various paper-handling functions. Use the following procedure to enter the paper menu: 1. Press the MENU button on the control panel. 2. Press the NEXT button until the text “Paper Menu” is shown on the second line of the display. 3. Press the SELECT button to enter the Paper Menu. 4. Press the NEXT button to move through the submenus.
TallyGenicom Intelliprint 8026DN Color Laser Printer User Guide 7-23 Paper Menu SUBMENUS DEFAULT SETTING AVAILABLE SETTINGS MEDIA SIZE/ TYPE This submenu allows you to set the media type, media size.
7-24 TallyGenicom Intelliprint 8026DN Color Laser Printer User Guide Paper Menu SUBMENUS DEFAULT SETTING AVAILABLE SETTINGS PROCEDURE FOR CHANGING SETTING AUTO RESIZE This menu will scale the output of a PS job to the size selected. It does not scale a PCL job. Off On Off 1. Press NEXT or PREVIOUS to toggle between ON and OFF. 2. Press SELECT to save this setting. SEPARATOR PAGE Prints a blank page between print jobs. Off On Off 1. Press NEXT or PREVIOUS to toggle between ON and OFF. 2.
TallyGenicom Intelliprint 8026DN Color Laser Printer User Guide 7-25 Interface Menu Interface Menu The Interface Menu provides access to the printer interface settings. Use the following procedure to enter the interface menu: 1. Press the MENU button on the control panel. 2. Press the NEXT button until the text “Interface Menu” is shown on the second line of the display. 3. Press the SELECT button to enter the interface menu. 4.
7-26 TallyGenicom Intelliprint 8026DN Color Laser Printer User Guide Interface Menu SUBMENUS DEFAULT SETTING AVAILABLE SETTINGS PROCEDURE FOR CHANGING SETTING NETWORK 1 SETUP This submenu allows you to set up the Network interface. Interpreter: Auto Switch Interpreter: Auto Switch PCL PostScript 3 Format: Raw Format: Raw Normal Binary 1. Press NEXT or PREVIOUS to move among the submenus. 2. Press SELECT to choose a submenu. 3. Press NEXT or PREVIOUS to scroll through the settings. 4.
TallyGenicom Intelliprint 8026DN Color Laser Printer User Guide 7-27 Interface Menu SUBMENUS DEFAULT SETTING SPOOLING The spooling feature allows print jobs to be automatically spooled to the Flash memory or Hard Drive. This is a diagnostic tool. Start Spooling: Spool and Print Spool Only Stop Spooling: Disables spooling AVAILABLE SETTINGS PROCEDURE FOR CHANGING SETTING 1. Press NEXT or PREVIOUS to scroll through the SPOOLING submenus. 2. Press SELECT to choose a submenu. 3.
7-28 TallyGenicom Intelliprint 8026DN Color Laser Printer User Guide PS Menu PS Menu The PS Menu provides access to the PostScript settings. Use the following procedure to enter the PS Menu: 1. Press the MENU button on the control panel. 2. Press the NEXT button until the text “PS Menu” is shown on the second line of the display. 3. Press the SELECT button to enter the PS menu. 4. Press the NEXT button to move through the submenus: Print PS Errors, and Manual Feed TO. 5.
TallyGenicom Intelliprint 8026DN Color Laser Printer User Guide 7-29 PCL Menu PCL Menu The PCL Menu provides access to the PCL settings. Use the following procedure to enter the PCL menu: 1. Press the MENU button on the control panel. 2. Press the NEXT button until the text “PCL Menu” is shown on the second line of the display. 3. Press the SELECT button to enter the PCL menu. 4.
7-30 TallyGenicom Intelliprint 8026DN Color Laser Printer User Guide PCL Menu SUBMENUS DEFAULT SETTING AVAILABLE SETTINGS PROCEDURE FOR CHANGING SETTING SYMBOL SET This submenu allows you to choose a symbol set. 10U:PC-8 CP437 10U:PC-8 CP437 11U:PC-8 D/N 12U:PC-850 17U:PC-852 9T:PC-Turkish 19U:WIN Latin1 9E:WIN Latin2 5T:WIN Latin5 7J:Desk Top 10J:PS Text 13J:Ventura Intl 14J:Ventura US 6J:Microsoft Pub 8M:Math-8 PS:Math 6M:Ventura Math 1.
TallyGenicom Intelliprint 8026DN Color Laser Printer User Guide 7-31 PCL Menu SUBMENUS DEFAULT SETTING AVAILABLE SETTINGS PROCEDURE FOR CHANGING SETTING FF MODE This submenu allows you to define the action prompted by a form feed—a form feed equals either a form feed alone or a carriage return and a form feed together. FF = FF FF = FF FF = CR/FF 1. Press NEXT or PREVIOUS to choose from FF=FF or FF=CR/FF. 2. Press SELECT to save this setting.
7-32 TallyGenicom Intelliprint 8026DN Color Laser Printer User Guide System Menu System Menu The system menu provides access to system settings. Use the following procedure to enter the system menu: 1. Press the MENU button on the control panel. 2. Press the NEXT button until the text “System Menu” is shown on the second line of the display. 3. Press the SELECT button to enter the system menu. 4.
TallyGenicom Intelliprint 8026DN Color Laser Printer User Guide 7-33 System Menu SUBMENUS DEFAULT SETTING AVAILABLE SETTINGS PROCEDURE FOR CHANGING SETTING JOB TIMEOUT This submenu allows you to increase or decrease the time limit (in seconds) for PostScript jobs. A 0 setting indicates no timeout. This setting applies only to PostScript jobs. 00000 0 – 99999 1. Press NEXT or PREVIOUS to increase or decrease each digit of the five-digit number. 2.
7-34 TallyGenicom Intelliprint 8026DN Color Laser Printer User Guide Quality Menu Quality Menu The Quality Menu provides access to the printer settings that are related to print quality. Use the following procedure to enter the Quality Menu: 1. Press the MENU button on the control panel. 2. Press the NEXT button until the text “Quality Menu” is shown on the second line of the display. 3. Press the SELECT button to enter the system menu. 4.
TallyGenicom Intelliprint 8026DN Color Laser Printer User Guide 7-35 Color Menu Color Menu The Color Menu contains the settings related to the quality of printed color. Use the following procedure to enter the Color Menu: 1. Press the MENU button on the control panel. 2. Press the NEXT button until the text “Color Menu” is shown on the second line of the display. 3. Press the SELECT button to enter the system menu. 4.
7-36 TallyGenicom Intelliprint 8026DN Color Laser Printer User Guide Color Menu SUBMENUS DEFAULT SETTING AVAILABLE SETTINGS PROCEDURE FOR CHANGING SETTING COLOR MATCHING This submenu allows you to enable automatic color correction when printer color documents in RGB format. On Off With this setting set to Off, RGB colors are internally converted to their CMYK equivalent and are then placed on the paper. It is possible that the colors that print will be different than what you see on your screen.
TallyGenicom Intelliprint 8026DN Color Laser Printer User Guide 7-37 Functions Menu Functions Menu The Functions Menu provides access to several printer functions that can supply you with information about the printer and its settings. Use the following procedure to enter the Functions Menu: 1. Press the MENU button on the control panel. 2. Press the NEXT button until the text “Functions Menu” is shown on the second line of the display. 3. Press the SELECT button to enter the system menu. 4.
7-38 TallyGenicom Intelliprint 8026DN Color Laser Printer User Guide FLASH Menu FLASH Menu NOTE: This menu selection will only appear if an optional hard disk drive or Flash DIMM has been installed. Consult the documentation that came with your hard disk drive or Flash DIMM for detailed installation and usage instructions. The FLASH Menu provides access to the printer settings that are related to the FLASH DIMM. This menu appears when a User Flash is installed in the printer.
TallyGenicom Intelliprint 8026DN Color Laser Printer User Guide 7-39 DISK Menu DISK Menu NOTE: This menu selection will only appear if an optional hard disk drive has been installed. Consult the documentation that came with your hard disk drive for detailed installation and usage instructions. The Disk Menu provides access to the printer settings that are related to the optional Hard Disk. Use the following procedure to enter the Disk Menu: 1. Press the MENU button on the control panel. 2.
7-40 TallyGenicom Intelliprint 8026DN Color Laser Printer User Guide Date/Time Menu Date/Time Menu NOTE: This menu selection will only appear if the Real Time Clock Option has been installed. Please contact your dealer for more information on this feature. The Date/Time Menu provides access to the printer settings that are related to print quality. Use the following procedure to enter the Date/Time Menu: 1. Press the MENU button on the control panel. 2.
Chapter 8 Optional Extended Features In this Chapter . . .
8-2 TallyGenicom Intelliprint 8026DN Color Laser Printer User Guide Installing DRAM Memory DIMMS About this Chapter This chapter describes the procedures for installation of DRAM Memory DIMMs and the Hard Disk Option. Also describes how to use the extended features associated with these options. Installing DRAM Memory DIMMS 1. Carefully review the safety precautions in the front of this guide before starting this installation procedure. 2.
TallyGenicom Intelliprint 8026DN Color Laser Printer User Guide 8-3 Installing DRAM Memory DIMMS 5. Remove the three screws that secure the controller assembly. 1 2 3 6. Remove the controller assembly. 7. Carefully insert a DRAM DIMM which is compatible with your printer into DRAM DIMM slot as shown below. Insert at a 45 degree angle into the DRAM connector. 8. When properly seated, gently push down on the DIMM until the side braces close onto the edges of the DIMM. Side Brace Side Brace 9.
8-4 TallyGenicom Intelliprint 8026DN Color Laser Printer User Guide Installing the Hard Disk/Compact Flash Option Installing the Hard Disk/Compact Flash Option 1. Carefully review the safety precautions in the front of this guide before starting this installation procedure. 2. Ensure that the printer power switch is set to the OFF [O] position. 3. Remove Tray 2 Rear Cover. 4. Disconnect the power cord and signal cable from the back of the printer.
TallyGenicom Intelliprint 8026DN Color Laser Printer User Guide 8-5 Installing the Hard Disk/Compact Flash Option 5. Remove the three screws that secure the controller assembly. 1 2 3 6. Remove the controller assembly. 7. The connector for the Compact Flash is located in the corner of the controller assembly. DRAM Connector Compact Flash Connector Flash Connector 8. Insert the Compact Flash into the connector on the controller assembly.
8-6 TallyGenicom Intelliprint 8026DN Color Laser Printer User Guide Installing the Flash Option in the Printer 9. Ensure the Compact Flash is pressed all the way into the connector. 10. Reinstall the controller assembly in reverse order as shown in Steps 5 and 6. 11. Reconnect the power cord and signal cable to the printer as shown in Step 4. Reinstall the Tray 2 rear cover as shown in Step 3. 12. Turn the printer power switch to the ON [I] position. Installing the Flash Option in the Printer 1.
TallyGenicom Intelliprint 8026DN Color Laser Printer User Guide 8-7 Installing the Flash Option in the Printer 4. Disconnect the power cord and signal cable from the back of the printer. Network Connection Parallel Connector USB Connector AC Power Cord 5. Remove the three screws that secure the controller assembly. 1 2 3 6. Remove the controller assembly. 7. The connector for the Flash is located on the right of the controller assembly.
8-8 TallyGenicom Intelliprint 8026DN Color Laser Printer User Guide Installing the Flash Option in the Printer 8. Insert the Flash into the connector on the controller assembly. 9. Ensure the Flash is pressed all the way into the connector. 10. Reinstall the controller assembly in reverse order as shown in Steps 5 and 6. 11. Reconnect the power cord and signal cable to the printer as shown in Step 4. Reinstall the Tray 2 rear cover as shown in Step 3. 12.
TallyGenicom Intelliprint 8026DN Color Laser Printer User Guide 8-9 Using the Hard Disk/Compact Disk Option and User Flash DIMM Module Using the Hard Disk/Compact Disk Option and User Flash DIMM Module This section discusses the available control panel menus when the Hard Disk/Compact Flash or User Flash option is installed. Power-on files and the storage of files on the Hard Disk/Compact Flash and User Flash option are also discussed.
8-10 TallyGenicom Intelliprint 8026DN Color Laser Printer User Guide Using the Hard Disk/Compact Disk Option and User Flash DIMM Module NOTE: 1. The Flash Menu and Disk Menu will only appear when the respective FLASH SIMM and/or Hard Disk/Compact Flash option is installed. 2. Power-On Files menu will only appear if either a FLASH SIMM or a Hard Disk/Compact Flash option is installed and power-on files exist.
TallyGenicom Intelliprint 8026DN Color Laser Printer User Guide 8-11 Using the Hard Disk/Compact Disk Option and User Flash DIMM Module Format Usr Flash This selection will reformat the FLASH SIMM. All files on the FLASH SIMM will be deleted if this function is selected. Flash Summary This selection will print a page containing information about the FLASH SIMM including a list of all the current existing files and directories.
8-12 TallyGenicom Intelliprint 8026DN Color Laser Printer User Guide Using the Hard Disk/Compact Disk Option and User Flash DIMM Module Device Parameter Sets When installed, a device parameter set will be supported for either or both FLASH SIMM and hard disk options. The parameter sets can be referenced using the device names %flash% or %disk0%.
TallyGenicom Intelliprint 8026DN Color Laser Printer User Guide 8-13 Using the Power-On Files Feature Using the Power-On Files Feature Power-on Files Defined If a FLASH DIMM or hard disk drive/Compact Flash is installed in your printer, your printer has the capability of storing additional power-on files which can be read and interpreted at power-on. Power-on files are processed at power-on initialization only and not at the start of every print.
8-14 TallyGenicom Intelliprint 8026DN Color Laser Printer User Guide Collating, Saved Jobs, and Job Accounting Collating, Saved Jobs, and Job Accounting The features discussed in this section are designed to work with the Hard Disk/Compact Flash Option. However, if no Hard Disk/Compact Flash Option is installed, but a User Flash Option is installed, these features will utilize the User Flash Option.
TallyGenicom Intelliprint 8026DN Color Laser Printer User Guide 8-15 Collating, Saved Jobs, and Job Accounting 2. Right click on the Printer icon and select the Properties option from the list. 3. Click on the Printing Preferences button. 4. Click on the Paper Quality button and then the Advanced button.
8-16 TallyGenicom Intelliprint 8026DN Color Laser Printer User Guide Collating, Saved Jobs, and Job Accounting 5. Click on the Copy Count button to enter the number of copies and make sure the Collate button is checked. 6. Click to OK button and your printer driver is set to collate the number of copies specified.
TallyGenicom Intelliprint 8026DN Color Laser Printer User Guide 8-17 Collating, Saved Jobs, and Job Accounting Use the following procedure to enable collating with the PCL driver: 1. Right click on the Printer icon and select the Properties option from the list. Then click on the Setup Tab. Then check the Hard Disk and Mopier check boxes. A Hard Disk or User Flash must be installed to use the Collating/Mopier feature. 2. Right click on the Printer icon and select the Properties option from the list.
8-18 TallyGenicom Intelliprint 8026DN Color Laser Printer User Guide Collating, Saved Jobs, and Job Accounting 3. Click on the Printing Preferences button. 4. Check the Enable Advanced Features check box. 5. Select the number of copies and check the Collate check box. 6. Click the OK button and your printer driver is set to collate the number of copies specified.
TallyGenicom Intelliprint 8026DN Color Laser Printer User Guide 8-19 Collating, Saved Jobs, and Job Accounting Saved Jobs Feature You can create saved jobs using the drivers that support this feature. The drivers that support this feature are as follows: ■ PCL – All windows platforms ■ PostScript – Windows 2000 and Windows XP There are three job types available, Normal, Saved, and Private. The descriptions of the job types are as follows: Normal A normal print job. No print job data is saved.
8-20 TallyGenicom Intelliprint 8026DN Color Laser Printer User Guide Collating, Saved Jobs, and Job Accounting Use the following procedure to enable the Saved Jobs Feature with the PS driver. 1. You are now in the Printing Properties menu, click on the Printing Preference button. 2. Click on the Options Tab.
TallyGenicom Intelliprint 8026DN Color Laser Printer User Guide 8-21 Collating, Saved Jobs, and Job Accounting 3. Select Job Type and then one of the three available options, Normal, Saved and Private. 4. If you want to Save your print job, enter a name you want to save job as and it will be saved under User ID folder listed. You can change the User ID in this menu also.
8-22 TallyGenicom Intelliprint 8026DN Color Laser Printer User Guide Collating, Saved Jobs, and Job Accounting 5. If you want to make your job Private, you can enter a number in the PIN menu. You will only be able to print this document if you know the PIN number.
TallyGenicom Intelliprint 8026DN Color Laser Printer User Guide 8-23 Collating, Saved Jobs, and Job Accounting Use the following procedure to enable the Saved Jobs Feature with the PCL driver. 1. Right click on the Printer icon and select the Properties option from the list. Then click on the Setup Tab. Then check the Hard Disk and Job Storage Enabled check boxes. A Hard Disk or User Flash must be installed to use the save job feature.
8-24 TallyGenicom Intelliprint 8026DN Color Laser Printer User Guide Collating, Saved Jobs, and Job Accounting 2. Select the General Tab, and click on the Printing Preference button. 3. Check the Enable Advanced Features check box.
TallyGenicom Intelliprint 8026DN Color Laser Printer User Guide 8-25 Collating, Saved Jobs, and Job Accounting 4. Select the Options tab and press the Job Storage Settings button. 5. You can now select Job Storage Mode Off, Private Job or Stored Job.
8-26 TallyGenicom Intelliprint 8026DN Color Laser Printer User Guide Collating, Saved Jobs, and Job Accounting 6. If you want to save your print job, enter a name you want to save the job as and it will be saved under User ID folder listed. You can change the User ID in this menu also. 7. If you want to make your job private, you can enter a number in the PIN menu. You will only be able to print this document if you know the PIN number.
TallyGenicom Intelliprint 8026DN Color Laser Printer User Guide 8-27 Collating, Saved Jobs, and Job Accounting Working with Saved Jobs There are two ways to work with Saved Jobs. One is through the front panel menus, the other is through the printer web pages. Front Panel Access The Job Library Menu provides access to the printer settings that are related to the optional Hard Disk.
8-28 TallyGenicom Intelliprint 8026DN Color Laser Printer User Guide Collating, Saved Jobs, and Job Accounting MENU Job Library DELETE Job Library (Delete Saved Job with PIN) SUBMENUS PROCEDURE FOR CHANGING SETTING Print User Folder 1 1. Press NEXT or PREVIOUS to scroll through the User Folder Names. 2. Press SELECT to choose the desired User Folder. Print Job1 1. Press NEXT or PREVIOUS to scroll through the Print Job Names. 2. Press SELECT to choose the desired Print Job. Job Name PIN 1.
TallyGenicom Intelliprint 8026DN Color Laser Printer User Guide 8-29 Collating, Saved Jobs, and Job Accounting MENU SUBMENUS Delete Job1 1. Press NEXT or PREVIOUS to scroll through the Print Job Names. 2. Press SELECT to choose the desired Print Job to Delete. Job Name PIN 1. Press NEXT or PREVIOUS to increase or decrease each digit of the four-digit number. 2. Press SELECT to set one digit and move to the next digit. 3. Press SELECT after changing the last digit to save this setting.
8-30 TallyGenicom Intelliprint 8026DN Color Laser Printer User Guide Collating, Saved Jobs, and Job Accounting Job Accounting Feature The printer supports a job accounting feature which will store certain information about each print job received by the printer. There are two ways to work with this feature. One is through the front panel menu. NOTE: Please see “Accessing the Printer Web Page” on page 8-37 for more information on the Job Accounting Feature.
TallyGenicom Intelliprint 8026DN Color Laser Printer User Guide 8-31 Collating, Saved Jobs, and Job Accounting Using the Custom Paper Size Feature There are two ways to work with the Custom Paper Size Feature. One is through the front panel menus, the other is through the printer driver. If you have a Windows or Macintosh printer driver, you can access this feature from the driver and you do not have to use front panel settings.
8-32 TallyGenicom Intelliprint 8026DN Color Laser Printer User Guide Collating, Saved Jobs, and Job Accounting Printer Driver Access To access the Custom Paper Size Feature through your printer driver, use the following procedure: 1. On your desktop, go to the Start menu, left click on Settings, left click on Printers, and then click on your printer driver icon, right click and follow the menu to the Properties menu. 2. You are now in the Printing Properties menu, click on the Printing Preference button.
TallyGenicom Intelliprint 8026DN Color Laser Printer User Guide 8-33 Collating, Saved Jobs, and Job Accounting 4. Click on the Paper Size button. 5. Scroll down to Custom Page Size and click on PS Custom Page Size.
8-34 TallyGenicom Intelliprint 8026DN Color Laser Printer User Guide Collating, Saved Jobs, and Job Accounting 6. Then enter the width and height of your custom paper size. 7. Click the OK button until you exit out of the driver menu. You are now ready to print your custom sized document.
TallyGenicom Intelliprint 8026DN Color Laser Printer User Guide 8-35 Custom Page size and Microsoft Word, Word 2000, and Word 2003 Custom Page size and Microsoft Word, Word 2000, and Word 2003 When you specify a PostScript custom page size in the Paper Size box in the advanced printer properties for a supported printer, the custom size setting appears to be ignored if you have configured Microsoft Word to use the PostScript Custom Page Size setting. Word defaults to the default size of 8.5 by 11 inches.
8-36 TallyGenicom Intelliprint 8026DN Color Laser Printer User Guide Custom Page size and Microsoft Word, Word 2000, and Word 2003 To use the new form from a program, follow these steps: ■ In the program, click PRINT. ■ In the PRINT dialog box, click PROPERTIES. ■ In the PAPER SIZE box, click the new form. ■ Click OK. ■ Click OK to print. NOTE: New forms are stored on the computer where they are created.
TallyGenicom Intelliprint 8026DN Color Laser Printer User Guide 8-37 Accessing the Printer Web Page Accessing the Printer Web Page You can access the printer web page by going to the internet browser and typing the IP address of your network printer (http://IP ADDRESS). You can directly access the printer control panel on the web and it allows you to view and change the printer settings.
8-38 TallyGenicom Intelliprint 8026DN Color Laser Printer User Guide Accessing the Printer Web Page MAIN PAGE OF PRINTER WEB SITE SUBMENU 1 OF PRINTER WEB SITE SUBMENU 2 OF PRINTER WEB SITE Printer Setup You can view and change printer configuration.
TallyGenicom Intelliprint 8026DN Color Laser Printer User Guide 8-39 Accessing the Printer Web Page MAIN PAGE OF PRINTER WEB SITE SUBMENU 1 OF PRINTER WEB SITE SUBMENU 2 OF PRINTER WEB SITE PCL Menu Provides access to the PCL settings: Orientation Font Source Font Number Pitch Symbol Set Macro Filter Lines Per Page CR Mode LF Mode FF Mode Print Area Parameter Values Paper Source Paper Size Only appears if the Real Time Clock Option is installed.
8-40 TallyGenicom Intelliprint 8026DN Color Laser Printer User Guide Accessing the Printer Web Page MAIN PAGE OF PRINTER WEB SITE SUBMENU 1 OF PRINTER WEB SITE SUBMENU 2 OF PRINTER WEB SITE Email Setup Provides access to the following settings which allow the administrator to set parameters for specific conditions and have an email alert sent to specific addresses.
TallyGenicom Intelliprint 8026DN Color Laser Printer User Guide 8-41 Accessing the Printer Web Page MAIN PAGE OF PRINTER WEB SITE SUBMENU 1 OF PRINTER WEB SITE SUBMENU 2 OF PRINTER WEB SITE User Flash Files You can view contents of folder, retrieve files or delete print files. Format User Flash Allows you to format your User Flash. Print User Flash Summary Prints a summary page of the files stored in the User Flash.
8-42 TallyGenicom Intelliprint 8026DN Color Laser Printer User Guide Accessing the Printer Web Page Printer Setup Go to your web browser and type in your printer web address. The printer web page will appear. 1. Click on Printer Setup. 2. When you enter the Printer Setup Menu, you have access to the Paper Menu, Interface Menu, PS Menu, PCL Menu, System Menu, Quality Menu , Date/Time, Email Setup, and SNMP Setup.
TallyGenicom Intelliprint 8026DN Color Laser Printer User Guide 8-43 Accessing the Printer Web Page 3. The Paper Menu allows the user to access and change the paper menu settings. 4. The Interface Menu allows the user to access and change the interface settings.
8-44 TallyGenicom Intelliprint 8026DN Color Laser Printer User Guide Accessing the Printer Web Page 5. The PS Menu allows the user to access and change the Post Script Menu settings 6.
TallyGenicom Intelliprint 8026DN Color Laser Printer User Guide 8-45 Accessing the Printer Web Page 7. The System Menu allows the user to access and change the System Menu settings 8. The Quality Menu allows the user to access and change the Quality Menu settings 9. The Color Menu allows the user to access and change the Rendering, Color Matching, and Refresh Toner.
8-46 TallyGenicom Intelliprint 8026DN Color Laser Printer User Guide Accessing the Printer Web Page 10. The Date/Time Menu allows the user to access and change the Date. 11. The Email Setup Menu allows you to configure the printer to send email messages when certain status conditions occur. Email Server Settings SMTP Server IP Address: Enter the IP address for the SMTP server that the printer will use to transmitt the email messages.
TallyGenicom Intelliprint 8026DN Color Laser Printer User Guide 8-47 Accessing the Printer Web Page Printer Email Address: The character string configured here will be used in the “FROM” field of the email message. Reply-To-Address: The character string configured here will be used in the “REPLY TO” field of the email message. Email Address Settings/Email Alert Conditions You can configure 1 – 5 destination email addresses.
8-48 TallyGenicom Intelliprint 8026DN Color Laser Printer User Guide Accessing the Printer Web Page Email Signature Settings These are text strings that are appended to the end of the email messages. They can be used to provide helpful hints/reminders to receprients of the status email messages. The SNMP Setup Menu allows you to define IP addresses for trap host that will be sent SNMP trap messages. The printer supports the folowing SNMP trap types: A) Cold Strart trap B) Printer MIB alert table traps.
TallyGenicom Intelliprint 8026DN Color Laser Printer User Guide 8-49 Accessing the Printer Web Page Job Accounting Web Page Access Go to your web browser and type in your printer web address. The printer web page will appear. 1. Click on Job Accounting. 2.
8-50 TallyGenicom Intelliprint 8026DN Color Laser Printer User Guide Accessing the Printer Web Page 3. When you click on Enable/Disable it will take you to the following screen. Click Yes or No to Enable or Disable Job Accounting. 4. When you click on Retrieve Job Accounting Files it will upload the file information, which is stored in a .CSV file.
TallyGenicom Intelliprint 8026DN Color Laser Printer User Guide 8-51 Accessing the Printer Web Page 5. When you click on Display Job Accounting Info it will bring you the following screen which displays all your job information. NOTE: Only products that have real time clock support will provide the Date/Time information. 6. When you click on Reset All Job Accounting Info, all printer job information will be deleted.
8-52 TallyGenicom Intelliprint 8026DN Color Laser Printer User Guide Accessing the Printer Web Page Web Page Access Using the printer web page, you can delete, print, or download any job files stored in the job library. Go to your web browser and type in your printer web address. The printer web page will appear as follows: 1. Click on Job Library. 2. Click on the folder icon or name to view the printer jobs in the user folders.
TallyGenicom Intelliprint 8026DN Color Laser Printer User Guide 8-53 Accessing the Printer Web Page 3. The printer job information will appear. If there is a PIN number associated with the file, you will be required to enter the correct PIN number to access the print file.
8-54 TallyGenicom Intelliprint 8026DN Color Laser Printer User Guide Accessing the Printer Web Page Jun 06
Appendix A Specifications and consumables In this Chapter . . .
A-2 TallyGenicom Intelliprint 8026DN Color Laser Printer User Guide Specifications Specifications Printer Specifications Machine type Desktop Printing system Laser xerography Printing speed Monochrome printing: 35 sheets/minute Color printing: 25 sheets/minute (for continuous printing of the same A4-sized document by short edge feed) Warm-up time 25 seconds (at temperature: 22 °C / humidity: 55%) However, the printer’s electrical system is ready 10 seconds after switching on the printer.
TallyGenicom Intelliprint 8026DN Color Laser Printer User Guide A-3 Specifications Printable area Non-Printable Area Printable Area Expected life of Consumables Toner Cartridge Possible number of pages printed • Black: 9,000 pages • Yellow/Magenta/Cyan: 8,000 pages NOTE: The possible number of pages that can be printed is based on Letter size paper with a print ratio of 5% and the default density setting. The number of pages that actually can be printed varies according to the conditions of use.
A-4 TallyGenicom Intelliprint 8026DN Color Laser Printer User Guide Specifications Jun 06
“All rights reserved. Translations, reprinting or copying by any means of this manual complete or in part or in any different form requires our explicit approval. We reserve the right to make changes to this manual without notice. All care has been taken to ensure accuracy of information contained in this manual. However, we cannot accept responsibility for any errors or damages resulting from errors or inaccuracies of information herein.
TALLYGENICOM REPRESENTATIVES U.S.A. TallyGenicom L.P. 4500 Daly Drive, Suite 100 Chantilly, VA 20151 U.S.A. Phone: +1 703 633 8700 Fax: +1 703 222 7629 http://www.tallygenicom.com GERMANY TallyGenicom Computerdrucker GmbH Postfach 2969 D-89019 Ulm Deutschland Tel.: +49 731 2075 0 Fax: +49 731 2075 100 http://www.tallygenicom.de UNITED KINGDOM TallyGenicom Limited Rutherford Road Basingstoke, Hampshire RG24 8PD England, U.K. Phone: +44 870 872 2888 Fax: +44 870 872 2889 http://www.tallygenicom.co.