
User Manual

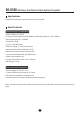
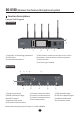
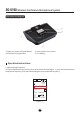
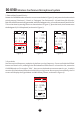
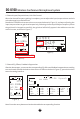
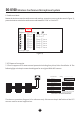
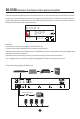
Table Of Contents

DG-U100
18
7.2 Camera Tracking Settings
After the CU and the camera are connected, output the camera video to a monitor, use a remote
to enter the camera settings, configure Camera ID and Baud. You can also view the Camera
Protocol in the settings. Set the Baud value to 9600, and ID to desired (supporting up to 7 cameras,
optional ID 1~7), and leave other parameters unchanged.
Once the camera parameters are set, rotate the CU CURSOR to enter camera tracking interface,
as shown below:
Move the cursor to the checkbox beside the camera icon, and press the CURSOR knob to check
tracking function. Then based on the configuration, check the corresponding camera ID, and modify
its respective Camera Protocol (by moving the cursor to the protocol, and press the knob to switch
protocol). Check Flip to flip around the camera footage if necessary." "
Next, proceed to binding and positioning the camera:
Adjust the camera angle based on your capturing footage on the monitor (via camera remote), rotate
the CU knob to move the cursor to below framed area:
Mod e : F IFO
Gamera Tracking:
Flip:
Sony Visca
Flip:
Pelco-P
Flip:
Sony Visca
Flip:
Sony Visca
Flip:
Sony Visca
Flip:
Sony Visca
Flip:
Sony Visca
Lan g u a g e
1:
2:
3:
4:
5:
6:
7:
SY N
Vol 31:
Cha.irman11
641.00MHz
11
A
TxGa.in:06
1
Wireless Conference Microphone System