
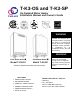
Manual


- 7 -
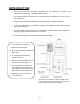
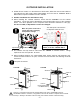
The dark square is the direction
the dipswitch should be set to.
OUTDOOR INSTALLATION
1. Follow all local codes, or in the absence of local codes, follow the most recent edition of
the National Fuel Gas Code: ANSI Z223.1/NFPA 54 in the USA or CAN/CSA B149.1
Natural Gas, Propane Installation Code in Canada.
2. Outdoor installation for mild climates only.
3. When installing the T-K3-SP outdoors, ensure that the T-K3-SP is set for outdoor
installation. Locate the bank of dipswitches at the bottom-right corner of the computer
board. The ‘OUT’ dipswitch on the computer board should be switched to ‘ON’ (up).
For the T-K3-OS, no dipswitches need to be changed.
4. The outdoor vent cap must be used when the T-K3-SP is installed outdoor. Takagi
requires the use of its part No. TK-TV04.
5. When installed outdoors, the T-K3-OS/SP water heater shall be wall mounted only.
Locate the water heater in an open, unroofed area and maintain the following minimum
clearances:
Make sure power to the unit is
turned OFF before changing
the dipswitch settings.
There is a 2” clearance from the left and right sides of the unit to combustible and non-
combustible surfaces. However, if any portion or area of the surface is exposed to the exhaust
fumes (i.e. directly to the sides of the vent cap), that surface must be at least 24” away.
T-K3-OS
T-K3-SP
Keep the clearances.
The dipswitch setting, as shown
above, is for the T-K3-SP ONLY.
dipswitches
Side 2”
Front 24”
Bottom 12”
Side 2”
Back 1”
Top 36”
*Side 24”
*Front 24”
*Side 24”
Top 36”
Back 1”
Front 4”
(24” Recommended
For Maintenance)
Bottom 12”
Side 2”
Side 2”