
Service Handbook


Condensing Models: On-Demand Water Heater Service Handbook • 29
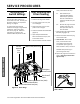
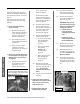
SERVICE PROCEDURES
cover. Be sure to connect all 3
wires on the front of the burner.
Also, inspect all gaskets to make
sure that they are free of debris
and are not ripped or torn. If the
gaskets are ripped or torn, replace
them BEFORE reassembly.
7. Verify proper operation.
Descaling the Unit
Hard water can cause damage to
the copper coils inside of the heat
exchangers. Heat exchanger failure
due to scale buildup, which results
from from hard water, is not covered
by warranty. In such cases, a scale
inhibitor should be installed before the
cold water inlet.
Tools and Materials:
● Pump: The pump should provide
a minimum of 1 gpm through the
water heater.
● 5% white vinegar (food grade)
● Washing machine hoses (2)
● Bucket
● Isolation valves with drain ports
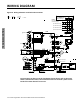
(See Figure 18.)
Draining and Hose Connec on
To complete this procedure,
isolation valves with drain ports are
recommended.
1. Isolate the unit by closing the
incoming and outgoing water
isolation valves (C
and D). See Figure 18.
2. Connect hoses.
3. Relieve pressure within the unit by
temporarily opening the pressure
relief valve.
4. Drain the unit, then connect the
hoses/pump to the drain ports of
the isolation valves (A and B). See
page 28, Figure 18. See also
“Unit Draining and Filter Cleaning,”
page 24.
Pump And Descale
1. Fill the bucket with 5 gallons of
5% white vinegar (food grade).
The dilution ratio depends on the
cleaning/descaling solution that is
used. (Follow the manufacturer’s
instructions.)
2. If the pump is submersible, place
it into the bucket. If it is not
submersible, place an inlet hose
into the bucket.
3. Open valves A and B.
(See Page 28, Figure 18.)
4. Circulate the white vinegar until
the water is clear of minerals and
debris. This may take up to 45
minutes.
Cleanse the System
Flush the solution out of the heat
exchanger with fresh water as
described below:
1. Close isolation valve B. (Figure 18.)
2. Open valve D and run fresh water
through the unit and drain out of
Hose 2 for at least 5 minutes or
until all of the solution is removed.
3. Close all valves, relieve pressure
from the unit with the pressure
relief valve, and clean the inlet
water filter with fresh water.
4. Once the unit is flushed and
cleansed, replace the water filter,
open C and D, then reconnect
power to the unit.
5. Set the desired water temperature
setting.
6. Restart the water heater as
described in its manual. Verify
proper operation
Cleaning the
Combus on
Components
Follow these procedures to clean the
fan, burner, flame sensor and air/fuel
ratio rod (AFR).
Tools and Materials
● Degreaser in a pump action bottle
● 100 Grit Sandpaper or other
suitable abrasive
● #2 Phillips Screwdriver, 8-in long
● Needle-Nosed Pliers
● Duct Tape
● Flashlight
● Air Compressor
● Shop Vacuum
● Towels
IMPORTANT: As you complete the
following steps, reinstall the screws after
removing each component. Doing so
will keep the fasteners organized and
will expedite reassembly.
WARNING!
□ Disconnect power by opening
the circuit breaker or removing
the fuses before installing or
servicing.
□ Use a non-contact circuit tester
to confirm that power is off
before working on or near any
electrical parts.
□ Ensure that the gas supply is
shut off at the manual gas
shutoff valve.
□ Replace the front cover after
servicing.