TD‐4283 BLOOD GLUCOSE MONITORING SYSTEM OWNER’S Manual Version 1.
Dear TD-4283 System Owner: Thank you for purchasing the TD-4283 Blood Glucose Monitoring System. This manual provides important information to help you to use the system properly. Before using this product, please read the following contents thoroughly and carefully. Regular monitoring of your blood glucose levels can help you and your doctor gain better control of your diabetes.
IMPORTANT SAFETY PRECAUTIONS READ BEFORE USE 1. Use this device ONLY for the intended use described in this manual. 2. Do NOT use accessories which are not specified by the manufacturer. 3. Do NOT use the device if it is not working properly or if it is damaged. 4. Do NOT use the equipment in places where aerosol sprays are being used or where oxygen is being administered. 5. Do NOT under any circumstances use the device on newborns or infants. 6.
TABLE OF CONTENTS BEFORE YOU BEGIN Important Information Intended Use Test Principle Meter Overview Display Screen Test Strip Setting the Meter THE FOUR MEASURING MODES Control Solution Testing Performing a Control Solution Test TESTING WITH BLOOD SAMPLE Preparing the Puncture Site Alternative Site Testing Performing a Blood Glucose Test METER MEMORY Reviewing Test Results Reviewing Blood Glucose Day Average Results Downloading Results onto a Computer MAINTENANCE Battery Caring for Your Meter Caring for You
BEFORE YOU BEGIN Important Information Severe dehydration and excessive water loss may cause readings which are lower than actual values. If you believe you are suffering from severe dehydration, consult a healthcare professional immediately. If your blood glucose results are lower or higher than usual, and you do not have any symptoms of illness, first repeat the test.
Intended Use This system is intended for use outside the body (in vitro diagnostic use) by people with diabetes at home and by healthcare professionals in clinical settings as an aid to monitoring the effectiveness of diabetes control. It is intended to be used for the quantitative measurement of glucose (sugar) in fresh whole blood samples (from the finger, palm, forearm, upper arm, calf and thigh). It should not be used for the diagnosis of diabetes, or testing on newborns.
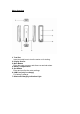
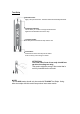
Meter Overview 1. Test Slot Insert test strip here to turn the meter on for testing. 2. Display Screen 3. Main Button Enter the meter memory and silence a reminder alarm. 4. Battery Compartment 5. Set Button Enter and confirm the meter settings. 6. USB Port (only for charge) For battery recharge. 7.
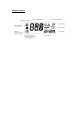
Display Screen
Test Strip Absorbent Hole Apply a drop of blood here. The blood will be automatically absorbed. Confirmation Window This is where you confirm if enough blood has been applied to the absorbent hole in the strip. Test Strip Handle Hold this part to insert the test strip into the slot Contact Bars Insert this end of the test strip into the meter. Push it in firmly until it will go no further. ATTENTION: The front side of test of test strip should face up when inserting test strip.
Setting the Meter Before using your meter for the first time or if you change the meter battery, you should check and update these settings. Make sure you complete the steps below and have your desired settings saved. Entering the Setting Mode Start with the meter off (no test strip inserted). Press SET located on the back to turn on the meter. 1. Setting the Date With the year flashing, press Main Button until the correct year appears. Press SET.
4. Deleting the memory With “dEL” and a flashing “no” symbol on the display, press SET to keep the results in memory. To delete all the results, press Main Button with a flashing ”yes” symbol on the display, press SET to delete all the results and “‐‐‐“ will be displayed. 5. Setting the reminder alarm You may set up any or all of the reminder alarms (1-4). The meter displays “On” or “OFF” and , press Main Button to turn on or turn off to set the first reminder alarm.
THE FOUR MEASURING MODES The meter provides you with four modes for measuring: General, AC, PC and QC. Modes General tests AC PC QC Use when any time of day without regard to time since last meal no food intake for at least 8 hours 2 hours after a meal testing with the control solution You can switch between each mode by: 1. Start with the meter switched off. Insert a test strip to turn on the meter. The screen will display a flashing “ ” . 2.
Control Solution Testing Our Control Solution contains a known amount of glucose that reacts with test strips and is used to ensure your meter and test strips are working together correctly. Test strips, control solutions, or sterile lancets may not be included in the kit (please check the contents on your product box). They can be purchased separately. Please make sure you have those items needed for a blood glucose test beforehand.
2. Press Main Button to mark this test as a control solution test With “QC” displayed, the meter will not store your test result in memory. If you press Main Button again, the “QC” will disappear and this test is no longer a control solution test. WARNING: When doing the control solution test, you have to mark it so that the test result will not be stored in the memory. Failure to do so will mix up the blood glucose test results with the control solution test results in memory. 3.
Out-Of-Range Results If you continue to have test results fall outside the range printed on the test strip vial, the meter and strips may not be working properly. Do NOT test your blood. Contact your local customer service or place of purchase for help. NOTE: The control solution range printed on the test strip vial is for control solution use only. It is not a recommended range for your blood glucose level. See the Meter Maintenance section for important information about your control solutions.
TESTING WITH BLOOD SAMPLE Warning: To reduce the chance of infection: Never share a lancet or the lancing device. Always use a new, sterile lancet. Lancets are for single use only. Avoid getting hand lotion, oils, dirt, or debris in or on the lancets and the lancing device. Preparing the Lancing Device for Blood Testing Please follow the instructions in the lancing device insert for collecting a blood sample.
Fingertip testing Press the lancing device’s tip firmly against the lower side of your fingertip. Press the release button to prick your finger, then a click indicates that the puncture is complete. Blood from sites other than the fingertip Replace the lancing device cap with the clear cap for AST. Pull the cocking control back until it clicks. When lancing the forearm, upper arm, hand, thigh, or calf, avoid lancing the areas with obvious veins because of the risk of excessive bleeding.
Alternative Site Testing You can test on a variety of locations on your body. Upper Arm Forearm Thigh Calf Suggested Test Areas for the Hand Important: There are limitations with AST (Alternative Site Testing). Please consult your health care professional before you perform AST. When to use AST? Food, medication, illness, stress and exercise can affect blood glucose levels. Capillary blood at the fingertip reflects these changes faster than capillary blood at other sites.
Performing a blood glucose test You will need: 1. Meter 2. Test Strip 3. Lancing Device 4. Lancet 1. Insert the test strip to turn on the meter Wait for the meter to display the “ ” . 2. Select the appropriate measuring mode by pressing M. For selecting the measurement mode, please refer to the “FOUR MEASURING MODES” section. 3. Obtaining a blood sample Use the pre-set lancing device to puncture the desired site. Wipe off the first appeared drop of blood with a clean cotton swab.
4. Apply the Sample Gently apply the drop of blood to the absorbent hole of the test strip at a titled angle. Confirmation window should be completely filled if enough blood sample has been applied. Do NOT remove your finger until you hear a beep sound. NOTE: Do not press the punctured site against the test strip or try to smear the blood. If you do not apply a blood sample to the test strip within 3 minutes, the meter will automatically turn off.
6. Remove the used test strip Remove the test strip by hand, throw the strip into a disposal container. The meter will turn itself off automatically after the test strip is removed. Always follow the instructions in the lancing device insert when removing the lancet. WARNING: The used lancet and test strip may be biohazards. Please discard them carefully according to your local regulations.
METER MEMORY The meter stores the 450 most recent blood glucose test results along with respective dates and times in its memory. To enter the meter memory, start with the meter switched off. Reviewing Test Results 1. Press and release Main Button will appear on the display. Press Main Button again, and the first reading you see is the last blood glucose result along with date, time and the measurement mode. (300 mg/dL = 16.7 mmol/L) 2.
Reviewing Blood Glucose Day Average Results 1. Press and release Main Button. When appears on the display, keep pressing Main Button for 3 seconds until the flashing “ ” appears. Release Main Button and then your 7-day average result measured in general mode will appear on the display. (58 mg/dL = 3.2 mmol/L) 2. Press Main Button to review 14-, 21-, 28-, 60- and 90- day average results stored in each measuring mode in the order of Gen, AC, then PC. 3. Exit the meter memory.
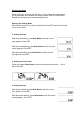
Downloading Results onto a Computer Data Transmission Via Bluetooth You can use your meter and Health Care Software System to view your test results on your personal computer. To learn more about the Health Care Software System, please contact local customer services or the place of purchase for assistance. 1. Obtaining the required cable and installing the software To download the Health Care Software System, please visit the TaiDoc’s website: www.taidoc.com 2.
MAINTENANCE Battery Your meter comes with a built-in rechargeable Li-polymer battery. Low Battery Signal The meter will display one of the messages below to alert you when the meter power is getting low. The symbol appears with E-b and : The power is not enough to do a test. Please recharge the battery immediately. Battery Recharge 1. Connect the USB cable to the USB port of the meter. 2. Connect the other end of cable to a free USB port on your personal computer. 3.
Caring for Your Meter To avoid the meter and test strips attracting dirt, dust or other contaminants, please wash and dry your hands thoroughly before use. Cleaning 1. To clean the meter exterior, wipe it with a cloth moistened with tap water or a mild cleaning agent, then dry the device with a soft dry cloth. Do NOT rinse with water. 2. Do NOT use organic solvents to clean the meter. Meter Storage Storage conditions: -20oC to 60oC (-4oF to140 oF), below 95% relative humidity.
Important Control Solution Information Use only our control solutions with your meter. Do not use the control solution beyond the expiry date or 3 months after first opening. Write the opening date on the control solution vial and discard the remaining solution after 3 months. It is recommended that the control solution test be done at room temperature 20°C to 25°C (68°F to 77°F). Make sure your control solution, meter, and test strips are at this specified temperature range before testing.
SYSTEM TROUBLESHOOTING If you follow the recommended procedure but the problem persists, or error messages other than the ones below appear, please call your local customer service. Do not attempt to repair the meter yourself and never try to disassemble it under any circumstances. Result Readings MESSAGE WHAT IT MEANS < 20 mg/dL (1.1 mmol/L). 20 - 69 mg/dL(1.1 and 3.8 mmol/L) 70 - 129 mg/dL 70 - 119 mg/dL 70 - 179 mg/dL (3.9 – 7.2mmol/L) (3.9 -9.9 mmol/L). (3.9 -6.6 mmol/L).
Error Messages MESSAGE WHAT IT MEANS Appears when the battery cannot provide enough power for a test. WHAT TO DO Recharge the battery immediately. Appears when a used test strip is inserted. Repeat test with a new test strip. If the error message re‐appears, please contact your local customer service agent for help. The temperature of the environment, meter, or test strip is outside the system’s operating range.
Troubleshooting 1. If the meter does not display a message after inserting a test strip: POSSIBLE CAUSE WHAT TO DO Battery exhausted. Recharge the battery. Test strip inserted upside down or incompletely. Insert the test strip with contact bars end first and facing up. Defective meter or test strips. Please contact customer services. 2. If the test does not start after applying the sample: POSSIBLE CAUSE WHAT TO DO Insufficient blood sample.
DETAILED INFORMATION The meter provides you with plasma equivalent results. Time of day Normal plasma glucose range for people without diabetes (mg/dL) Fasting and before meal < 100 mg/dL (5.6 mmol/L) 2 hours after meals < 140 mg/dL (7.8 mmol/L) Source: American Diabetes Association (2010). Clinical Practice Recommendations. Diabetes Care, 33 (Supplement 1): S1–S100. Please consult your doctor to determine a target range that works best for you.
SYMBOL INFORMATION Symbol Referent In vitro diagnostic medical device Do not reuse Consult instructions for use Keep away from sunlight Keep dry Temperature limitation Use by/ Expiry date Use within three months after first opening Batch code Manufacturer Serial number Caution, consult accompanying documents Authorised representative in the European Community Sterilised using irradiation Do not use if package is damaged CE mark
SPECIFICATIONS Model No. : TD-4283 Dimension & Weight: 93.03mm (L) x 26.03 mm (W) x 5.57 mm (H), 27.2g (without battery) Power source: Li-Polymer battery Display: LCD Memory: 450 measurement results with date and time External output: Bluetooth Automatic detection of electrode insertion Automatic reaction time count-down Automatic blood detection Temperature warning Operating condition: 10°C to 40°C (50°F to 104°F), below 85% R.H. Storage/transport conditions: -20°C to 60°C (-4°F to 140°F), below 95% R.H.
FEDERAL COMMUNICATIONS COMMISION (FCC) STATEMENT 15.21 You are cautioned that changes or modifications not expressly approved by the part responsible for compliance could void the user’s authority to operate the equipment. 15.105(b) Federal Communications Commission (FCC) Statement This equipment has been tested and found to comply with the limits for a Class B digital device, pursuant to part 15 of the FCC rules.