Version 2 2006/07/04
Table of Contents BEFORE YOU START 04 Warnings and Precautions 04 Intended Use Health Information 05 06 ABOUT THIS SYSTEM 08 Content of the System Device Overview 08 09 Button Function & Pressure Cuff 11 LCD Display Description 13 Test Strip Description 14 PREPARATIONS BEFORE USE 16 Battery Installation and Replacement 16 Setting the Monitor 18 HOW TO MEASURE BLOOD GLUCOSE 20 Important Information and Possible Interferences 21 Coding the Monitor Checking the Code 22 23 Testing Wi
Deleting memory HOW TO TAKE CARE OF YOUR MONITOR 39 40 Cleaning 40 Storage 40 ERROR MESSAGE 41 TROUBLESHOOTING 42 SPECIFICATIONS 44 SYMBOLS INFORMATION 45 * Before testing, please read all instructions and practice the test. * Be sure to keep this manual for future reference.
BEFORE YOU START Warnings and Precautions The CLEVER CHEK TD-3250 System is designed for use on individuals age 16 and above. It shall NOT be used: 1. to diagnose newborns with diabetes. 2. on infants or persons who cannot communicate. This device does not serve as a cure of any symptoms or disease. The data measured are only for reference. Always consult your physician to have the results interpreted.
BEFORE YOU START Intended Use What it is: The CLEVER CHEK TD-3250 system is a 2 in 1 system designed to measure blood glucose outside of human body and to measure blood pressure non-invasively. The system performs only one function at a time to avoid any interference problems. The system consists of the CLEVER CHEK TD-3250 monitor, test strips, and check & code strip. The system also comes with control solutions for quality control. How it works: Blood glucose is tested using an Amperometric Biosensor.
BEFORE YOU START Health Information Blood Glucose Blood glucose monitoring plays an important role in diabetes control. A long-term study shows that keeping blood glucose levels close to normal can reduce the risk of diabetes complications by up to 60 %.* The results you get with the CLEVER CHEK TD-3250 can help you and your healthcare professional monitor and adjust your treatment plan to gain better control of your diabetes.
Blood Pressure Clinical studies show that the adult diabetes is often accompanied by elevated blood pressure. People with diabetes can reduce their heart risk by managing their blood pressure along with diabetes treatment*. Knowing your routine blood pressure trend tells whether your body is in good condition or not. Human blood pressure naturally increases after reaching middle age. This symptom is a result of continuous aging of the blood vessel.
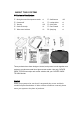
ABOUT THIS SYSTEM Content of the System 1 2 3 4 5 Blood glucose and blood pressure monitor x1 Pressure cuff Test strip x1 X25 Check & code strip X1 Taidoc control solutions X2 6 7 8 9 Sterile lancets X25 Lancing device Quick guide x1 x1 User’s manual x1 Sporty bag x1 These products have been designed, tested, and proven to work together as a system to produce accurate blood glucose test results.
8
ABOUT THIS SYSTEM Device Overview Three subtype of TD-3250 were developed and the difference of function among them is simply in data transmission. Subtype of TD-3250 TD-3250A Data transmission function No, you can only view results on the monitor itself. Yes, you can view results on the PC through TD-3250B cable connection. Yes, you can view results on the PC through TD-3250C wireless connection using Bluetooth technology. Five features are included in TD-3250: Feature 1.
Feature 2. Blood pressure test: Button is the ONLY button you need when measuring blood pressure. For detailed procedures, please see page 32. This is also the main power button of this monitor. When the monitor is on, no matter what function it is in, pressing Button will turn it off instantly. Note: If you insert test strip during blood pressure test, there will be no action. 9 Feature 3. Memory recall M Button helps you when you want to see previous data. For detailed procedures, please see page 37.
Feature 6. Wireless connection BT Button and Bluetooth indicator, only in model TD-3250C, assist you to transmit data wirelessly. For detailed procedures, please see page 38.
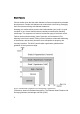
ABOUT THIS SYSTEM Button Function & Pressure Cuff LCD Display Test results are displayed with symbols and simple messages.
12
ABOUT THIS SYSTEM LCD Display Description 13
ABOUT THIS SYSTEM Test Strip Description Your system measures the amount of sugar (glucose) in whole blood. Blood is applied to the absorbent hole of the test strip and is automatically drawn into the reaction chamber where the reaction takes place.
Important usage information When you get a new vial of test strips: Check the expiry date on the vial. Do not use test strips beyond the expiry date since they may cause inaccurate results. Write the discard date on the vial when you first open it. When you use a test strip: Touch the test strip with clean and dry hands. Tightly close the vial cap immediately after removing a test strip. Use each test strip immediately after removing it from the vial. Do not bend, cut or alter a test strip in any way.
PREPARATIONS BEFORE USE Battery Installation and Replacement Your monitor comes with batteries already installed. When replacing, use ONLY 1.5V AA size alkaline batteries for best performance and longest life. Low Power Signal The monitor will remind you when the power is getting low by displaying two different messages: 1. Battery Symbol appears while you perform tests. (Fig. 1) This means it is about time to change the batteries although still 30 more measurements can be made. (Fig. 1) 2.
Battery Replacement To replace the batteries, make sure the monitor is turned off. Step1- Press the edge of the battery cover and pull up. (Fig. 3) Lift the battery cover and remove the batteries inside. (Fig. 3) Step2- Insert four 1.5V AA size alkaline batteries. Make sure the + (positive) and –(negative) marks match as indicated in the battery compartment. (Fig. 4) If (Fig. 4) inserted correctly, you will hear a "beep". Caution! Do not use different type, date or brand name batteries together.
PREPARATIONS BEFORE USE Setting the Monitor Your monitor comes with the time, date, and units preset. These options may be changed any time to fit your needs. They also need to be set again when you change the batteries. How to set the monitor? Step 1- Start with the meter turned off. Press the "S" button to enter the Setting Mode. Step 2- Select and make changes. Press the "S" button to select what you would like to change. The selected one will be flashing. Press the "M" button to make the change.
While setting is completed After choosing the units of glucose measurement, press “S” Button to save the settings and turn off the monitor. (Fig. 7) (Fig. 7) You may also press the Setting Mode.
HOW TO MEASURE BLOOD GLUCOSE Is your monitor all set? Refer to page 16 to replace the batteries and set the monitor. Refer to page 22 to code the Measure blood glucose. Refer to page 27 to get a drop of blood. Refer to page 29 to take a reading. monitor. Store your monitor carefully. Refer to page 39 for how to take care of your monitor. Turn the monitor off by removing the test strip. And then you can: Check the memory (refer to page 37). Perform blood pressure test (refer to page 32).
HOW TO MEASURE BLOOD GLUCOSE Important Information and Possible Interferences Important Information: Test results below 3.3mmol/L (60mg/dL) indicate hypoglycemia, which means abnormally low glucose level. If higher than 13.3mmol/L (240 mg/dL), symptoms of hyperglycemia might occur. Consult your physician when a result above occurs.
HOW TO MEASURE BLOOD GLUCOSE Coding the Monitor You must code the monitor every time you begin to use a new vial of test strips. Test results may be inaccurate if the code number displayed on the monitor does not match the number printed on the strip vial. Step 1- Insert the check & code strip when the monitor is off. Wait until the code number appears on the LCD display. (Fig 8) Make sure the code number on LCD display, on check & code strip, and on strip vial are the same. (Fig.
HOW TO MEASURE BLOOD GLUCOSE Checking the Code When you start measuring blood glucose, check the code number first. Step1- With the monitor off, insert a test strip into the Test Slot. Make sure you insert the end with the contact bars first and facing up. Contact bars must be inserted all the way into the monitor for an accurate result. (Fig. 9) (Fig. 9) Step2- The monitor will display “CHK” and the strip symbol. (Fig. 10) In about 1 second, the ambient temperature will be shown (Fig. 11). (Fig.
HOW TO MEASURE BLOOD GLUCOSE Testing with Control Solution What is a control solution test? The control solution contains a known amount of glucose that reacts with test strips. Compare your control solution test results with the expected range printed on the test strip vial label. This enables you to check if the monitor and the test strips are working together properly, and that you are performing the test correctly.
How to do a control solution test? Step 1- Insert a test strip and check if the code number shown on LCD display is the same as the code on the strip bottle. Step 2- Press the M Button. The symbol "CtL" will appear on the display. When you do this, control solution readings will not be stored in the memory. Step 3- Get a drop of control solution: 1. Shake the control solution vial well. 2. Remove the cap. Squeeze the vial and discard the first drop with a clean tissue to ensure an accurate result. (Fig.
What to do if out-of-range results appear? If test results fall outside the range printed on the test strip vial, repeat the test. Out-of-range results may be caused by one or more of the following: Error in performing the test. Not shaking the control solution vial vigorously. Control solution too warm or too cold. Expired or contaminated control solution. Improper coding of the monitor. Test strip deterioration. Monitor malfunction.
HOW TO MEASURE BLOOD GLUCOSE Getting a Drop of Blood Be sure to read this section and the test strip package insert found in the test strip box carefully before testing. Make sure you have all items needed to test: monitor, test strips, lancing device, and sterile lancet. Step 1- Insert a lancet in the adjustable lancing device. Twist and remove the cap of lancing device. Insert a lancet into the lancet holder and push down firmly until it is fully seated. (Fig. 15) (Fig.
Step 4- Wash your hands. Use warm and soapy water to wash your hands. Rinse and dry thoroughly. Clean the puncture site with 70% alcohol cotton and leave it dry completely. Step 5- Select a puncture site on fingertip. Hold the lancing device firmly against the side of your finger. (Fig. 19) Press the release button. You will hear a click, indicating that puncture is complete. (Fig. 19) Step 6- Obtain the required blood sample (1.8 microlitre in volume). Gently massage the chosen area to get enough blood.
HOW TO MEASURE BLOOD GLUCOSE Taking a Reading Step 1- Insert a test strip and check if the code number shown on LCD display is the same as the code on the strip vial. If not, please refer to “Coding the monitor”. Step 2- Obtain a drop of blood as described in “Getting a Drop of Blood”. Step 3- When the “ “ symbol is flashing on the LCD display, apply the drop of blood to the absorbent hole of the test strip. (Fig. 21) Do not push your finger against the test strip or try to apply a smeared sample. (Fig.
Ketone Warning: When your test reading is ≧240 mg/dL(13.3 mmol/dL), “KETONE" will appear on the LCD display. Ketone is a byproduct produced as the body burns fat for energy when there isn't enough insulin present for the metabolism of glucose. Ketone accumulation in the blood may lead to a dangerous condition known as diabetic ketoacidosis (DKA). High blood glucose is a symptom of insufficient insulin for people with type 1 diabetes.
HOW TO MEASURE BLOOD GLUCOSE Comparing With Laboratory Results Results obtained from your monitor may differ somewhat from your laboratory result due to normal variation. Monitor results can be affected by factors and conditions that do not affect laboratory results in the same way. Blood glucose levels can change significantly over short periods, especially if you have recently exercised, eaten, taken medication, or experienced stress.
HOW TO MEASURE BLOOD PRESSURE Is your monitor all set? Refer to page 16 to replace the batteries and set the monitor. Measure blood pressure. Refer to page 34 for applying the pressure cuff. Refer to page 35 for proper measurement position. Refer to page 36 for taking a reading Store your monitor carefully. Turn the monitor off by pressing the Refer to page 39 for how to take care of your monitor. button.
HOW TO MEASURE BLOOD PRESSURE Suggestions before Measuring Avoid caffeine, tea, alcohol, and cigarette at least 30 minutes before measurement. Wait 30 minutes after exercising or bathing before measurement. Sit or lie down for at least 10 minutes before measuring. Do not measure when feeling anxious or tense. Take a 5-10 minute break between measurements. This break can be longer if necessary, depending on your physical conditions Keep the records for your physician as reference.
HOW TO MEASURE BLOOD PRESSURE Applying the Pressure Cuff Step 1- Connect the air plug of the tubing to the air jack at the side of the monitor. (Fig.24) (Fig. 24) Step 2- Assemble the cuff as Figure 25. The smooth cloth is on the inside of the cuff loop and the metal D-ring will not touch your skin. (Fig. 25) Step 3- Hold your left arm in front of you with your palm facing up. Slide the cuff onto your left arm, above your elbow. The red line on the edge of the cuff should be approximately 0.8 to 1.
HOW TO MEASURE BLOOD PRESSURE Proper Measurement Position Please sit and take a rest at least 10 minutes before measuring. Step1- Place your elbow on a table or other object. Relax your hand with the palm facing up. (Fig 27) Step2- Relax and make sure the cuff is at the same height as your heart. Press the button. Remain still and do not talk or move during the measurement. (Fig. 27) WARINING! It is extremely important that the cuff is at the same level of the heart.
HOW TO MEASURE BLOOD PRESSURE Taking a Reading Read "Suggestions before Measuring" and "Applying the Pressure Cuff" before taking a reading. Always apply the pressure cuff before turning on the device. button. All the LCD display symbols will Step 1- Press the appear with a long “beep” sound (Fig. 28). Then cuff begins to inflate automatically. (Fig. 28) Step 2- After the cuff pressure is reached, the cuff begins to deflate.
HOW TO USE THE MEMORY FEATURES Viewing Memory in the Monitor Your monitor stores the most 352 recent results of blood glucose and pressure with date and time in its memory. You can review the test results in memory with these easy steps. Step 1- When the monitor is off, press the M Button once. You will see the average of the blood glucose results. (Fig. 31) (Fig. 31) Step 2- Press M Button again to recall the readings measured previously.
HOW TO USE THE MEMORY FEATURES Viewing Results on a Personal Computer Results in memory can be transmitted to the personal computer either by cable or by wireless connection for model TD-3250B or TD-3250C, respectively. Accessories needed to activate this function are: Health Management Software: is able to download from Taidoc website. Interface Cable: an optional accessory for model TD-3250B. Bluetooth Adapter: an optional accessory for model TD-3250C.
HOW TO USE THE MEMORY FEATURES Deleting Memory To clear the memory, with the monitor turned off, press and hold the M Button for 3 seconds. “CLr/ALL” then appears and indicate that ALL the memories stored in the monitor will be cleared.
HOW TO TAKE CARE OF YOUR MONITOR Cleaning To clean the monitor exterior, wipe with a cloth moistened with tap water or a mild cleaning agent, then dry the device with a soft and dry cloth. Do not flush with water. Do not use organic solvents to clean the monitor and cuff. The cuff can be cleaned by wiping with a moistened cloth and soap. Do not immerse in water. Storage Storage conditions: -20oC-60oC, 10%-95% relative humidity. Always use the storage box provided with the monitor to transport or store it.
ERROR MESSAGE Please check the chart below for problems you can fix at home without tools. If you follow “What to Do” but the problem still exists, please contact Customer Care Line: (703) 591-4934 for help. Message Cause Err.00 Weak pulse. Err.02 Monitor can not figure out systolic pressure. Err.04 Monitor can not figure out diastolic pressure or it is out What to Do Refit cuff tightly, relax, and repeat measurement as shown in "Applying the Pressure Cuff". of range. Err.22 Invalid coding.
TROUBLESHOOTING Please check the chart below for problems you may encounter during measurement and what to do. If you follow “What to Do” but the problem still exists, please contact Customer Care Line: (703) 591-4934 for help. Blood Glucose Function If no message appears after inserting a test strip: POSSIBLE CAUSE WHAT TO DO Batteries exhausted. Replace the batteries. Batteries incorrectly installed or absent. Check that the batteries are correctly installed.
Blood Pressure Function Condition Cause What to do No display after pushing Batteries incorrectly installed or absent. Insert the batteries in the correct position. the Batteries exhausted. Replace the batteries. Battery Batteries exhausted. Replace the batteries. symbol appears on Batteries might perform poorly at low Warm up the batteries, or place at a warm place for a while, then temperatures. test again Heart rate Moving during Repeat measurement.
SPECIFICATIONS System performance Power source: Four 1.5V alkaline AA batteries Size of monitor w/o cuff: 137mm (L) x 90 mm (W) x 54 mm (H) Memory: 352 measurement results with date& time Power saving: Automatic power off if idle for 3 minutes System operating condition: 10℃-40℃ (50-104℉), below 85% RH System storage condition: 4℃ to 40℃ (39-104℉), below 85% RH Bluetooth Carrier Frequency 2400MHz to 2483.5MHz Bluetooth Modulation Method GFSK,1Mbps,0.5BT Gaussian Maximum Data Rate Asynchronous:723.2kbps/57.
SYMBOLS INFORMATION Symbol Referent Do not re-use Consult operating instruction Keep away from sunlight Keep dry Temperature limitation Use by Date of manufacture Batch code Type BF Equipment Serial number 45
Federal Communications Commission (FCC) Statement 15.21 You are cautioned that changes or modifications not expressly approved by the part responsible for compliance could void the user’s authority to operate the equipment. 15.105(b) This equipment has been tested and found to comply with the limits for a Class B digital device, pursuant to part 15 of the FCC rules. These limits are designed to provide reasonable protection against harmful interference in a residential installation.
FCC RF Radiation Exposure Statement: This equipment complies with FCC radiation exposure limits set forth for an uncontrolled environment. End users must follow the specific operating instructions for satisfying RF exposure compliance. This transmitter must not be co-located or operating in conjunction with any other antenna or transmitter. Note The changes or modifications not expressly approved by the party responsible for compliance could void the user’s authority to operate the equipment.