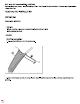
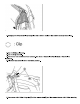
2012 Infinite G37 Convertible (VQ37VHR) Vehicle > Body and Frame > Interior Molding / Trim > Trim Panel > Service and Repair >» Removal and Replacement > Body Side Trim REMOVAL AND INSTALLATION BODY SIDE TRIM Removal and Installation CAUTION: When removing, always use a remover tool that is made of plastic, Never damage the body. REMOVAL FRONT PILLAR GARNISH 1.Release front pillar portion of body side welt. 2.
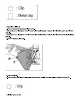
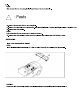
Oh ( ) Clip i 1 1 Metal clip DASH SIDE FINISHER 1.Remove instrument passenger lower cover. See: Dashboard / Instrument Panel > Removal and Replacement > Removal and Installation A/T Models (A/T models). See: Dashboard / Instrument Panel > Removal and Replacement > Removal and Installation M/T Models (M/T models). 2.Remove kicking plate inner. 3.Remove clip (A). 4. Remove dash side finisher fixing clips with a remover tool (B), and then remove dash side finisher (1).
A vo: Pawl & Ain 2.Remove kicking plate inner (1). BODY SIDE WELT 1.Remove kicking plate inner. 2.Remove body side welt. REAR SIDE FINISHER 1.Fully open hard top detractor roof. 2.Fully open trunk lid assembly.
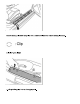
4 Disengage the body side molding fixing clips with a remover tool, and then remove the body side molding. 5.Remove kicking plate inner. 6.Remove body side welt. 7.Remove rear seat cushion and rear setback. See: Seats > Removal and Replacement > Removal and Installation. 8.Slide front seat assembly to the front most position. 9.
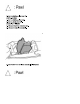
bolt. NOTE: The rear side finisher mounting bolt is located behind the front side clip. ~ : Pawls 4 om 10.Remove the rear side finisher mounting bolt. 11.Remove front seat belt anchor escutcheon. See: Seat Belt Buckle > Removal and Replacement > Exploded View 12.Remove rear side finisher. NOTE: Pull up rear side finisher to remove the dual-lock fastener. 13.Remove rear side finisher bracket mounting bolts and then remove rear side finisher bracket. INSTALLATION Install in the reverse order of removal.