
User's Manual
BOARD OPERATION
Turn on the board by pushing the power (top) switch. The LED will flicker briefly to show the current battery level
and then display the breech status by showing solid or blinking blue.
Turn off the board by pressing and holding the power switch for at least 1 second. The LED will turn off to indicate
the board has shut down.
The eye system is toggled on and off by pressing and holding the eye (bottom) switch. The LED will reflect the eye
status by blinking red when they are turned off.
If used, the eye system cycles the marker as fast as possible. During each shot the eyes watch for the bolt to return,
ending the current firing cycle and starting another as quickly as the pneumatics allow. If the eye system is
continually blocked (e.g., putting your finger in front of the eyes) and is unable to see the bolt return after every
shot, the max rate of fire will be reduced to about 8 balls per second to prevent further chopping, and the LED will
display an eye malfunction by blinking yellow. Firing the marker with paint and air will utilize the eye system
correctly, maximizing the rate of fire.
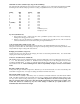
LED INDICATORS
The multi-color LED shows the user battery status, eye status, and is used for the programming menu.
Rapid Blinking Red At startup this indicates an exhausted battery
Rapid Blinking Yellow At startup this indicates a low battery
Rapid Blinking Green At startup this indicates a good battery
Solid Blue Ball in breech, ready to fire
Slow Blinking Blue No ball in breech
Slow Blinking Yellow Eye malfunction, max rate of fire reduced to ~8 bps; clean eyes or make sure the gun is
fired with paint and air
Slow Blinking Red Eyes disabled, rate of fire limited
MENU SYSTEM
The tournament lock must be disabled in order to change settings on the board. Pushing the small switch beside the
color-coded sockets toggles the tournament lock. While the marker is turned off, push and hold the lock button. The
LED will flash red or green to indicate the status of the lock. Red indicates the lock is on, while green indicates the
lock is off. When the lock and the marker are off, pull and hold the trigger, then push the power button. The marker
will boot into programming mode, showing a rainbow sequence before stopping at solid green.
Pulling and releasing the trigger quickly will toggle between the different programming modes:
Green Debounce
Purple Dwell
Yellow Loader delay
Blue AMB (anti-mechanical bounce)
White Fire mode
Teal Fire mode max rate of fire
Flickering Green Eye mode
Flickering Purple CPF (cycle percentage filter)
Flickering Yellow Ramp start
Flickering Blue G mode
Flickering Red Bolt delay
Flickering White PWM dwell
When the LED is lit for the desired setting, press and hold the trigger until the LED goes out. When you release the
trigger, the LED will blink to show the current setting. For example, if the current setting for debounce is 5, the LED
will blink green 5 times. Once the LED stops blinking, you have 2 seconds to begin entering the new setting. To
enter the new setting, pull the trigger the desired number of times. For example, to set the debounce to 2, you must
pull the trigger 2 times. Every time you pull the trigger the LED will light. After all settings have been changed, turn
the marker off, using the power button.