
User Manual


The programming menu system is activated by holding down the trigger while turning the board on. The OLED
display will show “Menu system initiated….” Further details regarding the menu system can be found below.
If selected in the menu system, the game timer will replace the current rate of fire indicator on the OLED display.
The game timer will start after the first trigger pull.
USB
Your Yakuza Series USB board has full USB 2.0 functionality, and works in tandem with the Tengu USB interface,
which can be downloaded online at http://www.tadaotechnologies.com/productcart/pc/viewContent.asp?idpage=15.
Tengu allows you to update the firmware on your board, create and save custom boot screens, modify all the
settings, and more. To run the Tengu interface you need a mini-B USB cable and a PC running Windows XP or
Vista. XP users will also need to download the Microsoft .NET Framework 2.0 or newer. Refer to the Tengu user
guide for information regarding USB installation and using the Tengu USB interface.
OLED DIAGRAMS
The OLED display built into the Yakuza series board shows the user a multitude of information via text and icons.
The software is written with performance in mind, and will not update the screen until the user stops shooting for
just a fraction of a second. This ensures that the screen does not interfere with the timings of the marker.
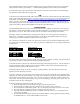
The battery indicator shows battery life by displaying a bar within the icon. The longer the bar, the higher the
battery level. A low battery is reached at approximately 7.5 volts, but if quality alkaline batteries are used, the
remaining power should be adequate for at least one more case of paint.
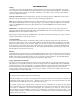
The eye indicator is displayed as a circular icon, which shows when the eyes are blocked or malfunctioning. If the
eye system is off, the indicator displays “off.” If the eye system has a malfunction from not seeing the bolt return, it
will show an X.
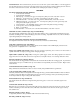
Empty breech: Blocked breech:
Bolt not seen returning: Eyes off:
MENU SYSTEM
The Yakuza menu system allows the user to quickly and easily change a multitude of settings. The text based menu
is much faster and easier to understand than LED based programming modes.
To boot into the menu system the user must hold down the trigger while turning the board on. After the menu boot
message, the displayed setting will be the last one that was modified. If this is the first time the board has been
booted into the menu system, it will show the fire mode.
Scrolling through the settings is done by using the top and bottom buttons. The menu will wrap around to the
beginning when the last setting is reached.
To change a setting the user must quickly press and release the power switch. The OLED screen will reflect this by
displaying “set” in front of the current value. The setting can be modified pressing the top or bottom buttons, which
will increment or decrement the current value. Once you reach its maximum or last value, it will loop back to the
lowest value. After the desired value is displayed, you can save the setting by pressing the power switch. The “set”
designation next to the value will disappear.
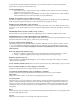
Example of changing the maximum rate of fire from 12 to 20:
1. Boot into programming mode by holding the trigger while turning the board on.
2. The first setting is fire mode. Press the top button one time to advance to max rate of fire.
3. Press and release the middle button quickly. The “set” designation will display next to the current value.
4. Press and release the top button 8 times to increment the value from 12 to 20.
5. Press and release the middle button quickly. The OLED screen will remove the “set” designation from
view and save the setting.
6. Cycle through additional settings using the top and bottom buttons, or exit programming mode by holding
the middle button for 1 second, until the OLED screen turns off.