
Install Instructions


Prepare the Hot-LinkPlus Circulator for Operation:
P
UMP CONTROL OPTIONS:
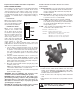
The circulator has a “Mode Select” toggle switch that allows
for 2 operation modes. “Pulse” or “Smart” mode can be
selected using the toggle switch located on the capacitor
base mounted electronic control board (See Fig. 1). A yel-
low LED indicates which mode is selected. All operation is
automatic, no manual timer or temperature setting is
required.
•
“Pulse Mode”
When set for “Pulse” operation,
the circulator will run for 5 min-
utes every 10 minutes to main-
tain hot water at all fixtures.
• “Smart/Learn” Mode
When set for “Smart/Learn”
operation, the circulator will
run in “Pulse” mode as above
for the first 7 days. During this
time, the circulator will monitor
and record the home’s hot
water usage pattern. For the
next 7 days, the circulator will
then use the preceding week’s
usage pattern to cycle the
pump. This process will be repeated every 7 days. The
pump will run in “Pulse” mode from 1 hour before to 1 hour
after each recorded hot water demand.
1. The circulator is shipped from the factory in “Smart”
mode. To switch the pump to “Pulse” mode, remove the
2 capacitor cover screws and cover. Change the posi
tion of the toggle switch on the circuit board to “Pulse”
(see Fig.1 ). Install the capacitor cover and secure the
2 screws.
2. Plug the external temperature sensor connector pro-
vided into the the ”TEMP SENSOR” receptacle on the
side of the capacitor base. Attach the sensor to the hot
water supply pipe downstream of the pump using the
black zip-tie connector provided.
3. Once the system is filled and air is purged, plug in the
circulator power cord.
NOTE: The temperature sensor must be installed and
connected in either “Pulse” or “Smart” mode.
NOTE: The circulator must be installed and supported
by the circulation piping.
WARNING: All local plumbing and electrical codes
should be followed when installing this product.
WARNING: Risk of electrical shock. This pump is sup-
plied with a grounding conductor and grounding-type
attachment plug. To reduce the risk of shock, be cer-
tain that it is connected only to a properly grounded
grounding-type receptacle.
CAUTION: Do not plug in the circulator power cord until
the system is filled with water and purged of air.
OTHER SPECIAL FEATURES OF THE Hot-LinkPlus
C
IRCULATOR:
1. Vacation Function - If no hot water usage is detected for
36 hours, the pump will remain off until hot water
usage is detected. Once detected, the pump will
resume operation.
2
. Exercise Function - While in vacation mode, the pump
will come on every 7 days and run for 10 seconds
t
o prevent corrosion or scale buildup.
3. Power Outage - When power is restored, pump will
revert to its mode setting, either “Pulse” or “Smart.”
If in “Smart” mode, previously recorded data will not
be saved and the pump will begin a new 7-day
usage learning cycle.
4. LED - The circulator is provided with 3 LED’s located
on the side of the capacitor base.
Green LED - Illuminated - Power on.
Yellow LED - Flashing - Pump in “Pulse” mode.
I
lluminated (not flashing) - Pump is in “Smart” mode.
Red LED - LED off - Sensor is connected properly.
LED flashes once every 5 seconds - Shorted sensor.
LED flashes twice every 5 seconds - Open
sensor.
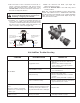
Installing the Hot-Link Valve:
1. Select the hot water faucet furthest from the water
heater. If your plumbing system branches in two differ-
ent directions, another Hot-Link Valve may need to be
installed at the end of each run.
2. Shut off the hot and cold angle stop valves below the
sink.
3. Open the hot and cold faucets to purge water from the
lines.
CAUTION: Do not use pipe dope or teflon
tape on the valve body threads.