
Install Instructions

7
Installation
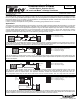
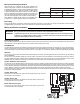
1. Mounting position – Circulator must be mounted with the motor in a horizon-
tal position. It may be mounted vertically with the motor up, provided that the
system pressure is at least 20 psi (138 kPa).
2. Rotating body – Body has an arrow on the front that indicates direction of flow.
To rotate body, remove the four body bolts, rotate body and replace bolts.
Make sure that the junction box is NOT located underneath the circulator.
(The junction box must NOT be located in the 6 o’clock position, as viewed
from the motor end.)
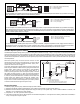
3. Electrical connections – Observe all applicable codes when connecting to power supply. The motor is impedance protected, and
does not require overload protection.
The pump cannot run backwards.
4. Fill system with tap water – The system must be filled before operating the circulator. The bearings are water lubricated and should
not be allowed to operate dry. Filling the system will result in immediate lubrication of the bearings. It is always good practice to
flush a new system of foreign matter before starting the circulator.
5. Circulator operation – Operate the circulator for 5 minutes immediately after filling system to purge remaining air from the bearing
chamber. This is especially important when installing the circulator during the off-season.
Replacing Cartridge Assembly
1. Disconnect the electrical supply.
2. Reduce system pressure to 0 psi and allow system to return to room temperature. Isolate the circulator by closing the service valves
or draining the system.
3. Remove the body bolts and swing motor assembly away from the body.
4. Pull cartridge out of the motor housing.
5. Install replacement cartridge, making sure that the cover plate is between the cartridge flange and motor.
6. Make sure the replacement cartridge corresponds to the full circulator product number. A complete parts list is available from your
local plumbing supply wholesaler.
7. Reassemble the circulator using the new gasket and bolts supplied.
8. Follow the “Installation” procedure to start up the circulator.
Replacing Integral Flow Check (IFC) Assembly (if applicable)
1. Disconnect the electrical supply.
2. Reduce system pressure to 0 psi and allow system to return to room temperature. Isolate the circulator by closing the service valves
or draining the system.
3. Remove the body bolts and swing motor assembly away from the body.
4. Remove IFC, using needle nose pliers.
5. Install replacement IFC by pressing valve into casing until it is firmly seated.
6. Reassemble the circulator using the new gasket and bolts supplied.
7. Follow the “Installation” procedure to start up the circulator.
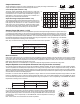
Replacing Circuit Board
1. Disconnect the electrical supply and all field wiring to the circuit board.
2. Unplug the 3-pin plastic connector that connects the motor to the circuit board.
3. Bend the lip of the capacitor base to ease the removal of the circuit board. Pull the circuit board up and out.
4. Reverse directions to install the new circuit board.
CAUTION:
1. The addition of petroleum based fluids or certain chemical additives to systems utilizing
TACO equipment voids the warranty.
2. Use supply wires suitable for 90°C.
CAUTION: Installations at higher elevations over 5000 feet must have higher fill pressure of 20 psi minimum to
prevent pump cavitation and flashing. Premature failure may result. Adjust expansion tank pressure to
equal fill pressure. A larger size expansion tank may be required.
ATTENTION: Employer des fils d´alimentation adequats pour 90°C.
WARNING: To avoid electrical shock, disconnect the power supply to the circulator and the main electrical unit.