
Installation Guide


4
Installation: (B-1200)
1. Turn off water supply and drain
lines. Hand tighten no.12 fi rmly
against no.6 and remove no.13 from
no.11.
12
Installation: (B-1210)
1. Turn off water supply and drain
lines.
2. Unscrew and remove no.16 and
no.17 from no.14. Position no.15 to
cover threads of no.14.
3. Place no.14 through 7/8” hole in
countertop. Replace no.16 and no.17
onto no.14 and tighten with a wrench
at bottom side of countertop.
11
13
2. Drill 7/8” hole in sheet metal.
Insert no.6 through hole and screw
no.13 on back of no.6, leaving no.12
free to turn.
3. Apply tefl on tape or pipe joint
compound to threads of water supply
line. Connect no.6 to water supply
line outlet, tightening as far as pos-
sible.
4. Tighten no.12 and no.13 so they
are fl ush against surface of sink back.
5. Turn on water supply and check
for leaks.
Flow Adjustment:
To adjust water fl ow, use included
T-45 Torx wrench & inserting it into
no.20 turn clockwise to increase
water fl ow, turn counterclockwise to
reduce water fl ow.
14
15
17
16
4. Apply tefl on tape or pipe joint
compound to threads of no.14,
connect to water supply line inlet.
5. Turn on water supply and check for
leaks.
To adjust water fl ow see fl ow
adjustment note for B-1200 model.
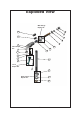
6
General Instructions
sink back
6
20
20