
Installation Guide
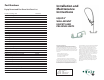

Instructions Instructions
STEP 1
STEP 2
STEP 3
STEP 12
STEP 12
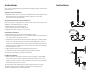
wall or
backsplash
B-0230-K
inlet kit
(available
separately)
Note: If unit is equipped with a rigid or swivel spout/gooseneck, install spout/
gooseneck rst.
Rigid Gooseneck Installation:
1. Apply Te on tape, Loctite, or pipe joint compound to threads of gooseneck.
Thread gooseneck into outlet hole of body until joint is secure and
gooseneck faces desired direction.
Swing Nozzle/Swivel Gooseneck Installation:
Note: Silicon grease is applied to the interior swivel cavity of the body prior to
shipment. No additional grease is required.
2. Remove plastic cap from body outlet.
3. Insert nozzle/gooseneck into body cavity.
4. Tighten swivel lock nut using 1 5/16” wrench.
Faucet Body Installation:
5. Flush debris from water lines then shut o water supply.
6. Drill two holes, approximately 1” to 1-1/4” diameter, in wall or backsplash of
sink. Holes must be 8” between centers.
7. Install washers and nuts onto B-0230-K supply elbow kits, or similar ½” NPT
inlets, as far onto threaded ends as possible. Apply Te on tape or thread
sealant to ½“ NPT threads of these ends and pass through from back side of
wall openings. Thread elbow ends into the inlet holes of the faucet anges
until the joints are secure.
8. Apply plumbers putty to faucet ange mounting surfaces.
9. Secure faucet in place with supply elbow kit washers and nuts.
10. Connect water supplies to other end of elbows.
Pre-Rinse Installation:
11. After installation of the faucet body per steps 5 through 10, apply Te on
tape, Loctite, or pipe thread compound on the bottom of the riser. Slide
nger hook onto riser before riser installation. Thread riser into outlet hole
of faucet body until joint is secured.
12. Install wall bracket and nger hook, tightening all fasteners securely.
13. Rotate spring and hose assembly until they face desired direction.
14. Turn on water supplies and check for leaks.