
Mounting Instruction

Thomann GmbH · Hans-Thomann-Straße 1 · 96138 Burgebrach · Germany · www.thomann.de
DocID: 340340_493134_19.03.2021
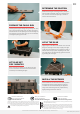
While determining the mounting positions, it helps to
mark the walls and ceiling using a level and tape mea-
sure, in order to achieve even spacing in relation to
corners and sound sources.
DETERMINE THE POSITION
Before mounting the diuser on the wall, let the glue
set for 5 minutes on the element. This ensures that it
can develop its full holding strength.
LET GLUE SET
FOR 5 MINUTES
Apply the glue to the back of the diusor in an even line
along the outer edge. It also helps to apply some glue
to the center of the diusor in an X pattern, in order to
hold the center rmly in place. Depending on the condi-
tion of the walls, we recommend using a generous amount
of glue along the outer edges.
APPLY THE GLUE
Press the diuser onto the wall in the marked position
and apply even pressure along the lines of glue for
2 minutes. We recommend checking the alignment
using a level and making necessary adjustments by
slightly rotating the element. That’s it!
INSTALL THE DIFFUSER
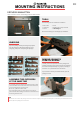
Carefully open the glue cartridge using a utility knife. Take
care to move the knife away from your body. Thread the
included nozzle onto the opening. Insert the cartridge into
the caulk gun. For thicker lines of glue, you can use the knife
to enlarge the opening of the nozzle.
PREPARE THE CAULK GUN
EN
This product is intended to be used to optimise the room acoustics. Any other use or use un-
der other operating conditions is considered to be improper and may result in personal inju-
ry or property damage. No liability will be assumed for damages resulting from improper use.
Ensure that plastic bags, packaging, etc. are disposed of properly and are not within
reach of babies and young children. Choking hazard!
When opening the glue cartridge using a knife or a cutter, pay attention not to injure
your ngers/hands. Risk of cutting!
For the transport and protective packaging, environmentally friendly materials have
been chosen that can be supplied to normal recycling. Ensure that plastic bags, pa-
ckaging, etc. are properly disposed of. Do not just dispose of these materials with
your normal household waste, but make sure that they are collected for recycling.
Please follow the notes and markings on the packaging.
Find more solutions for
your room on our website:
www.takustik.com
Share your installation
with us on Instagram:
www.takustik.com/instagram
Find more installation
guides on YouTube:
www.takustik.com/youtube