
WCS-232_v6.0_User Manual_Eng_DM v1.0.1


WCS-232 v6.0
User Manual
17
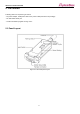
3.8 Pairing Button
3.8.1 1:1 Connection
WCS-232 can be automatically connected with a pairing button without a PC. In this manual, a pair of WCS-232 is
marked as WCS-232#1 and WCS-232#2 for a convenience of explanation.
*The pairing button only operates in single connection mode.
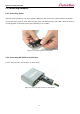
Step1. Turn WCS-232#1 and WCS-232#2, press the reset button for more than 2 seconds for factory reset. Mode
LED turns on.
Step2. Press the pairing button of WCS-232#1 and WCS-232#2 for more than 2 seconds. The Mode LED flashes
green 3 times every 3 seconds. Check it and leave the power on.
Step3. Press the pairing button of WCS-232#2 once again for more than 2 seconds and check if the Mode LED
flashes every 1 second.
Step4. Once connected, the Connect LED of WCS-232#1 and WCS-232#2 flashes once every 1 second. In this
state, wait for WCS-232#1 and WCS#2 connection. In normal cases, the connection takes within 30 seconds.
However, it may take more time depending on the surrounding wireless environment.
Step5. Not a pair of WCS-232 are set to always-auto connect status. You can plug two WCS-232s into each host
devices such as a virtual serial cable.
*Caution: When connecting using the pairing button, response function sending messages such as OK, ERROR,
CONNECT and DISCONNECT will be deactivated.
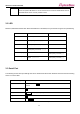
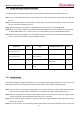
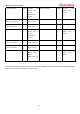
WCS-232#1
Status
LED
WCS-232#2
Status
LED
1. Press the reset
button for more than
2 seconds
Mode 0
Mode LED turns on
1. Press the reset
button for more
than 2 seconds
Mode 0
Mode LED turns on
2. Press the pairing
button for more than
2 seconds
Mode 3
Mode LED flashes 3
times every 3 seconds
2. Press the pairing
button for more
than 2 seconds
Mode 3
Mode LED flashes 3
times every 3 seconds
3. Re-press the pairing
button for more
than 2 seconds
Mode 1
Mode LED flashes
every 1 second
4. Connection
complete
Slave
Connect LED flashes
every 1 second
4. Connection
complete
Master
Connect LED flashes
every 1 second
Table 0-6 Connection process using pairing button