
HandBook F R60K2022 07 11


23/59 | F-R60K
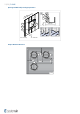
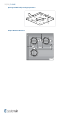
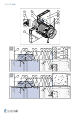
Installation ON a Ceiling
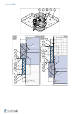
Rigid Ceiling, Floor
IMPORTANT: The insulation ring cannot be delivered separately! The insulation ring is delivered pre-mounted on a
damper.
1. The supporting construction opening must be prepared as depicted in wall preparation. Opening surfaces must be
even and cleaned off.
2. The opening dimension D1 is driven by the nominal dimensions of the damper with added clearance.
3. Insert the duct into the opening with its end flush with the supporting construction on the side where the fire
damper will be mounted.
4. Apply glue (F4) to segments of mineral wool (F3). Fill the opening with segments of mineral wool (F3) with
density at least 100 kg/m^3 to create filling between duct and wall.
5. Bend outwards hangers on the metal sheet covering ring.
6. Apply a suitable fire resistive caulk (F2) to the fire damper insulation ring on the wall connection side.
7. Insert the damper into the duct and fix the insulation ring through bendable hangers to the wall with screws (F1)
into the wall beams or with plugs for gypsum boards.
8. If needed, uncover and clean the damper after installation.
9. Check the damper’s functionality
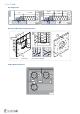
Installation Distances
According to the standard EN 1366-2, the minimum distance from the wall or ceiling to the duct holding the fire
damper is 75 mm. For multiple crossings through a fire resistive wall the minimum distance between the duct opening
is 200 mm. This applies for distances between the duct holding the damper and a nearby foreign object crossing the
fire-resistive wall.
ON
F-R60K
DN100 ... DN630
EI 60 (h
o
- i ↔ o) S
c)
≥ 100 mm
≥ 620 kg/m
3
Notes:
c) - Concrete/cellular concrete (rigid) floor/ceiling
d) - Shaft wall - one side covered with 2 layers of gypsum board
h
o
- Horizontal floor/ceiling placement