
User's Manual
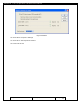
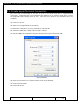

Table Of Contents
- 1.1 GT Lite Overview
- 2.1 GT Lite Detailed Hardware Description
- 2.2 GT Lite Detailed Software Description
- 3.1 Updating the Main Processor Software
- 3.2 Updating Main Processor Firmware
- 3.3 Programming the Low Power Controller
- 3.4 Recovering the GT Lite
- 4.1 Install GT Lite USB Drivers
- 4.2 Create HyperTerminal Connection
- 4.3 Connect GT Lite to HyperTerminal
- 5.1 Monitoring the GT Lite
- Diagnostic Overview
- Common GT Lite Functions
- Common Diagnostic Output
- APPLICATION: IMEI:
- APPLICATION: Firmware Version:
- APPLICATION: (batteryVoltageCallback) millivolts=4101, mAh =
- APPLICATION: (messageCallback) ZIGBEE_STAR_AWAKE
- APPLICATION: (messageCallback) ZIGBEE_RESET_INFO
- APPLICATION: (messageCallback) ZIGBEE_STAR_SENSOR_DATA
- APPLICATION: (messageCallback) sensorId=6, sensorValue=454
- APPLICATION: (messageCallback) ZIGBEE_STAR_SENSOR_EVENT_DATA
- APPLICATION: (messageCallback) ZIGBEE_STAR_END
- PROTOCOL: (LoggerMessage_Create) Enter. recordDataType=0
- PROTOCOL: (LoggerMessage_CreateTempMessage) Device message c
- PROTOCOL: (LoggerMessage_CreateDeviceMessage) Device message
- GPRS: CREG reports:
- GPRS: GPRS has successfully connected!
- GPS: Powering on the GPS
- GPS: (GetGpsFix) Started hot fix timer.
- GPS: (HotFixTimer) Hot fix timer expired.
- GPS: (HotFixTimer) Started cold fix timer.
- GPS: (HotFixTimer) SendingAssistNow request.
- TCP: Got WIP_CEV_READ
- TCP: PEER_CLOSE received
- GPS: ASSISTNOW_TRANSFER_COMPLETE
- GPS: (ColdFixTimer) Cold fix timer expired
- GPS: (ColdFixTimer) Valid fix not obtained
- PROTOCOL: (TempMessage_CheckQueue) Updating a LoggerMessage
- PROTOCOL: (TempMessage_CheckQueue) Placing updated LM on Dev
- PROTOCOL: (LoggerMessage_SendMessage) Sending message via GP
- PROTOCOL: (LoggerMessage_TcpTransferCallback) TCP Successful
- APPLICATION: IMEI:
- 5.2 Configuring the GT Lite
- Configurable Parameters
- Local Configuration and Commands
- Status Commands
- Power Commands
- Network Commands
- View Server Port Number
- Set Server Port Number
- View Server Address
- Set Server Address
- View SMS Number
- Set SMS Number
- View GSM Registration Timeout
- Set GSM Registration Timeout
- View GPRS Enable Parameter
- Set GPRS Enable Parameter
- View SMS Enable Parameter
- Set SMS Enable Parameter
- View GSM Frequency Band Default
- Set GSM Frequency Band Default
- View GSM Frequency Band
- Set GSM Frequency Band
- GPS Commands
- View GPS Enable Parameter
- Set GPS Enable Parameter
- View GPS Hotfix Timeout
- Set GPS Hotfix Timeout
- View GPS Coldfix Timeout
- Set GPS Coldfix Timeout
- View GPS Coldfix Lockout
- Set GPS Coldfix Lockout
- View GPS Assistance Mode
- Set GPS Assistance Mode
- View GPS Mode
- Set GPS Mode
- View Default Assistance Latitude
- Set Default Assistance Latitude
- View Default Assistance Longitude
- Set Default Assistance Longitude
- Sensor Commands
- View Low Battery Threshold
- Set Low Battery Threshold
- View Optic Threshold
- Set Optic Threshold
- View Shock Threshold
- Set Shock Threshold
- View Low Temperature Threshold
- Set Low Temperature Threshold
- View High Temperature Threshold
- Set High Temperature Threshold
- View Door Enable Parameter
- Set GPS Enable Parameter
- View Mount Enable Parameter
- Set Mount Enable Parameter
- View Motion Enable Parameter
- Set Motion Enable Parameter
- ZigBee Commands
- Programming Commands
- Remote Configuration
- 6.1 Using the GT Lite
- 6.2 Installation Types
- 7.1 Handling GT Lite
- 7.2 GT Lite Maintenance
- 8.1 Standards
- 8.2 Certifications
- 9.1 Diagnostic Setup Troubleshooting
- 9.2 Programming Troubleshooting
- 9.3 Configuration Troubleshooting
- 9.4 Installation and Operational Troubleshooting
- 9.5 Maintenance Troubleshooting
- 12.1 Overview
- 12.2 Pairing
- 12.3 Operations and Installation
- 12.4 Supported Devices
- 12.5 Wireless Devices Troubleshooting
- 13.1 Overview
- 13.2 Detailed Description
- 13.3 Operations and Installation
- 13.4 Troubleshooting
- 14.1 Overview
- 14.2 Detailed Description
- 14.3 Operations and Installation
- 14.4 Troubleshooting
- 15.1 Overview
- 15.2 Detailed Description
- 15.3 Operations and Installation
- 15.4 Supported Tags
- 15.5 Troubleshooting
- 16.1 Overview
- 16.2 Detailed Description
- 16.3 Operations and Installation
- 16.4 Troubleshooting
- 17.1 Overview
- 17.2 Detailed Description
- 17.3 Operations and Installation
- 17.4 Supported Tags
- 17.5 Troubleshooting

GlobalTrak ™ GT Lite Operation and Maintenance Manual
4.3 Connect GT Lite to HyperTerminal
After installing drivers and creating a HyperTerminal connection, it is possible to connect GT
Lite to a host PC. The steps below outline the method for establishing a host connection over
USB. However, it is also important to understand what makes these steps necessary.
When GT Lite is powered off, in a sleep mode, or in the process of rebooting, the connection
over USB is internally disconnected. When this happens the PC will likely play the ‘disconnect
USB’ notification sound. When the GT Lite powers up (from off state, sleep, or coming out of
reboot), it reestablishes the USB connection. At the time when the USB connection is
established, it is essential for HyperTerminal to be disconnected from USB COM port. Only
after the USB connection is established can the COM port be successfully opened by clicking
the ‘Call’ button in HyperTerminal.
Due to the nature of USB drivers and HyperTerminal there are also times when this procedure
is followed correctly and the connection looks to be established, but no text is displayed in the
terminal window. In this case it is necessary to disconnect the COM port connection in
HyperTerminal and reboot the device.
23. Open the GT Lite HyperTerminal Connection.
24. When HyperTerminal warns that the COM port cannot be opened, click OK.
25. Power off GT Lite if it is on.
26. Ensure HyperTerminal is disconnected from the COM port.
27. Power on GT Lite.
28. Wait for the USB device to connect. This usually takes about 5 seconds. Windows will
play the USB connect notification sound when it is done.
29. Click the ‘Call’ button on HyperTerminal.
30. If HyperTerminal is unable to connect to the COM port, go back to step 25.
31. Type a character and press enter to ensure the connection is correctly made.
32. If the character is not echo’d back in the HyperTerminal session, click the Disconnect
button in HyperTerminal and go back to step 3.
33. GT Lite is now connected to HyperTerminal and commands can be issued. If characters
stop echoing to the terminal or the device disconnects from USB, go back to step 25.
Prepared: R. Straz Date: July 25, 2007 Page 55 of
139