Synology NAS User's Guide Based on DSM 4.
Table of Contents Chapter 1: Introduction Chapter 2: Get Started with Synology DiskStation Manager Install Synology NAS and DSM............................................................................................................................................. 8 Log into Synology DiskStation Manager .............................................................................................................................. 8 DiskStation Manager Appearance ..........................................
SSD Cache ............................................................................................................................................................................ 35 Manage External Disks ........................................................................................................................................................ 35 Chapter 6: Access your Synology NAS from the Internet Use the EZ-Internet Wizard ..................................................................
Chapter 13: Share Photos, Videos, and Blogs with Photo Station Install Photo Station .............................................................................................................................................................. 73 Enable Personal Photo Station ........................................................................................................................................... 74 Photo Station Features......................................................................
Receive Event Notifications ............................................................................................................................................... 104 Access Applications with Independent Login .................................................................................................................. 105 Index Multimedia Files for Applications............................................................................................................................
Chapter Chapter 1: Introduction Congratulations on your purchase of Synology NAS. Synology NAS is a multi-functional Network-Attached Storage server, serving as a file-sharing center within your Intranet.
Synology NAS User's Guide Based on DSM 4.3 Organize Videos with Video Station Video Station allows you to organize your collection of movies, TV shows, and home videos into a media platform on which you can watch and play video clips, live stream and record digital TV programs with a USB DTV dongle plugged into your Synology NAS, view and edit video metadata whose information is retrieved automatically from the Internet. You can also stream videos to your iPhone or iPad for playback.
Chapter Chapter 2: Get Started with Synology DiskStation Manager This chapter explains how to log in to Synology NAS’ web-based management UI, Synology DiskStation Manager (DSM), customize your own desktop, manage its taskbar and widgets, and use the Main Menu to access DSM settings and applications. For more detailed instructions, please see DSM Help.
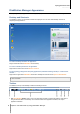
Synology NAS User's Guide Based on DSM 4.3 DiskStation Manager Appearance When you log in to Synology DiskStation Manager (DSM), you can see the desktop, taskbar and widgets. Desktop and Shortcuts The desktop is where your application windows are displayed. You can also create desktop shortcuts to frequently used applications. To create a desktop shortcut to an application: Drag its thumbnail from the Main Menu to the desktop.
Synology NAS User's Guide Based on DSM 4.3 2 The Main Menu button: Click to reveal the Main Menu. See "Manage DSM with the Main Menu" for more information. 3 The icons of open applications: Click the icon of an application to show or hide its window on the desktop. Right-click the icon and choose from the shortcut menu to manage the application window (Maximize, Minimize, Restore, Close) or its taskbar icon (Pin to Taskbar, Unpin from Taskbar).
Synology NAS User's Guide Based on DSM 4.3 Manage DSM with the Main Menu The Main Menu is where you can find all the applications and settings provided by Synology DiskStation Manager. Restart and Shutdown Click Restart or Shutdown at the bottom-right corner of the Main Menu to restart Synology NAS or turn it off, just like using any other operating systems. Reorder Main Menu’s Thumbnails Open Main Menu and drag any thumbnail to any position you want.
Synology NAS User's Guide Based on DSM 4.3 Use the Control Panel Choose Control Panel from the Main Menu to see the thumbnails of DSM settings. The DSM settings on the Control Panel are grouped into the following categories: File Sharing and Privileges: Set up file sharing for Win/Mac/NFS, as well as application privileges for different user accounts. Network Services: Manage and edit the settings for network services and Internet connection. System: Edit the basic settings on your Synology NAS.
Synology NAS User's Guide Based on DSM 4.3 Account Under Account, you can edit your account settings, enable 2-step verification, and view recent login activity of your DSM account. Limitations: The user description is case sensitive and can be 0 to 64 displayable Unicode characters. The password is case sensitive and should be 0 to 127 displayable characters, including letters, numbers, signs, and space. 2-Step Verification 2-step verification provides improved security for your DSM account.
Chapter Chapter 3: Modify System Settings After you have connected to Synology DiskStation Manager (DSM) and learned how to access its functions and customize its appearance, users belonging to the administrators group can begin to modify basic settings. This chapter explains the basics of modifying network settings, display languages, time, and energy saving features. For more detailed instructions, please see DSM Help.
Synology NAS User's Guide Based on DSM 4.3 HTTP Service Click the HTTP Service tab to change the port number for accessing DSM or configure HTTPS settings. When the HTTPS connection function is enabled, any connection to Synology NAS via the HTTPS protocol will be encrypted with the SSL/TLS encrypting mechanism.
Synology NAS User's Guide Based on DSM 4.3 Change Network Settings Go to Main Menu > Control Panel > Network to modify the following network settings of your Synology NAS. For more detailed instructions, please see DSM Help. General The General tab provides options to edit the name and default gateway of the Synology NAS, as well as configure domain name server or proxy server settings.
Synology NAS User's Guide Based on DSM 4.3 Wireless 1 Click Wireless on the left side to connect the Synology NAS to a wireless network. Wireless network is available only when a wireless dongle is plugged into the USB port of your Synology NAS. IPv6 Setup When you are configuring the LAN or Wireless Network interface, click the IPv6 Setup button to change the IPv6 settings. Synology NAS supports IPv4/IPv6 dual stack scheme. This means that both IPv4 and IPv6 can work 2 simultaneously on Synology NAS.
Synology NAS User's Guide Based on DSM 4.3 Modify Regional Options Go to Main Menu > Control Panel > Regional Options to configure the following regional options. For more detailed instructions, please see DSM Help. Set Up Time Click the Time tab to set up the system time settings of the Synology NAS. You can check the current time, manually set the server's date and time, or automatically set the time using a network time server.
Synology NAS User's Guide Based on DSM 4.3 Use Energy Saving Features Go to Main Menu > Control Panel > Hardware to manage the following energy saving features provided by DSM. For more detailed instructions, please see DSM Help. General 1 Click the General tab to modify power recovery, Wake on LAN (WOL) , or fan speed settings.
Synology NAS User's Guide Based on DSM 4.3 UPS Under the UPS tab, you can modify UPS-related settings. UPS (Uninterruptible Power Supply) is a backup power device that allows the Synology NAS to continue operating for a short time if power failure occurs. This function helps prevent data loss by giving the Synology NAS enough time to save data and unmount volumes before losing power and shutting off. Synology NAS supports connecting to local or SNMP UPS devices.
Chapter Chapter 4: Manage Storage Space Before taking advantage of the various features of your Synology NAS, you need to set up at least one storage space. This chapter explains how Storage Manager can help you manage storage spaces, such as volumes, Disk Groups, iSCSI Targets, or iSCSI LUNs, as well as view the status of hard drives. For more detailed instructions, please see DSM Help. Volumes and Disk Groups Volumes are the basic storage spaces on your Synology NAS.
Synology NAS User's Guide Based on DSM 4.3 Quick or Custom Volumes When creating a new volume, the following options are available: Method Features Creates an SHR (Synology Hybrid RAID) volume. Quick Automatically optimizes volume capacity and performance based on member hard disks. Recommended for saving time and simplifying storage management. Supports different RAID types. Supports creating single or multiple volumes on Disk Groups.
Synology NAS User's Guide Based on DSM 4.3 RAID Type HDD # Allowed Failed HDD # RAID 1 2-4 (HDD #) - 1 The system will write identical data to each hard drive at the same time, so data integrity is protected when at least one disk is normal. Smallest HDD size RAID 5 ≧3 1 This configuration includes a backup option. It uses parity mode to store redundant data on space equal to the size of one disk for later data recovery.
Synology NAS User's Guide Based on DSM 4.3 Hard Disk Requirements In order to change the RAID type of a volume or Disk Group, there must be a sufficient number of available hard disks installed in your Synology NAS. Please see below for the minimum number of hard disks required for each RAID type.
Synology NAS User's Guide Based on DSM 4.3 Expand a Volume or Disk Group by Adding Disks For SHR, JBOD, RAID 5, RAID 5+Spare, and RAID 6, the storage capacity of volumes and Disk Groups can be expanded by adding more hard disks if there are empty hard drive bays in your Synology NAS. For more detailed instructions, please see DSM Help. Please see the following table regarding the minimum size of new hard disks.
Synology NAS User's Guide Based on DSM 4.3 Manage iSCSI Targets Go to Main Menu > Storage Manager and click the iSCSI Target tab to manage iSCSI Targets on your Synology NAS. The maximum number of iSCSI Targets varies depending on the model. For more information, please refer to “Manage iSCSI LUNs”. Manage iSCSI LUNs An iSCSI LUN (logical unit number) represents an individually addressable portion of an iSCSI Target.
Synology NAS User's Guide Based on DSM 4.3 Clone iSCSI LUNs 1 LUN Clone allows you to create near-instantaneous virtual copies of a LUN. It means much higher productivity and less complex deployment during system-wide operations. LUN Clone also consumes only a fraction of storage at the time of creation.
Synology NAS User's Guide Based on DSM 4.3 Hot Spare 1 Hot spare disks are standby hard disks that can repair a degraded volume/Disk Group/iSCSI LUN by automatically replacing a failed disk. Hot spare disks can be globally assigned to protect any volume/Disk Group/iSCSI LUN within your Synology NAS, as long as the volume/Disk Group/iSCSI LUN matches the following criteria: The RAID type of the volume/Disk Group/iSCSI LUN must be one with data protection (i.e. RAID 1, RAID 5, RAID 6, RAID 10).
Chapter Chapter 5: Manage Storage Space (for RS10613xs+) Before using features or services on your Synology NAS, you need to create RAID Groups and manage storage spaces. This chapter explains how to create and manage RAID Groups, volumes, and iSCSI LUNs and iSCSI Targets, as well as access external disks and manage hard disks or cache. For more detailed information or instructions, please refer to DSM Help.
Synology NAS User's Guide Based on DSM 4.3 RAID Group Types Your Synology NAS supports the following RAID Groups types: RAID Group for Single Volume or iSCSI LUN (Block-Level) Allocates all available capacity to a single volume or iSCSI LUN (Block-Level). Provides better performance but less storage management flexibility. Allows creation of multiple iSCSI LUNs (Regular File) on volumes. Supports a maximum of one RAID Array.
Synology NAS User's Guide Based on DSM 4.3 Change RAID Types The RAID types of existing RAID Groups can be changed without losing existing data, allowing you to easily and economically manage storage capacity. To change the RAID type of a RAID Group, there must be available hard disks installed in the Synology NAS. The table below displays supported types of RAID change. For more detailed instructions regarding how to change RAID types, please refer to DSM Help.
Synology NAS User's Guide Based on DSM 4.3 Manage Volumes Volumes are basic storage spaces on which you can create shared folders, iSCSI LUNs (regular file), save data, or install packages. Before creating a volume on your Synology NAS, please create at least one RAID Group. Create Volumes To create a volume, please go to Main Menu > Storage Manager > Volume, and click Create. For more detailed instructions, please see DSM Help.
Synology NAS User's Guide Based on DSM 4.3 SSD TRIM If a volume consists entirely of SSDs (Solid State Drives), we recommend enabling SSD TRIM. This feature optimizes the read and write performance of volumes created on SSDs, increasing efficiency as well as extending the lifetime of your SSDs. Before trying to set up SSD TRIM, please see DSM Help for detailed instructions and more limitations. Note: SSD TRIM is only available on certain Synology NAS models and RAID types.
Synology NAS User's Guide Based on DSM 4.3 Manage iSCSI Targets By mapping iSCSI Targets and iSCSI LUNs, client servers can access space on a storage server as if it were a local disk. In reality, all data transferred to the disk are actually transferred over the network to the storage server. Create, Edit, or Remove iSCSI Targets You can manage iSCSI Targets by going to Main Menu > Storage Manager > iSCSI Target.
Synology NAS User's Guide Based on DSM 4.3 SSD Cache SSD cache drives can be installed and mounted in a RAID 0 configuration to boost the read speed of a volume, including iSCSI LUN (Regular Files) on a volume, or iSCSI LUN (Block-Level) on your Synology server. You can mount, check SSD compatibility, and view related information by going to Main Menu > Storage Manager > SSD Cache. Please refer to your Synology server Quick Installation Guide for information regarding SSD installation.
Chapter Chapter 6: Access your Synology NAS from the Internet You can connect to your Synology NAS over the Internet, allowing its services to be accessible from anywhere and anytime. This chapter explains the basics regarding using the Synology EZ-Internet wizard, advanced port forwarding functions, and DDNS hostname registration to connect your Synology NAS to the Internet. For more detailed instructions, please see DSM Help.
Synology NAS User's Guide Based on DSM 4.3 Set Up Port Forwarding Rules for Router If your Synology NAS is within the local network, you can set up port forwarding rules for the router to allow your Synology NAS to be accessible over the Internet. Note: Before you start, make sure you have manually assigned a static IP address for your Synology NAS. See "Network Interface" for more information. Go to Main Menu > Control Panel > Router Configuration to set up your router and port forwarding rules.
Synology NAS User's Guide Based on DSM 4.3 Register DDNS for the Synology NAS DDNS (Dynamic Domain Name Service) simplifies connecting to your Synology NAS over the Internet by mapping a hostname to its IP address. For example, DDNS allows you to access your Synology NAS using a domain name (e.g. www.john.synology.me), with no need to remember an IP address (e.g. 172.16.254.1). Service Requirement The servers of the DDNS service provider are working normally.
Synology NAS User's Guide Based on DSM 4.3 Access DSM Services via QuickConnect QuickConnect is a solution that helps client applications (such as DS file, Cloud Station, DS audio, etc.) connect to your Synology NAS via the Internet without setting up port forwarding rules. Go to Main Menu > Control Panel > QuickConnect to manage the QuickConnect service. For more details regarding QuickConnect, please see DSM Help.
Synology NAS User's Guide Based on DSM 4.3 Set up VPN Connection VPN Server is an add-on package that enables your Synology NAS to become a PPTP, OpenVPN, or L2TP/IPSec VPN (virtual private network) server, allowing DSM local users over the Internet to access resources shared within local area network of the Synology NAS. Set up your Synology NAS as a VPN Server To install VPN Server on your Synology NAS, go to Main Menu > Package Center.
Chapter Chapter 7: Enhance Internet Security After your Synology NAS is available on the Internet, you will need to safeguard it against any attacks from Internet hackers. This chapter explains how to set up firewall, control outgoing traffic, enable DoS protection and enable auto block. For more detailed instructions, please see DSM Help. Prevent Unauthorized Connection with Firewall The built-in firewall can prevent unauthorized logins, and control which services can be accessed.
Synology NAS User's Guide Based on DSM 4.3 Apply Firewall Rules to Source IP Addresses In the Source IP section, choose to allow or deny access from a source IP addresses using one of the following options: All: Choose this option to apply the rule to all source IP addresses. Single host: Choose this option to apply the rule to an IP address. Subnet: Choose this option to apply the rule to a subnet.
Synology NAS User's Guide Based on DSM 4.3 Configure Bandwidth Settings After selecting a service, you will need to set Guaranteed Bandwidth and Maximum Bandwidth to limit its outgoing traffic. Guaranteed Bandwidth Defines the outgoing traffic a service guarantees to serve when the whole system bandwidth is wide enough. Maximum Bandwidth Defines the outgoing traffic this service can borrowed when the whole system bandwidth is enough and there is System Remaining Bandwidth.
Synology NAS User's Guide Based on DSM 4.3 Automatically Block Suspicious Login Attempts Auto block allows you to prevent unauthorized login. After enabling the service, an IP address will be blocked if it has too many failed login attempts. Go to Main Menu > Control Panel > Auto Block to create and manage your block list and allow list.
Chapter Chapter 8: Set Up File Sharing Synology NAS can become the file sharing center within the local network or over the Internet, allowing users to access its files anytime and anywhere. For more detailed instructions, please see DSM Help. This chapter explains how to enable the support for file sharing protocols for all platforms, create and manage users and groups, set up shared folders, and allow or deny access to the shared folders, applications or subfolders from specific users or groups.
Synology NAS User's Guide Based on DSM 4.3 Enable NFS Service for Linux Clients Click the NFS Service tab at Main Menu > Control Panel > Win/Mac/NFS to allow Linux client to access the Synology NAS data. If you want to configure Linux client's NFS access privileges to the shared folders, see "Allow Users or Groups to Access Shared Folders" for more information.
Synology NAS User's Guide Based on DSM 4.3 Binding to an LDAP Server LDAP allows your Synology NAS to join an existing directory service as an LDAP client, and then retrieve user or group information from an LDAP server (or "directory server"). The profiles option allows you to smoothly connect to different types of LDAP servers, such as standard (Synology Directory Servers or Mac Open Directory), IBM Lotus Domino servers, or customize your own profile settings.
Synology NAS User's Guide Based on DSM 4.3 Manage Users and Groups Go to Main Menu > Control Panel > User or Group to create users or groups, and allow or deny their access to different shared folders. Create Users Click Create to create a user account. The user can log in to edit his/her account info after the user account has been established. You can also choose to set an account expiration date or disallow the user to change account password.
Synology NAS User's Guide Based on DSM 4.3 Allow Self-service Password Reset If you would like to allow users to reset forgotten passwords via email, you can click Password Settings and tick the box marked Allow non-admin users to reset forgotten passwords via email. When this option is enabled, a link marked Forgot your password? will appear on the DSM login page. If a user forgets his password, he can click this link and enter his username.
Synology NAS User's Guide Based on DSM 4.3 Create Groups Go to Main Menu > Control Panel > Group to create and edit a group, add users to the group, and then edit the group's properties, saving you the trouble of editing users one by one. Groups created by default include the following: administrators: Users belonging to the administrators group have the same administrative privilege as admin. users: All users belong to the users group.
Synology NAS User's Guide Based on DSM 4.3 Built-in Shared Folders Created by the System System built-in shared folders are created when the services or applications requiring the folders are enabled. Name public web Description The public folder will be created automatically after the first time you set up Synology NAS. 1 The web folder contains contents of your website. It will be created automatically when Web Station is enabled.
Synology NAS User's Guide Based on DSM 4.3 Allow Users or Groups to Access Shared Folders Go to Main Menu > Control Panel > Shared Folder, click Privileges and choose Privileges Setup to allow or deny users' or groups' access to the shared folders. Note: To set the access privileges to subfolders, you can use File Station. See "Edit the Properties of Files and Subfolders" for more information.
Synology NAS User's Guide Based on DSM 4.3 Define Windows ACL Privileges for Shared Folder Go to Main Menu > Control Panel > Shared Folder to define ACL privileges for a shared folder. Windows Access Control List (ACL) is a list of privileges or permissions that determine specific access rights under the Windows environment. This can help administrator define access control rules for an individual file or a directory, and give different access rights for individual user or group.
Chapter Chapter 9: Access Files from Anywhere When you have set up users or groups with proper access privileges to the shared folders, they can share their files with your Synology NAS from anywhere. This chapter explains the ways to access the Synology NAS shared folders within the local network or over the Internet. For more detailed instructions, please see DSM Help.
Synology NAS User's Guide Based on DSM 4.3 Access Shared Folders from Mac Choose Go > Connect to Server from the menu bar. Type the IP address or name (appended with .local) of the Synology NAS preceded by smb:// or afp:// in the Server Address field and click Connect. (e.g. smb://EricaWang.local or afp://192.168.0.2) Note: For better performance, it is recommended that you connect to the shared folders via SMB. Select the shared folder you want to access.
Synology NAS User's Guide Based on DSM 4.3 Access Files via FTP If your Synology NAS is accessible over the Internet, you can use a FTP application to access the shared folders. Note: For more information about making Synology NAS accessible over the Internet, see "Chapter 6: Access your Synology NAS from the Internet". Go to Main Menu > Control Panel > FTP to enable FTP service, allowing users to upload or download Synology NAS data via FTP.
Synology NAS User's Guide Based on DSM 4.3 Access Files via WebDAV By enabling WebDAV or CalDAV (at Main Menu > Control Panel > WebDAV), you can remotely manage and edit files or calendars stored on the Synology NAS.
Synology NAS User's Guide Based on DSM 4.3 Sync Files via Cloud Station Cloud Station is a file sharing service that allows your Synology NAS to become a file sync center to sync files between multiple client computers. Go to Main Menu > Package Center to install and run the Cloud Station package. Note: A client application (Cloud Station for computer clients, available at Synology's Download Center) is required to be installed on client computers before syncing files with the Synology NAS.
Synology NAS User's Guide Based on DSM 4.3 Access Files via File Station File Station is DSM's file management tool, allowing DSM users over the Internet to access the Synology NAS folders with their web browsers. By launching two or more File Stations, you can manage all your Synology NAS data by dragging and dropping them between different File Stations. File Station Appearance Go to Main Menu > File Station to open a File Station window.
Synology NAS User's Guide Based on DSM 4.3 Search for Files or Folders You can type keywords in the Filter field at the top-right corner of File Station to filter through files or folders in the current folder. Additionally, you can also perform advanced search in the Advanced Search panel for more refined search results. Note: For quicker search result, it is recommended that you index shared folder contents. See "Index Shared Folder Contents" for more information.
Synology NAS User's Guide Based on DSM 4.3 Mount Remote Folders or Virtual Drives File Station allows you to mount remote folders to access contents shared by network computers or other Synology NAS, or virtual drives to access contents within disc images. That way, you can easily navigate all available network resources or disc images with File Station.
Chapter Chapter 10: Back Up Data 10 Synology offers comprehensive backup solutions for your computer and Synology NAS, allowing you to back up data on your computer to Synology NAS. If you are a user belonging to the administrators group, you can also back up the Synology NAS data with local or network backup, or sync shared folder contents between Synology NAS. The creative Copy button simplifies external storage devices backup with One-touch design.
Synology NAS User's Guide Based on DSM 4.3 Use Data Replicator for Windows The Synology Data Replicator installation package can be found at Synology's Download Center at: http://www.synology.com/support/download.php What Can Data Replicator Do? Monitor specific folders on your Windows computer and perform real-time backup when any modification to the contents within a monitored folder is made. Adjust backup versions and restore points.
Synology NAS User's Guide Based on DSM 4.3 Back up Data or iSCSI LUN on Synology NAS Other than backing up computer data to Synology NAS, users belonging to the administrators group can back up data or iSCSI LUN on the Synology NAS. Ways to Back Up Synology NAS Data Local Backup and Network Backup are ways you can choose to back up data or iSCSI LUN on your Synology NAS. Plus, Synology NAS also supports Amazon S3 Backup, allowing you to back up data to the Amazon S3 Server.
Synology NAS User's Guide Based on DSM 4.3 Perform Backup Tasks on Synology NAS Go to Main Menu > Backup and Restore to perform backup tasks on Synology NAS. Before you start, do the following: For Network Backup to another Synology NAS: Log in to the DSM of the target Synology NAS, and then go to Main Menu > Control Panel > Network Backup > Network Backup.
Synology NAS User's Guide Based on DSM 4.3 Sync Shared Folder Contents between Synology NAS Shared Folder Sync allows you to sync shared folder contents from a source Synology NAS (or "client") to a destination Synology NAS (or "server") over the network. Shared Folder Sync backup tasks can be viewed and managed by going to Main Menu > Backup and Restore > Shared Folder Sync. For detailed instructions regarding how to enable Shared Folder Sync, please see DSM Help.
Synology NAS User's Guide Based on DSM 4.3 Back up Data on USB Device or SD Card You can go to Main Menu > Control Panel > Devices and Printers to specify a shared folder for use with USBCopy or SDCopy, and then use the Copy button on the front panel of your Synology NAS to copy data from 1 a USB device or SD card to the shared folder.
Chapter Chapter 11: Host Websites, Email Server, and Print Server 11 Synology NAS is designed for small and medium businesses (SMB), providing the ability to set up web, email, and print servers on a single Synology NAS without spending extra money. This chapter provides basic information regarding these features. For more detailed instructions, please see DSM Help.
Synology NAS User's Guide Based on DSM 4.3 Enable MySQL You can enable MySQL to use the MySQL database function for your website. After MySQL is enabled, you can install the phpMyAdmin package available at Synology's Download Center to manage the MySQL database. Manage PHP Settings After you have enabled Web Station, you can click the PHP Settings tab to configure PHP related settings. For more detailed instructions, please see DSM Help.
Synology NAS User's Guide Based on DSM 4.3 Before you start Register a domain name for your IP address, or apply for a DDNS hostname. Note: For more information about registering a DDNS account for Synology NAS, see "Register DDNS for the Synology NAS." When applying for a domain name or dynamic domain name, please fill the MX (Mail eXchanger) record of mail domain with your mail server (that is the FQDN of Synology NAS). For example, if the mail server is mail.synology.
Synology NAS User's Guide Based on DSM 4.3 Set Synology NAS as Print Server Go to Main Menu > Control Panel > Devices and Printers > Printer to set the Synology NAS as a print server over your local area network, allowing client computers or mobile devices to access printers connected to the Synology NAS. The Synology NAS can connect to USB printers or network printers.
Chapter Chapter 12: Discover Various Applications with Package Center 12 Synology has integrated third party or Synology-designed applications into packages that can be installed on Synology NAS and managed with Package Center.
Chapter Chapter 13: Share Photos, Videos, and Blogs with Photo Station 13 Photo Station is an online photo album integrated with a blog for you to easily share photos, videos, and blog posts over the Internet. With Photo Station, you can upload, organize, edit, and share your photos in quick, easy steps.
Synology NAS User's Guide Based on DSM 4.3 Enable Personal Photo Station Users belonging to the administrators group (if Photo Station's account system is set as DSM accounts) can enable Personal Photo Station service to allow all DSM users to have their own Personal Photo Station. To enable Personal Photo Station, you need to enable the following services first: Enable user home service (Go to Main Menu > Control Panel > User > User Home). See "Create User's Home Folder" for more information.
Synology NAS User's Guide Based on DSM 4.3 Browse Photos and Videos in Different Modes Navigate to Albums, and click the view control icon to switch between view modes and change the way albums are sorted. For example, in timeline mode, you can scroll through an intuitive timeline to quickly find photos or videos of a specific period of time.
Chapter Chapter 14: Play Music with Audio Station 14 Audio Station is a web-based audio application, allowing you to access the music library on your Synology NAS, choose available audio sources on the local area network, and add your favorite music to playlists for playback. You can also browse and play songs on the DLNA-certified Digital Media Servers, and listen to Internet radio.
Synology NAS User's Guide Based on DSM 4.3 Manage Audio Station Settings Users belonging to the administrators group need to do the following before enjoying music or allowing users to listen to music on Audio Station: Enable personal music library: You can enable personal library to allow Synology NAS users to have their own personal music library. Once users' personal library is enabled, they can choose to browse and play either their own personal music or both shared and personal music.
Synology NAS User's Guide Based on DSM 4.3 Edit Music Information You can view and edit the information of music files and song lyrics. To view and edit music information or song lyrics, right-click a music file and choose Song information.
Chapter Chapter 15: Organize Videos and Record TV Programs with Video Station 15 Video Station is an ideal video organizer of your collection of movies, TV shows, home videos, and TV recordings, 1 allowing you to watch videos on your computer, DLNA/UPnP-compliant DMAs, AirPlay devices , iOS/Android devices, and Windows Phone. In addition to system's default video libraries, you can also create custom libraries and assign access permissions to them.
Synology NAS User's Guide Based on DSM 4.3 Before You Start Users belonging to the administrators group need to do the following before allowing non-admin users to watch videos or stream live TV programs with Video Station: Create video folders for default libraries (including movie, TV show, home video), TV recording, and custom libraries (optional) first to store your videos before managing files with Video Station.
Synology NAS User's Guide Based on DSM 4.3 streaming service provided by Video Station. Once the channel scan is completed, you can stream programs for playback with Video Station's embedded Video Player. Play Videos Video Station comes with an embedded player which allows you play videos with once the package is installed on your Synology NAS.
Chapter Chapter 16: Download Files with Download Station 16 Download Station is a web-based download application which allows you to download files from the Internet through BT, FTP, HTTP, NZB, Thunder, FlashGet, QQDL, eMule, and Xunlei-Lixian, and subscribe to RSS feeds to keep you updated on the hottest or latest BT. It offers the auto unzip service to help you extract compressed files to your Synology NAS whenever files are downloaded.
Synology NAS User's Guide Based on DSM 4.3 Download Station Features Once properly installed and setup, Download Station provides the below features. For more detailed instructions regarding these and other features, please see DSM Help. Manage Auto Extract Service Auto Extract service optimizes download task by unzipping downloaded archives automatically to your specified location. Password can be created to extract compressed files if needed.
Synology NAS User's Guide Based on DSM 4.3 Create via BT search: You can search for torrent files with BT search engines to help you find your favorite downloads more easily. To create download tasks via BT search, enter a keyword in the search field at the top-left corner of BT/HTTP/FTP/NZB. Create Download Tasks for RSS Feeds You can use Download Station to download RSS feeds that links to files instead of web pages, such as your favorite audio broadcasts.
Synology NAS User's Guide Based on DSM 4.3 Create eMule Download Tasks You can create eMule download tasks by choosing any of the following methods. Create by uploading files: Upload a text file (.txt) containing ED2K links from your local computer to Download Station. To create download tasks by uploading a file, click Download Queue on the left panel. Click the Create button, choose Open a file, and click the button to browse to the text file for upload.
Chapter Chapter 17: Safeguard Your Environment with Surveillance Station 17 Surveillance Station is a professional Network Video Recording (NVR) software bundled with DiskStation Manager (DSM), allowing you to remotely record and monitor video footages from IP cameras which are paired with your Synology NAS, watch live view videos, set up scheduled recording, playback recorded files via web browser or mobile device for remote monitoring so as to safeguard your home or office environment.
Synology NAS User's Guide Based on DSM 4.3 Once you have set up a CMS host, you can go to the Server page to add recording servers and manage them with the CMS service. Add and Edit Cameras Go to IP Camera > List under Management to add and edit cameras, set up recording schedule and advanced settings. Create Camera Groups To organize multiple cameras into camera groups for easier deployment, go to IP Camera > Group.
Synology NAS User's Guide Based on DSM 4.3 Install Camera License Go to the License page under Management to manage camera licenses. With Default License, your Synology NAS can manage one camera within LAN. You can purchase Synology Camera License Packs and then add the license keys here to manage additional cameras. View Logs Go to the Log page under Management to view and manage log records of critical events such as camera disconnection or changes on the camera settings.
Synology NAS User's Guide Based on DSM 4.3 Use Other Functions On the Live View page, you can also use the following functions. 1 2 3 4 5 6 7 8 9 10 11 12 1 To digitally zoom in and out, drag the zoom bar or place the mouse over the live view of a selected camera and then scroll the mouse. You can also zoom digitally by using the scroll button on your mouse, and move by dragging the picture. 2 To adjust volume, drag the volume bar. 3 To pause or resume the playback, click this button.
Synology NAS User's Guide Based on DSM 4.3 Work with Timeline Surveillance Station allows you to locate the actual recorded footage via Timeline and calendar support. The calendar lets you pick any date to show the day’s recording. Using Timeline, you can easily identify videos recorded in different modes, labeled by color on the timeline. During a recording playback, you can activate Smart Search to track down suspicious targets.
Chapter Chapter 18: Provide Nonstop Service with Synology High Availability 18 High Availability refers to a server layout solution designed to reduce interruptions of services caused by server malfunctions. With Synology High Availability, two servers form a “high-availability cluster,” in which one assumes the role of the active server while the other acts as the stand-by server. If the server malfunctions, the stand-by server takes over all services, thus minimizing server downtime.
Synology NAS User's Guide Based on DSM 4.3 Passive Server Under normal conditions, the passive server remains in standby mode. Data on the active server is continuously replicated to the passive server. In the event the active server cannot provide services, you or the system can initiate a switchover to the passive server. Install Synology High Availability Synology High Availability can be installed by going to Main Menu > Package Center.
Synology NAS User's Guide Based on DSM 4.3 Storage Manager Limitations Once a high-availability cluster has been created, certain options in Storage Manager will be unavailable. Available Options: The following options are still available when a high-availability cluster exists: Expand storage spaces (e.g. volumes, Block-Level iSCSI LUNs, Disk Groups, RAID Groups, etc). Create, delete, or repair volumes and iSCSI LUNs. Change iSCSI LUN (File-Level) size and location. Change iSCSI LUN target.
Chapter Chapter 19: Create a Domain Name Server with DNS Server 19 DNS (Domain Name System) is a naming system that facilitates the exchange of data between computers over the Internet and other networks. Its main function is to translate user-friendly domain names (e.g. www.synology.com) into corresponding fixed, public IP addresses (e.g. 120.89.71.100). This function allows users to easily find web pages, computers, or other devices over the Internet or local network.
Synology NAS User's Guide Based on DSM 4.3 Check firewall or port forwarding settings: DNS services require the use of TCP and UDP port 53. If your Synology NAS uses a firewall, this port must be opened. If the Synology NAS connects to the Internet through a router, set up port forwarding rules and open TCP and UDP port 53. Register your device: After you set up DNS Server, remember to register the IP address and other required information of your Synology NAS with the provider of your domain name.
Chapter Chapter 20: Manage Media Server and iTunes Service 20 Synology NAS can become a multimedia server on the local area network, allowing computers (using Windows Media Player or iTunes) and DLNA/UPnP home devices (such as stereo system or TV set) to play its multimedia contents. This chapter explains how to stream multimedia contents from Synology NAS to your computer or other DLNA/UPnP home devices. For more detailed instructions, please see DSM Help.
Synology NAS User's Guide Based on DSM 4.3 Manage DLNA Media Server Go to Main Menu > Media Server to browse and play the multimedia contents on Synology NAS via DLNA/UPnP home devices, also known as Digital Media Adapter (DMA). With Media Server, you can easily connect those devices such as TV sets and stereo systems to your home network, and stream multimedia files stored on Synology NAS to the devices to enjoy music, photos, and videos.
Synology NAS User's Guide Based on DSM 4.3 Manage iTunes Server Go to Main Menu > iTunes Server to use iTunes service. After it is enabled, all iTunes clients on the same local area network can browse and play songs or videos in the music and video shared folders on the server. The server will be listed below Shared in the iTunes window after the service is enabled. Note: For privacy reasons, iTunes clients are not allowed to view videos in the photo shared folder.
Chapter Chapter 21: Perform Advanced Management Tasks 21 Synology DiskStation Manager comes with a variety of management functions, allowing you to check system information, monitor system resources, manage notification services, restore or upgrade DSM, access applications with independent login, index multimedia files for applications and more. This chapter explains how to comprehend advanced management functions to make sure your Synology NAS is providing the best performance.
Synology NAS User's Guide Based on DSM 4.3 General Under the General tab, you can see the basic information about your Synology NAS, including serial number, model name, amount of physical memory, DSM version, time information, thermal status, or external devices. Synology NAS’ thermal status is represented by green or orange lights: Green: Thermal status is normal. 1 Orange: Synology NAS’ thermal temperature is high.
Synology NAS User's Guide Based on DSM 4.3 Report 1 Under the Report tab, you can collect data and generate reports that provide information about disk usage trends. You can select report types, set a schedule to receive periodic storage reports or generate reports on demand. For more detailed instructions, please see DSM Help. View System Logs Go to Main Menu > System Logs to view the log records of Synology NAS services.
Synology NAS User's Guide Based on DSM 4.3 Monitor System Resources Go to Main Menu > Resource Monitor to monitor system resources, such as CPU usage, memory usage, disk utilization and network flow. You can choose to monitor the below tabs in real time or view the previous data. For more detailed instructions, please see DSM Help. Performance Click on Performance tab to view the resource utilization data, including CPU, memory, disk, and network.
Synology NAS User's Guide Based on DSM 4.3 Manage Bluetooth Devices Go to Main Menu > Control Panel > Bluetooth to manage Bluetooth adapters and connect Bluetooth devices to your Synology NAS. Once connected, some Bluetooth devices, such as speakers or headphones, can be selected as the audio output for Audio Station, allowing you to easily listen to music stored on your Synology NAS. For more detailed instructions, please see DSM Help.
Synology NAS User's Guide Based on DSM 4.3 Receive Event Notifications Go to Main Menu > Control Panel > Notification and set up Synology NAS to notify you via e-mail, SMS, mobile devices, Windows Live Messenger, or Skype, when status changes or errors occur to the system, for example: connection loss, fan behavior change, power failure, storage volume running out of space, or back and restoration failure, etc.
Synology NAS User's Guide Based on DSM 4.3 Manage SMS Notification Service Click the SMS section to set up SMS notifications. You can enable SMS notifications in order for Synology NAS to send you notification messages via SMS when status changes or errors occur to the system, such as connection loss, fan behavior change, power failure, storage volume running out of space, or back/restoration failure, etc. More Information SMS URL: case sensitive and must be between 1 and 500 Unicode characters.
Synology NAS User's Guide Based on DSM 4.3 Re-index Media Files Multimedia data within the installed applications can be scanned and re-indexed for applications. Click Reindex to re-construct the index structure of all media files in the indexed folders, both default folders and the ones created by you. The process will be executed in the background.
Synology NAS User's Guide Based on DSM 4.3 Reinstall Synology NAS If you want to reinstall your Synology NAS without losing its data, you can use the RESET button on the back panel. To reinstall Synology NAS: 1 Press and hold the RESET button for about 4 seconds until the Synology NAS emits a beep sound. 2 Within the next 10 seconds, press and hold RESET button for about 4 seconds until the Synology NAS emits a beep sound.
Chapter Chapter 22: Communicate with Mobile Devices 22 As Internet access grows popular on mobile devices, Synology provides you with several creative alternatives to communicate with your Synology NAS using iOS/Android, Windows Phone, or other mobile devices. Manage DSM Settings with DSM mobile DSM mobile allows DSM users belonging to the administrators group to manage DSM settings and check DSM information with the web browser of an iOS (iPhone, iPad or iPod touch), Android device, or Windows Phone.
Synology NAS User's Guide Based on DSM 4.3 DS finder DS finder allows you to monitor or email the status of your Synology NAS, and request it to perform wake on LAN (WOL), restart, shut down, or play beep sounds (to help you quickly find the its location) with an iOS/Android device or Windows Phone. DS photo+ DS photo+ allows you to access Photo Station with an iOS/Android device or Windows Phone and share your precious moments on the go.
Troubleshooting For any questions about managing your DSM, go to Main Menu > DSM Help or click the Help button (with a question mark) at the top-right corner of every window. For any questions other than that, please visit Synology Inc. website www.synology.com for further assistance.
SYNOLOGY, INC. END USER LICENSE AGREEMENT IMPORTANT–READ CAREFULLY: THIS END USER LICENSE AGREEMENT ("EULA") IS A LEGAL AGREEMENT BETWEEN YOU (EITHER AN INDIVIDUAL OR A SINGLE ENTITY) AND SYNOLOGY, INC. AND ITS AFFILIATES, INCLUDING SYNOLOGY AMERICAN CORP AND SYNOLOGY UK LTD., (COLLECTIVELY, "SYNOLOGY") FOR ANY SYNOLOGY SOFTWARE, TOGETHER WITH ANY OTHER ASSOCIATED FIRMWARE, MEDIA, PRINTED MATERIALS AND "ONLINE" OR ELECTRONIC DOCUMENTATION (COLLECTIVELY, THE "SOFTWARE") AVAILABLE FOR DOWNLOAD AT WWW.
INABILITY TO USE THE SOFTWARE OR OTHERWISE UNDER OR IN CONNECTION WITH THIS EULA OR THE SOFTWARE, WHETHER BASED ON CONTRACT, TORT (INCLUDING NEGLIGENCE), STRICT LIABILITY OR OTHER THEORY EVEN IF SYNOLOGY HAS BEEN ADVISED OF THE POSSIBILITY OF SUCH DAMAGES. Section 13. Limitation of Liability.
SYNOLOGY, INC. LIMITED PRODUCT WARRANTY THIS LIMITED WARRANTY ("WARRANTY") APPLIES TO THE PRODUCTS (AS DEFINED BELOW) OF SYNOLOGY, INC. AND ITS AFFILIATES, INCLUDING SYNOLOGY AMERICA CORP AND SYNOLOGY UK LTD., (COLLECTIVELY, "SYNOLOGY"). YOU ACCEPT AND AGREE TO BE BOUND BY THE TERMS OF THIS WARRANTY BY OPENING THE PACKAGE CONTAINING AND/OR USING THE PRODUCT. IF YOU DO NOT AGREE TO THE TERMS OF THIS WARRANTY, DO NOT USE THE PRODUCT.
Customer, whichever period is longer Any Product found by Synology to be non-defective will be returned to Customer. 2.6 Support. During the Warranty Period, Synology will make available to Customer the support services. Following the expiration of the applicable Warranty Period, support for Products may be available from Synology upon written request. 2.7 Exclusions.
or the relationship between Customers residing within the United States and Synology will be resolved exclusively and finally by arbitration under the current commercial rules of the American Arbitration Association, except as otherwise provided below. The arbitration will be conducted before a single arbitrator, and will be limited solely to the dispute between Customer and Synology.