Synology RackStation RS812 Quick Installation Guide Synology_QIG_RS8Bay_20110914
Table of Contents Chapter 1: Before You Start Package Contents .............................................................................................................................................................. 3 Synology RackStation at a Glance................................................................................................................................... 4 Safety Instructions ....................................................................................................
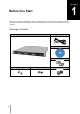
Chapter Chapter 1: 1 Before You Start Before you start setting up RackStation, please check the package contents to verify that you have received the items below. Please also read the safety instructions carefully before use to prevent your RackStation from any damages. Package Contents Main Unit x 1 AC power cord x 1 Installation disc x 1 Rack mount kit x 2 Screws for 3.5" hard drives x 20 3 Screws for 2.
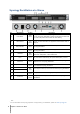
Synology RackStation at a Glance 1 4 No. Article Name Location 1) Power Button Front Panel 2) LED Indicators Front Panel The LED indicator is used to display the status of the internal disk and the system. For more information, see "Appendix B: LED Indication Table" on Page 15. 3) Beep off Button Front Panel The Beep off Button is used to turn off the beep sound of Synology RackStation.
Safety Instructions Keep away from direct sunlight and away from chemicals. Make sure the environment does not experience abrupt changes in temperature or humidity. Do not place the Synology product close to any liquid. Before cleaning, unplug the power cord first. Wipe Synology product with damp paper towels. Do not use chemical or aerosol cleaners to clean it. Do not place the Synology product on a cart, table, or desk, which is not stable to avoid the product from falling over.
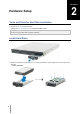
Chapter Chapter 2: Hardware Setup Tools and Parts for Hard Disk Installation A screwdriver At least one 3.5” or 2.5” SATA hard disk (Please visit www.synology.com for compatible hard disk models.) Warning: If you install a hard disk that contains data, system will format the hard disk and erase all data. If you need the data in the future, please back it up before installation. Install Hard Disks 1 Pull the hard drive tray handle in the direction as indicated below to remove the hard drive tray.
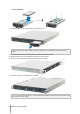
For 2.5" Hard Disk: 3 Insert the loaded hard drive tray into the empty hard drive bay. Important: Make sure the tray is pushed in all the way. Otherwise, the hard disk might not be able to function properly. 4 Press the handle in flush with the front panel to hold the hard drive tray in place. 5 Repeat the steps above to assemble all hard disks you have prepared. 6 Fix the two rack mount kits on both sides with their screws provided. 7 The disks' positions are numbered as shown below.
Start Up Your RackStation 1 Connect one end of the power cord to the power port of RackStation, and the other to the power outlet. 2 Use the LAN cable to connect RackStation to your switch/router/hub. 3 Press and hold the power button to turn on your RackStation. Your RackStation is now online and detectable from a network computer.
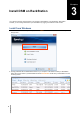
Chapter Chapter 3: 3 Install DSM on RackStation On a network computer, follow the steps in this chapter to install DSM on your RackStation. After DSM is installed, you can manage all features of your RackStation by logging in to DSM with a web browser. Install from Windows 1 Insert the installation disc into your computer, and click Start. Follow the onscreen instructions to complete the setup process. 2 Synology Assistant will be installed and launched on your computer.
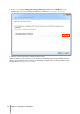
3 Click Browse to locate the DSM_[model name]_[number].pat installation file in the DSM folder of your installation disc. You can also download the latest version of DSM from Synology Download Center. D:\DSM\DSM_RS812_3.2-1922.pat 4 Follow the onscreen instructions to complete the setup process. After the installation process is finished, you can manage your RackStation with Synology DiskStation Manager (DSM).
Install from Mac OS X 1 Insert the installation disc into your computer, and then double-click the SynologyInstall icon on the desktop. 2 In the window that appears, double-click the MacOSX folder, and then double-click Synology Assistant[number].dmg. 3.2-1922 3 Double-click the Synology Assistant.app in the window that appears. 4 Follow step 2 to 4 of the “Install from Windows” section to finish setup. Install from Linux The Linux version is optimized for Ubuntu distribution version 8 and 9.
5 To run Synology Assistant, you can either use the following command: /path/install/SynologyAssistant/SynologyAssistant Or run the shortcut: /usr/local/bin/SynologyAssistant If /usr/local/bin exists in your environment variable $PATH, just type: SynologyAssistant If you want to install using the GUI: 1 Go to /usr/local and /usr/local/bin and delete the following folders (if any): Synology, SynologyAssistant 2 Insert the installation disc into your computer, and then double-click the SynologyInstall icon on
Important: If you are using 64bit Ubuntu, you have to install the 32bit libraries before proceeding. To install, type the following command in Terminal: sudo apt-get install ia32-libs 5 Go to /usr/local/SynologyAssistant (or [the path you just specified]/SynologyAssistant), double-click SynologyAssistant, and then select Run in Terminal in the dialog box that appears.
Appendix A Specifications AppendixA: Item RS812 Internal HDD 3.5" or 2.5" SATA (II) x 4 Max. Capacity 12TB (4 x 3TB hard drives) Hot Swappable HDD Yes External HDD Interface USB x 2 eSATA x 1 LAN Port Gigabit x 2 USBCopy No Size (HxWxD) (mm) 44 X 430.5 X 457.5 Weight (Kg) 6.9 Supported Clients ‧Mac OS X 10.3 onward ‧Windows 2000 onward ‧Ubuntu 9.04 onward Max. User Accounts 2048 Max. Group Accounts 256 Max. Shared Folders 256 Max. Concurrent Connections 256 Max.
Appendix B LED Indication Table AppendixB: LED Indication Color Green Status Description Static Volume Normal Off HDD Hibernation Static STATUS Orange Blinking Green LAN 1 & LAN 2 Orange DISK 1~4 Green Orange Power Green Available volume space < 1 % Volume degraded or crashed No volume Static Gigabit Link Blinking Network is active Off Network is down Static 10/100MB Link Blinking Network is active Off Network is down Static Disk ready Blinking Disk is being accessed Of
SYNOLOGY, INC. END USER LICENSE AGREEMENT IMPORTANT–READ CAREFULLY: THIS END USER LICENSE AGREEMENT ("EULA") IS A LEGAL AGREEMENT BETWEEN YOU (EITHER AN INDIVIDUAL OR A SINGLE ENTITY) AND SYNOLOGY, INC. AND ITS AFFILIATES, INCLUDING SYNOLOGY AMERICAN CORP AND SYNOLOGY UK LTD., (COLLECTIVELY, "SYNOLOGY") FOR ANY SYNOLOGY SOFTWARE, TOGETHER WITH ANY OTHER ASSOCIATED FIRMWARE, MEDIA, PRINTED MATERIALS AND "ONLINE" OR ELECTRONIC DOCUMENTATION (COLLECTIVELY, THE "SOFTWARE") AVAILABLE FOR DOWNLOAD AT WWW.
INABILITY TO USE THE SOFTWARE OR OTHERWISE UNDER OR IN CONNECTION WITH THIS EULA OR THE SOFTWARE, WHETHER BASED ON CONTRACT, TORT (INCLUDING NEGLIGENCE), STRICT LIABILITY OR OTHER THEORY EVEN IF SYNOLOGY HAS BEEN ADVISED OF THE POSSIBILITY OF SUCH DAMAGES. Section 13. Limitation of Liability.
SYNOLOGY, INC. LIMITED PRODUCT WARRANTY THIS LIMITED WARRANTY ("WARRANTY") APPLIES TO THE PRODUCTS (AS DEFINED BELOW) OF SYNOLOGY, INC. AND ITS AFFILIATES, INCLUDING SYNOLOGY AMERICA CORP AND SYNOLOGY UK LTD., (COLLECTIVELY, "SYNOLOGY"). YOU ACCEPT AND AGREE TO BE BOUND BY THE TERMS OF THIS WARRANTY BY OPENING THE PACKAGE CONTAINING AND/OR USING THE PRODUCT. IF YOU DO NOT AGREE TO THE TERMS OF THIS WARRANTY, DO NOT USE THE PRODUCT.
Product specifications and such failure is attributable to causes not within or under Synology's control.
proceedings will be final and binding on the parties, and judgment may be entered thereon in any court of competent jurisdiction.