
User's Manual

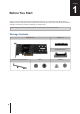
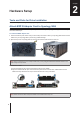
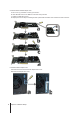
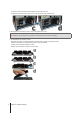

Table Of Contents

Tools and Parts for Drive Installation
• A screwdriver (for removing the casing of your target installed DiskStation)
Attach M2D18 Adapter Card to Synology NAS
Please refer to Synology Hardware Compatibility List to make sure your Synology NAS supports M2D18 adapter
card before attaching it.
To install the M2D18 adapter card:
1
Press and hold the power button until you hear a beep sound to shut down your Synology NAS. Disconnect all
cables from your Synology NAS to prevent any possible damage.
2
Open the top cover of Synology NAS by removing the 6 screws that secure the main unit.
Note:
Here we use DS1618+ as an example
.
Please refer your Synology NAS Hardware Installation Guide for the
proper casing removal process.
3
Assemble M.2 SSD:
a
Push the SSD all the way into the xed bracket until it is rmly seated.
b
Align the heatsink with the clips of the bracket and press the four corners down. Please make sure the
heatsink is rmly attached to the clips to ensure the smooth running of the SSD.
Note:
Please remove the stretch wrap at the bottom of the heatsink before step 3-b.
Hardware Setup
5
2
Chapter