
Installation & Assembly


4
Remove all parts and hardware from the carton and place them on a clean, soft, dry surface. Parts
and assembly steps are grounded for wall-hanging or recessing use. Check the parts list to make
sure nothing is missing. Dispose of packaging materials properly. Please recycle whenever
possible. You will need the following tools (not included): Phillips screwdriver; stud finder; level;
tape measure; electric drill; 1/4” wood drill bit, hammer.
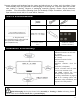
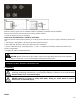
PARTS & HARDWARE
A- Fireplace with
pre-installed faux log ember bed and
non-replaceable LED strip (life
span=100,000 hours)
B-4x8mm Screws
C- 4x30 Screws
D-Drywall anchors
E-Wall Bracket
Pre-installed on back of
firebox
F-Metal Bracket
G-Remote Control with pre-
installed 3V CR2025
Lithium Cell Battery
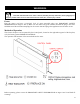
Step 1. Find a safe location.
Minimum clearance on each side:
20” (50cm).
Minimum clearance above:
20” (50cm).
Minimum clearance below:
39.5” (100cm).
Minimum clearance from the
front:
And sides: 3 feet(90cm).
Choose a location near an outlet
so never use extension cord.
DO NOT position the unit
directly below a power outlet.
See safety information on pages 2
and 3 for warnings about safe
placement, safety installation, and
purpose use of this product.
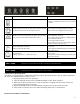
Installation & Assembly
ALWAYS unplug this fireplace heater before Assembly or cleaning, or before relocating. Failure
to do so could result in electric shock, fire, or personal injury.